社区微信群开通啦,扫一扫抢先加入社区官方微信群

社区微信群
HTTP 是基于请求/响应模式的:客户端向服务器发送一个HTTP 请求,然后服务器将会返回一个HTTP 响应。
一个HTTP 请求/响应可能由多个数据部分组成,并且它总是以一个LastHttpContent 部分作为结束。FullHttpRequest 和 FullHttpResponse 消息是特殊的子类型,分别代表了完整的请求和响应。 所有类型的HTTP 消息(FullHttpRequest、LastHttpContent等等)都实现了HttpObject 接口。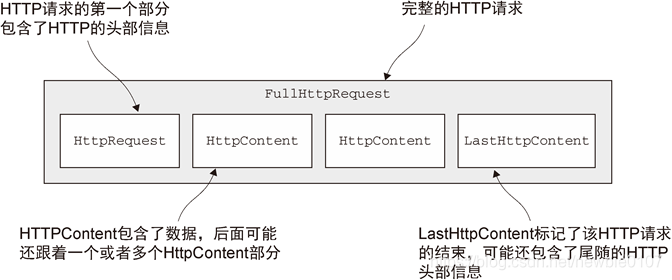
在了解完 Netty的编解码器框架 后,我们大概清除了编解码器的作用,这里我们就需要用到有关Http系统的几个编解码器:
如在客户端,我们肯定要将发送的请求进行编码,在接收到服务端的响应时需要将其解码
HttpRequestEncoder: 将 HttpRequest、HttpContent 和 LastHttpContent 消息编码为字节
HttpResponseDecoder: 将字节解码为HttpResponse、HttpContent 和LastHttpContent 消息
同时这两个我们也可以用一个来代替:HttpClientCodec
在服务端,我们需要将接收到的客户端请求进行解码,在给客户端发送响应信息有需要编码
HttpRequestDecoder: 将字节解码为HttpRequest、HttpContent 和LastHttpContent 消息
HttpResponseEncoder : 将HttpResponse、HttpContent 和LastHttpContent 消息编码为字节
其同样也是可以直接使用一个来替代:HttpServerCodec
另外我们在上图中也看到,一个HTTP 请求/响应可能由多个数据部分组成,这里为了方便处理,我们一般会进行聚合它们以形成完整的消息。将多个消息部分合并为 FullHttpRequest 或者 FullHttpResponse 消息。通过这样的方式,你将总是看到完整的消息内容 —— HttpObjectAggregator
另外当使用HTTP 时,建议开启压缩功能以尽可能多地减小传输数据的大小。虽然压缩会带来一些CPU 时钟周期上的开销,但是通常来说它都是一个好主意,特别是对于文本数据来说。Netty 为压缩和解压缩提供了ChannelHandler 实现,它们同时支持 gzip 和 deflate 编码。
一般在服务器端会进行压缩 —— HttpContentCompressor,客户端接收到信息后进行解压 —— HttpContentDecompressor
接下来,我们就来实现一个简单的Http服务器,首先看一下Http服务器的启动相关
public class HttpServer {

    public static final int PORT = 8888;

    public static EventLoopGroup group = new NioEventLoopGroup();
    public static ServerBootstrap serverBootstrap = new ServerBootstrap();

    public static void main(String[] args) throws Exception {
        try {
            serverBootstrap.group(group)
                    .channel(NioServerSocketChannel.class)
                    .childHandler(new ServerHandlerInit());

            ChannelFuture channelFuture = serverBootstrap.bind(PORT).sync();
            channelFuture.channel().closeFuture().sync();
        } finally {
            group.shutdownGracefully().sync();
        }
    }
}
其实这里和我们一开始介绍的Netty小应用很类似,几乎是相同的,只不过我们将其需要添加的 ChannelHandler 提取出来,单独的写了一个类,如下:
public class ServerHandlerInit extends ChannelInitializer<SocketChannel> {
    @Override
    protected void initChannel(SocketChannel ch) throws Exception {
        ChannelPipeline pipeline = ch.pipeline();
        pipeline.addLast("responseEncode", new HttpResponseEncoder());
        pipeline.addLast("requestDecode", new HttpRequestDecoder());

        pipeline.addLast("objectAggregator", new HttpObjectAggregator(1024));
        pipeline.addLast("contentCompressor", new HttpContentCompressor());

        pipeline.addLast("httpServerHandler", new HttpServerHandler());
    }
}
这其中就是添加了刚刚我们介绍的一些编解码器的框架,最后一个HttpServerHandler就是我们自己实现的,用于对Http请求的处理,内容如下:
public class HttpServerHandler extends ChannelInboundHandlerAdapter {
/**
* 收到消息是,返回响应信息
*/
@Override
public void channelRead(ChannelHandlerContext ctx, Object msg) throws Exception {
FullHttpRequest httpRequest = (FullHttpRequest)msg;
String ret = "";
try {
String uri = httpRequest.uri();
String data = httpRequest.content().toString(CharsetUtil.UTF_8);
HttpMethod method = httpRequest.method();
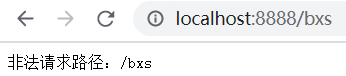
if(!"/bxs".equalsIgnoreCase(uri)){
ret = "非法请求路径:" + uri;
response(ret, ctx, HttpResponseStatus.BAD_REQUEST);
return;
}
if(HttpMethod.GET.equals(method)){
System.out.println("客户端请求数据内容:" + data);
ret = "服务端接受到数据,接收到数据为:" + data;
response(ret, ctx, HttpResponseStatus.OK);
}
if (HttpMethod.POST.equals(method)){
//...
}
if (HttpMethod.PUT.equals(method)){
//..
}
//..
} catch (Exception e) {
System.out.println("服务器处理失败...");
} finally {
httpRequest.release();
}
}
private void response(String data, ChannelHandlerContext ctx, HttpResponseStatus status){
FullHttpResponse resp = new DefaultFullHttpResponse(HttpVersion.HTTP_1_1, status,
Unpooled.copiedBuffer(data, CharsetUtil.UTF_8));
resp.headers().set(HttpHeaderNames.CONTENT_TYPE, "text/plain;charset=UTF-8");
ctx.writeAndFlush(resp).addListener(ChannelFutureListener.CLOSE);
}
}
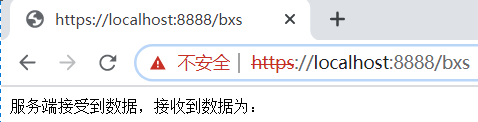
这其中我们还限制了只有 /bxs 的访问路径可以进行访问,然后就可以对不同类型的Http请求进行处理,这里我们简单的响应一句字符串,这样一个超简单的Http服务就完成了,测试结果如下: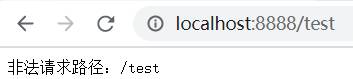
上述我们完成了一个简单的Http服务器,然后使用了浏览器进行测试,这里我们还可以使用Netty来实现一个Http的客户端,如下:
public class HttpClient {

    public static void main(String[] args) throws Exception {
        HttpClient client = new HttpClient();
        client.connect("127.0.0.1", HttpServer.PORT);
    }

    private void connect(String host, int port) throws Exception {
        EventLoopGroup group = new NioEventLoopGroup();
        Bootstrap bootstrap = new Bootstrap();

        try {
            bootstrap.group(group)
                    .channel(NioSocketChannel.class)
                    .option(ChannelOption.SO_KEEPALIVE, true);

            bootstrap.handler(new ChannelInitializer<SocketChannel>() {
                @Override
                protected void initChannel(SocketChannel ch) throws Exception {

                    ch.pipeline().addLast(new HttpClientCodec());

                    ch.pipeline().addLast("objectAggregator", new HttpObjectAggregator(2014));
                    ch.pipeline().addLast("contentDecompressor", new HttpContentDecompressor());

                    ch.pipeline().addLast("httpClientHandler", new HttpClientHandler());
                }
            });
            ChannelFuture channelFuture = bootstrap.connect(host, port).sync();

            URI uri = new URI("/bxs");
            String data = "Hello Netty";
            DefaultFullHttpRequest req = new DefaultFullHttpRequest(HttpVersion.HTTP_1_1, HttpMethod.GET,
                    uri.toASCIIString(), Unpooled.wrappedBuffer(data.getBytes("UTF-8")));

            req.headers().set(HttpHeaderNames.HOST, host);
            req.headers().set(HttpHeaderNames.CONNECTION, HttpHeaderValues.KEEP_ALIVE);
            req.headers().set(HttpHeaderNames.CONTENT_LENGTH, req.content().readableBytes());

            channelFuture.channel().write(req);
            channelFuture.channel().flush();
            channelFuture.channel().closeFuture().sync();
        } finally {
            group.shutdownGracefully().sync();
        }
    }
}
上述代码中一开始的部分都是大同小异的,连接上服务器后,我们就开始给服务器发送Http请求,然后我们主要看一下客户端在接受服务器响应后的处理——HttpClientHandler
public class HttpClientHandler extends ChannelInboundHandlerAdapter {

    @Override
    public void channelRead(ChannelHandlerContext ctx, Object msg) throws Exception {
        FullHttpResponse httpResponse = (FullHttpResponse)msg;
        System.out.println(httpResponse.headers());

        ByteBuf content = httpResponse.content();
        System.out.println(content.toString(CharsetUtil.UTF_8));
        content.release();
    }
}
这里我们就是简单的将服务器返回的消息头及内容打印出来,其测试结果如下:

SSL和TLS这样的安全协议,它们层叠在其他协议之上,用以实现数据安全。我们在访问安全网站时遇到过这些协议,但是它们也可用于其他不是基于HTTP的应用程序,如安全SMTP(SMTPS)邮件服务器甚至是关系型数据库系统。
为了支持SSL/TLS,Java 提供了javax.net.ssl 包,它的SSLContext 和SSLEngine类使得实现解密和加密相当简单直接。Netty 通过一个名为 SslHandler 的ChannelHandler实现利用了这个API,其中SslHandler 在内部使用SSLEngine 来完成实际的工作。
其在代码中的使用也是非常的简单,这里我们将之前实现的 Http 服务器做一点点的修改,如下:
在大多数情况下,SslHandler 将是ChannelPipeline 中的第一个ChannelHandler。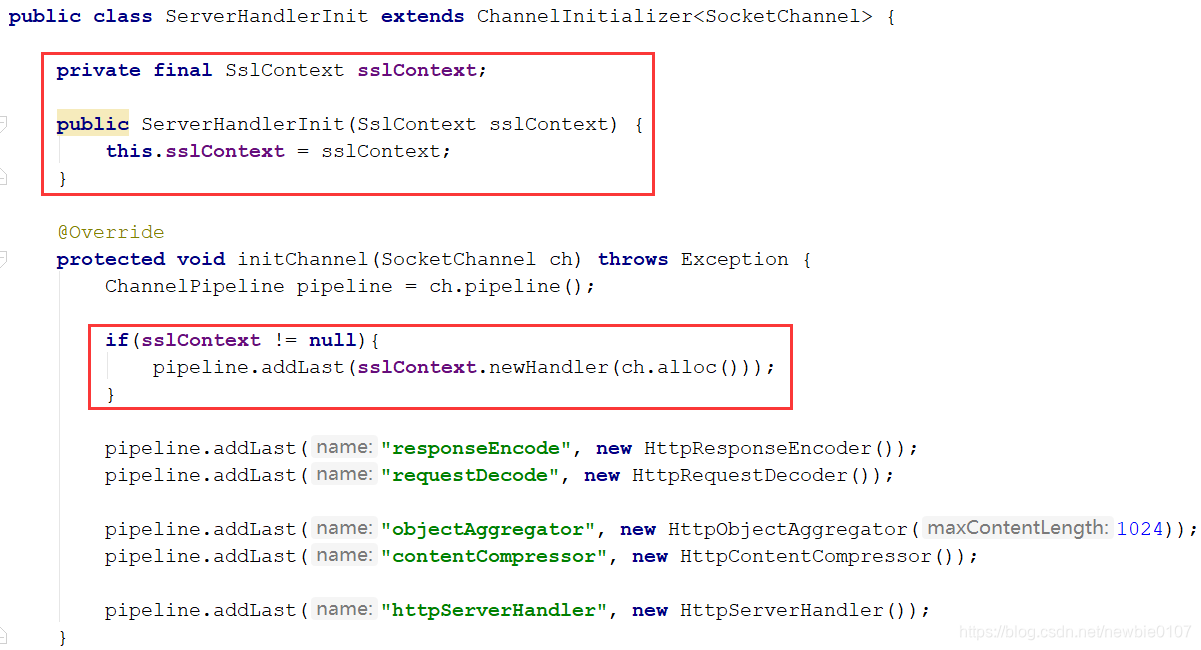
然后我们发下在浏览器中使用 http:// 进行访问就不可以了,这里就比如使用 https:// 进行访问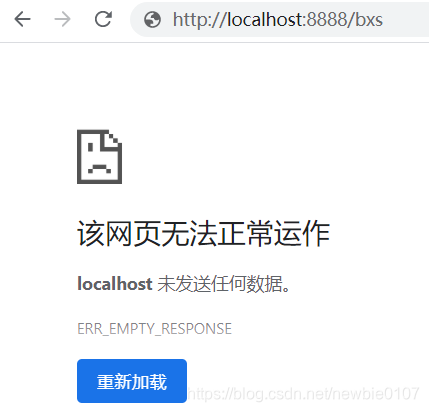
另外Netty 还提供了使用 OpenSSL 工具包(www.openssl.org)的SSLEngine 实现。这个OpenSslEngine 类提供了比JDK 提供的SSLEngine 实现更好的性能。
如果OpenSSL库可用,可以将Netty 应用程序(客户端和服务器)配置为默认使用OpenSslEngine。如果不可用,Netty 将会回退到JDK 实现。
如果觉得我的文章对您有用,请随意打赏。你的支持将鼓励我继续创作!
