社区微信群开通啦,扫一扫抢先加入社区官方微信群

社区微信群
添加pom依赖
<!--swagger2 start-->
<dependency>
    <groupId>io.springfox</groupId>
    <artifactId>springfox-swagger2</artifactId>
    <version>2.2.2</version>
</dependency>
<dependency>
    <groupId>io.springfox</groupId>
    <artifactId>springfox-swagger-ui</artifactId>
    <version>2.2.2</version>
</dependency>
<!--swagger2 end-->
Swagger2Config初始化配置:
package com.example.demo.config;
import com.google.common.base.Predicates;
import org.springframework.context.annotation.Bean;
import org.springframework.context.annotation.Configuration;
import springfox.documentation.builders.ApiInfoBuilder;
import springfox.documentation.builders.PathSelectors;
import springfox.documentation.builders.RequestHandlerSelectors;
import springfox.documentation.service.ApiInfo;
import springfox.documentation.spi.DocumentationType;
import springfox.documentation.spring.web.plugins.Docket;
import springfox.documentation.swagger2.annotations.EnableSwagger2;
/**
* @Auther: xiaojian
* @Date: 2018/9/7 16:23
* @Description:
*/
@Configuration
@EnableSwagger2
public class Swagger2Config {
@Bean
public Docket api() {
return new Docket(DocumentationType.SWAGGER_2)
.apiInfo(apiInfo())
.pathMapping("/")
.groupName("demo")
.select() // 选择那些路径和api会生成document
.apis(RequestHandlerSelectors.any())// 对所有api进行监控
//不显示错误的接口地址
.paths(Predicates.not(PathSelectors.regex("/error.*")))//错误路径不监控
.paths(PathSelectors.regex("/.*"))// 对根下所有路径进行监控
.build();
}
private ApiInfo apiInfo() {
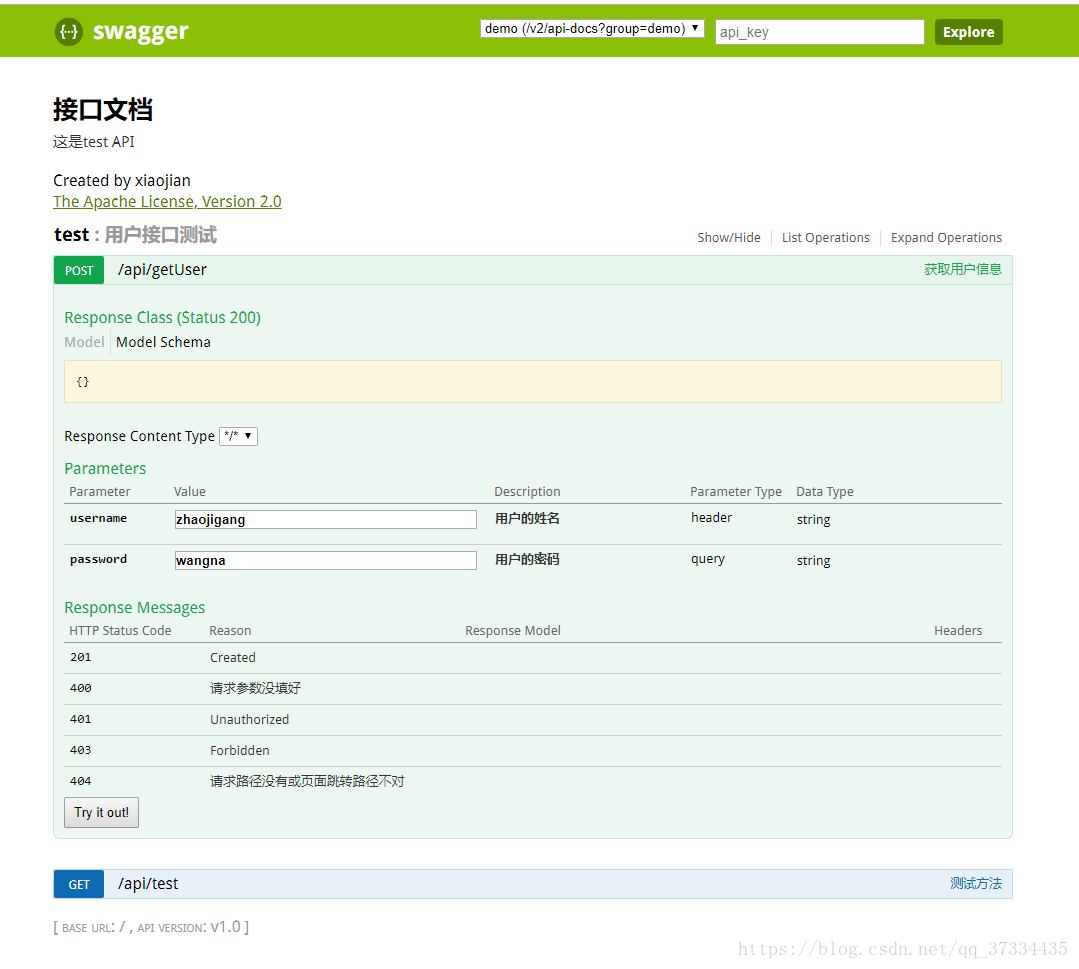
return new ApiInfoBuilder().title("接口文档")
.contact("xiaojian")
.description("这是test API")
.termsOfServiceUrl("NO terms of service")
.license("The Apache License, Version 2.0")
.licenseUrl("http://www.apache.org/licenses/LICENSE-2.0.html")
.version("v1.0")
.build();
}
}
Controller中测试方法:
在这里我们使用@ApiOperation注解来声明此方法为要生成的接口文档,在配置中已经配置过了,如果不想方法生成文档,不加此注解即可;
配置中已经使用了自定义的响应信息,所以可以不设置@ApiResponses;
package com.example.demo.controller;

import io.swagger.annotations.*;
import org.springframework.web.bind.annotation.*;

/**
 * @Auther: xiaojian
 * @Date: 2018/9/7 16:05
 * @Description:
 */
@RestController
@RequestMapping("/api")
@Api(description = "用户接口测试")
public class test {

    @ApiOperation("测试方法")
    @RequestMapping(value = "/test",method = RequestMethod.GET)
    public String test(){
        return "hello world";
    }

    @ApiOperation("获取用户信息")
    @ApiImplicitParams({
            @ApiImplicitParam(paramType="header",name="username",dataType="String",required=true,value="用户的姓名",defaultValue="zhaojigang"),
            @ApiImplicitParam(paramType="query",name="password",dataType="String",required=true,value="用户的密码",defaultValue="wangna")
    })
    @ApiResponses({
            @ApiResponse(code=400,message="请求参数没填好"),
            @ApiResponse(code=404,message="请求路径没有或页面跳转路径不对")
    })
    @RequestMapping(value="/getUser",method=RequestMethod.POST)
    public Object getUser(@RequestHeader("username") String username, @RequestParam("password") String password){
        System.out.println("username = "+ username +", password = "+password);
        return "{'code:200','result:true'}";
    }
}
注解说明:
以上这些就是最常用的几个注解了。
需要注意的是:
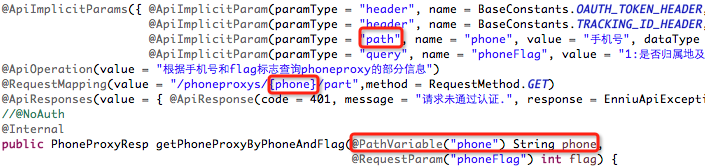
如果ApiImplicitParam中的phone的paramType是query的话,是无法注入到rest路径中的,而且如果是path的话,是不需要配置ApiImplicitParam的,即使配置了,其中的value="手机号"也不会在swagger-ui展示出来。
启动Spring Boot程序,访问:http://localhost:8080/swagger-ui.html
生成文档效果:
如果觉得我的文章对您有用,请随意打赏。你的支持将鼓励我继续创作!