社区微信群开通啦,扫一扫抢先加入社区官方微信群

社区微信群
Swagger 是生成文档的工具,随着微服务架构体系的发展和应用, 为了前后端能够更好的集成与对接,同时为了项目的方便交付,每个项目都需要提供相应的API文档。
1、对API文档进行更新的时候,需要通知前端开发人员,导致文档更新交流不及时;
2、API接口返回信息不明确,大公司中肯定会有专门文档服务器对接口文档进行更新。
3、缺乏在线接口测试,通常需要使用相应的API测试工具,比如postman、SoapUI等
4、接口文档太多,不便于管理
5、为了解决传统API接口文档维护的问题,为了方便进行测试后台Restful接口并实现动态的更新,因而引入Swagger接口工具。
1.功能丰富:支持多种注解,自动生成接口文档界面,支持在界面测试API接口功能;
2.及时更新:开发过程中花一点写注释的时间,就可以及时的更新API文档,省心省力;
3.整合简单:通过添加pom依赖和简单配置,内嵌于应用中就可同时发布API接口文档界面,不需要部署独立服务。
        <!--SpringBoot整合 swagger-->
        <dependency>
            <groupId>io.springfox</groupId>
            <artifactId>springfox-swagger2</artifactId>
            <version>2.9.2</version>
        </dependency>
        <dependency>
            <groupId>io.springfox</groupId>
            <artifactId>springfox-swagger-ui</artifactId>
            <version>2.9.2</version>
        </dependency>
pom 全文件展示
<?xml version="1.0" encoding="UTF-8"?>
<project xmlns="http://maven.apache.org/POM/4.0.0" xmlns:xsi="http://www.w3.org/2001/XMLSchema-instance"
         xsi:schemaLocation="http://maven.apache.org/POM/4.0.0 https://maven.apache.org/xsd/maven-4.0.0.xsd">
    <modelVersion>4.0.0</modelVersion>
    <parent>
        <groupId>org.springframework.boot</groupId>
        <artifactId>spring-boot-starter-parent</artifactId>
        <version>2.0.1.RELEASE</version>
        <relativePath/> <!-- lookup parent from repository -->
    </parent>
    <groupId>com.example</groupId>
    <artifactId>springboot-swagger2</artifactId>
    <version>0.0.1-SNAPSHOT</version>
    <name>springboot-swagger2</name>
    <description>Demo project for Spring Boot</description>

    <properties>
        <java.version>1.8</java.version>
    </properties>

    <dependencies>
        <dependency>
            <groupId>org.springframework.boot</groupId>
            <artifactId>spring-boot-starter</artifactId>
        </dependency>

        <!-- SpringBoot整合Web组件 -->
        <dependency>
            <groupId>org.springframework.boot</groupId>
            <artifactId>spring-boot-starter-web</artifactId>
        </dependency>

        <!--SpringBoot整合 swagger-->
        <dependency>
            <groupId>io.springfox</groupId>
            <artifactId>springfox-swagger2</artifactId>
            <version>2.9.2</version>
        </dependency>
        <dependency>
            <groupId>io.springfox</groupId>
            <artifactId>springfox-swagger-ui</artifactId>
            <version>2.9.2</version>
        </dependency>
    </dependencies>
</project>
自行修改为自己的包路径
import org.springframework.context.annotation.Bean;
import org.springframework.context.annotation.Configuration;
import springfox.documentation.builders.ApiInfoBuilder;
import springfox.documentation.builders.PathSelectors;
import springfox.documentation.builders.RequestHandlerSelectors;
import springfox.documentation.service.ApiInfo;
import springfox.documentation.spi.DocumentationType;
import springfox.documentation.spring.web.plugins.Docket;
import springfox.documentation.swagger2.annotations.EnableSwagger2;


@Configuration //声明这是一个注解类
@EnableSwagger2
public class SwaggerConfig {

    @Bean
    public Docket api() {
        return new Docket(DocumentationType.SWAGGER_2)
                .apiInfo(apiInfo())
                .select()
                // 自行修改为自己的包路径
                .apis(RequestHandlerSelectors.basePackage("com.example.springbootswagger2.controller"))
                .paths(PathSelectors.any())
                .build();
    }

    private ApiInfo apiInfo() {
        return new ApiInfoBuilder()
                .title("api文档")
                .description("restfun 风格接口")
                //服务条款网址
                //.termsOfServiceUrl("http://blog.csdn.net/forezp")
                .version("1.0")
                //.contact(new Contact("帅呆了", "url", "email"))
                .build();
    }
}
import org.springframework.context.annotation.Configuration;
import org.springframework.web.servlet.config.annotation.EnableWebMvc;
import org.springframework.web.servlet.config.annotation.ResourceHandlerRegistry;
import org.springframework.web.servlet.config.annotation.WebMvcConfigurer;

@Configuration
@EnableWebMvc
public class WebMvcConfig implements WebMvcConfigurer {

    @Override
    public void addResourceHandlers(ResourceHandlerRegistry registry){
        // 解决静态资源无法访问(可选)
        /*registry.addResourceHandler("/**")
                .addResourceLocations("classpath:/static/");*/

        // 直接在浏览器访问:根目录/swagger-ui.html
        registry.addResourceHandler("/swagger-ui.html")
                .addResourceLocations("classpath:/META-INF/resources/");

        // 需要用到的webjars(包含js、css等)
        registry.addResourceHandler("/webjars/**")
                .addResourceLocations("classpath:/META-INF/resources/webjars/");
    }
}
http://127.0.0.1:8080/swagger-ui.html
效果如下:
<!-- swagger-spring-boot -->
		<dependency>
			<groupId>com.spring4all</groupId>
			<artifactId>swagger-spring-boot-starter</artifactId>
			<version>1.7.0.RELEASE</version>
		</dependency>
swagger:
  base-package: com.mayikt.member.service  # 扫包范围
  title: 文档标题
  description: 文档描叙
  version: 1.1
  terms-of-service-url: www.mayikt.com
  contact:
    name: 文档创建人
    email:********@qq.com
启动类添加 @EnableSwagger2Doc
http://127.0.0.1:8080/swagger-ui.html
需实现效果,客户端服务网关地址就可以访问所有服务的文档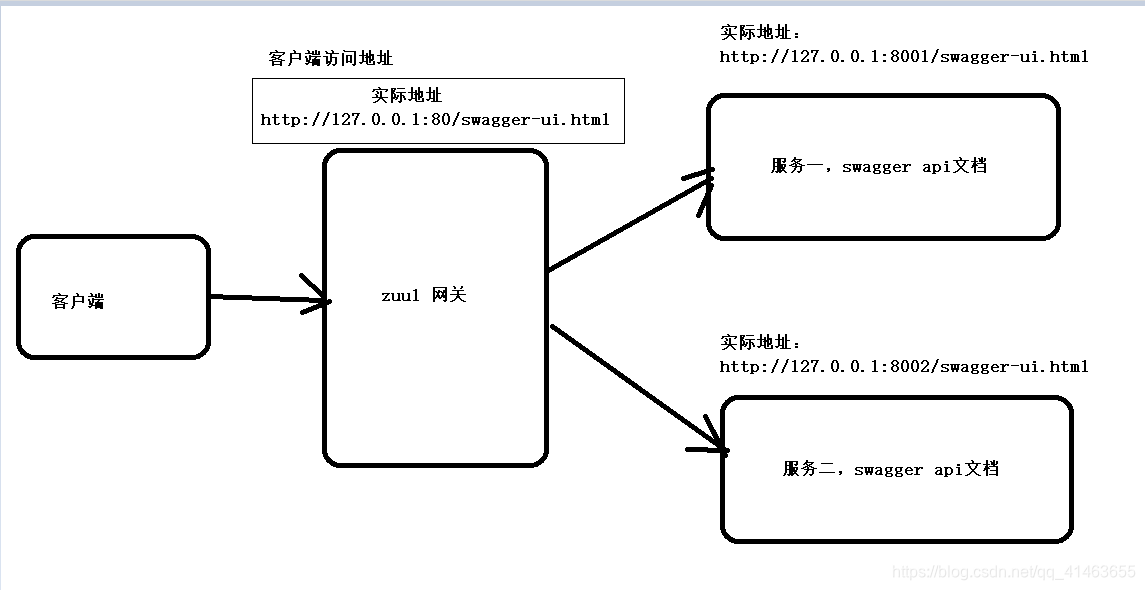
1、网关项目
2、所有服务项目
     <!-- https://mvnrepository.com/artifact/com.spring4all/swagger-spring-boot-starter -->
        <dependency>
            <groupId>com.spring4all</groupId>
            <artifactId>swagger-spring-boot-starter</artifactId>
            <version>1.9.0.RELEASE</version>
        </dependency>
        <!-- 处理 Failed to start bean 'documentationPluginsBootstrapper'; 错误,升级guava -->
        <dependency>
            <groupId>com.google.guava</groupId>
            <artifactId>guava</artifactId>
            <version>25.1-jre</version>
        </dependency>
1、所有服务项目
Api接口扫描范围配置
swagger:
  base-package: com.example.springcloudimplorder.api
1、网关项目
2、所有服务项目
@SpringBootApplication
@EnableEurekaClient
@EnableZuulProxy
@EnableSwagger2Doc
public class AppGateWay {
    // @EnableZuulProxy 开启网关代理
	public static void main(String[] args) {
		SpringApplication.run(AppGateWay.class, args);
	}
配置文档,swaggerResource 添加的数据建议使用分布式配置中心配置,不要写死在这里
import org.springframework.context.annotation.Primary;
import org.springframework.stereotype.Component;
import springfox.documentation.swagger.web.SwaggerResource;
import springfox.documentation.swagger.web.SwaggerResourcesProvider;

import java.util.ArrayList;
import java.util.List;

// 添加文档来源
@Component
@Primary
class DocumentationConfig implements SwaggerResourcesProvider {
    @Override
    public List<SwaggerResource> get() {
        List resources = new ArrayList<>();
        // app-member,参数二api-member 为服务名称,必须一致
        resources.add(swaggerResource("app-member", "/api-member/v2/api-docs", "2.0"));
        resources.add(swaggerResource("app-order", "/api-order/v2/api-docs", "2.0"));
        return resources;
    }

    private SwaggerResource swaggerResource(String name, String location, String version) {
        SwaggerResource swaggerResource = new SwaggerResource();
        swaggerResource.setName(name);
        swaggerResource.setLocation(location);
        swaggerResource.setSwaggerVersion(version);
        return swaggerResource;
    }
}
接口上的配置同boot配置Swagger
http://127.0.0.1:8080/swagger-ui.html
效果如下:
@SpringBootApplication
@EnableEurekaClient
@EnableZuulProxy
@EnableSwagger2Doc
@EnableApolloConfig
public class AppGateWay {

	// 获取ApolloConfig 配置属性
	@ApolloConfig
	private Config appConfig;


	public static void main(String[] args) {
		SpringApplication.run(AppGateWay.class, args);
	}


	// 添加文档来源
	@Component
	@Primary
	class DocumentationConfig implements SwaggerResourcesProvider {
		@Override
		public List<SwaggerResource> get() {
			// 开启监听,配置文件发生改变需要更改
			appConfig.addChangeListener(new ConfigChangeListener() {

				@Override
				public void onChange(ConfigChangeEvent changeEvent) {
					get();
				}
			});
			return resources();
		}


		/**
		 * 从阿波罗服务器中获取resources
		 *
		 * @return
		 */
		private List<SwaggerResource> resources() {

			List resources = new ArrayList<>();
			// app-itmayiedu-order
			// 网关使用服务别名获取远程服务的SwaggerApi
			String swaggerDocJson = swaggerDocument();
			JSONArray jsonArray = JSONArray.parseArray(swaggerDocJson);
			for (Object object : jsonArray) {
				JSONObject jsonObject = (JSONObject) object;
				String name = jsonObject.getString("name");
				String location = jsonObject.getString("location");
				String version = jsonObject.getString("version");
				resources.add(swaggerResource(name, location, version));
			}
			return resources;
		}


		/**
		 * 获取swaggerDocument配置
		 *
		 * @return
		 */
		private String swaggerDocument() {
			String property = appConfig.getProperty("mayikt.zuul.swaggerDocument", "");
			return property;
		}


		private SwaggerResource swaggerResource(String name, String location, String version) {
			SwaggerResource swaggerResource = new SwaggerResource();
			swaggerResource.setName(name);
			swaggerResource.setLocation(location);
			swaggerResource.setSwaggerVersion(version);
			return swaggerResource;
		}

	}

}
自定义Swagger文档配置 mayikt.zuul.swaggerDocument
[
    {
        "name": "app-mayikt-member",
        "location": "/app-mayikt-member/v2/api-docs",
        "version": "2.0"
    },
    {
        "name": "app-mayikt-weixin",
        "location": "/app-mayikt-weixin/v2/api-docs",
        "version": "2.0"
    }
]
如果觉得我的文章对您有用,请随意打赏。你的支持将鼓励我继续创作!
