社区微信群开通啦,扫一扫抢先加入社区官方微信群

社区微信群
官方解释:JSON Web Token(JWT)是一个开放标准(RFC 7519),它定义了一种紧凑且自包含的方式,用于在各方之间作为JSON对象安全地传输信息。由于此信息是经过数字签名的,因此可以被验证和信任。可以使用秘密(使用HMAC算法)或使用RSA或ECDSA的公钥/私钥对对JWT进行签名。
公司的业务越来越复杂,随着业务的扩展需要将现有单个后端web系统进行拆分,并在同为顶级域名的多个web系统之间实现单点登录及权限控制,同时也为以后的服务集群部署做准备。
实现的方式:基于现有的完整权限控制项目,之前整理过的一篇博文 前后端分离 SpringBoot整合SpringSecurity权限控制(动态拦截url),在此基础之上引入JWT实现单点登录。
实现的效果:
GitHub: link. 欢迎star
maven依赖:
        <dependency>
            <groupId>org.springframework.boot</groupId>
            <artifactId>spring-boot-starter-security</artifactId>
        </dependency>

		<dependency>
            <groupId>io.jsonwebtoken</groupId>
            <artifactId>jjwt</artifactId>
            <version>0.9.1</version>
        </dependency>
@Configuration
public class WebSecurityConfigure extends WebSecurityConfigurerAdapter {

    @Resource
    private UrlAuthenticationEntryPoint authenticationEntryPoint; //自定义未登录时:返回状态码401

    @Resource
    private UrlAuthenticationSuccessHandler authenticationSuccessHandler; //自定义登录成功处理器并生成token:响应状态码200及token

    @Resource
    private UrlAuthenticationFailureHandler authenticationFailureHandler; //自定义登录失败处理器:返回状态码402

    @Resource
    private UrlAccessDeniedHandler accessDeniedHandler; //自定义权限不足处理器:返回状态码403

    @Resource
    private UrlLogoutSuccessHandler logoutSuccessHandler; //自定义注销成功处理器:返回状态码200

    @Resource
    private SelfAuthenticationProvider authenticationProvider; //自定义登录认证

    @Resource
    private SelfFilterInvocationSecurityMetadataSource filterInvocationSecurityMetadataSource; //动态获取url权限配置

    @Resource
    private SelfAccessDecisionManager accessDecisionManager; //自定义权限判断管理器

    @Resource
    private AuthenticationDetailsSource<HttpServletRequest, WebAuthenticationDetails> authenticationDetailsSource; //身份验证详细信息源

    @Resource
    private JwtAuthorizationTokenFilter authorizationTokenFilter; //JwtToken解析并生成authentication身份信息过滤器

    @Override
    public void configure(WebSecurity web) {
//    	web.ignoring().antMatchers("/connect/**"); //无条件允许访问
        web.ignoring().antMatchers("/common/**"); //无条件允许访问
    }

    @Override
    protected void configure(AuthenticationManagerBuilder auth) {
        auth.authenticationProvider(authenticationProvider); //自定义登录认证
    }

    @Override
    protected void configure(HttpSecurity http) throws Exception {

        // 关闭csrf验证(防止跨站请求伪造攻击)
        http.csrf().disable();

        // JwtToken解析并生成authentication身份信息过滤器
        http.addFilterBefore(authorizationTokenFilter, UsernamePasswordAuthenticationFilter.class);

        // 未登录时:返回状态码401
        http.exceptionHandling().authenticationEntryPoint(authenticationEntryPoint);

        // 无权访问时:返回状态码403
        http.exceptionHandling().accessDeniedHandler(accessDeniedHandler);

        // url权限认证处理
        http.antMatcher("/**").authorizeRequests()
//                .antMatchers("/security/user/**").hasRole("ADMIN") //需要ADMIN角色才可以访问
//                .antMatchers("/connect").hasIpAddress("127.0.0.1") //只有ip[127.0.0.1]可以访问'/connect'接口
                .anyRequest() //其他任何请求
                .authenticated() //都需要身份认证
                .withObjectPostProcessor(new ObjectPostProcessor<FilterSecurityInterceptor>() {
                    @Override
                    public <O extends FilterSecurityInterceptor> O postProcess(O o) {
                        o.setSecurityMetadataSource(filterInvocationSecurityMetadataSource); //动态获取url权限配置
                        o.setAccessDecisionManager(accessDecisionManager); //权限判断
                        return o;
                    }
                });

        // 将session策略设置为无状态的,通过token进行登录认证
        http.sessionManagement().sessionCreationPolicy(SessionCreationPolicy.STATELESS);

        // 开启自动配置的登录功能
        http.formLogin() //开启登录
//                .loginPage("/login") //登录页面(前后端不分离)
                .loginProcessingUrl("/nonceLogin") //自定义登录请求路径(post)
                .usernameParameter("username").passwordParameter("password") //自定义登录用户名密码属性名,默认为username和password
//                .successForwardUrl("/index") //登录成功后的url(post,前后端不分离)
//                .failureForwardUrl("/error") //登录失败后的url(post,前后端不分离)
                .successHandler(authenticationSuccessHandler) //验证成功处理器(前后端分离):生成token及响应状态码200
                .failureHandler(authenticationFailureHandler) //验证失败处理器(前后端分离):返回状态码402
                .authenticationDetailsSource(authenticationDetailsSource); //身份验证详细信息源(登录验证中增加额外字段)

        // 开启自动配置的注销功能
        http.logout() //用户注销, 清空session
                .logoutUrl("/nonceLogout") //自定义注销请求路径
//                .logoutSuccessUrl("/bye") //注销成功后的url(前后端不分离)
                .logoutSuccessHandler(logoutSuccessHandler); //注销成功处理器(前后端分离):返回状态码200
    }
}
@SuppressWarnings("unchecked")
@Slf4j
@Component
public class JwtAuthorizationTokenFilter extends OncePerRequestFilter {

    @Value("${jwt.token-header-key}")
    private String tokenHeaderKey; //token请求头Key
    @Value("${jwt.token-prefix}")
    private String tokenPrefix; //token前缀
    @Value("${jwt.token-secret}")
    private String tokenSecret; //token秘钥

    /**
     * 解析token并生成authentication身份信息
     */
    @Override
    protected void doFilterInternal(HttpServletRequest request, HttpServletResponse response, FilterChain chain) throws ServletException, IOException {
        String token = request.getHeader(tokenHeaderKey);
        log.info("JwtAuthorizationTokenFilter >> token:{}", token);
        if (null == token || !token.startsWith(tokenPrefix + " ")) {
            chain.doFilter(request, response);
            return;
        }
        Claims claims;
        try {
            // 解析token
            claims = Jwts.parser().setSigningKey(tokenSecret).parseClaimsJws(token.replace(tokenPrefix + " ", "")).getBody();
        } catch (Exception e) {
            log.error("JwtToken validity!! error={}", e.getMessage());
            chain.doFilter(request, response);
            return;
        }
        String username = claims.getSubject();
        List<String> roles = claims.get("role", List.class);
        List<SimpleGrantedAuthority> authorities = roles.stream().map(SimpleGrantedAuthority::new).collect(Collectors.toList());
        if (null != username) {
            // 生成authentication身份信息
            UsernamePasswordAuthenticationToken authentication = new UsernamePasswordAuthenticationToken(username, null, authorities);
            SecurityContextHolder.getContext().setAuthentication(authentication);
        }
        chain.doFilter(request, response);
    }
}
@Component
public class UrlAuthenticationSuccessHandler implements AuthenticationSuccessHandler {

    @Value("${jwt.token-header-key}")
    private String tokenHeaderKey; //token响应头Key
    @Value("${jwt.token-prefix}")
    private String tokenPrefix; //token前缀
    @Value("${jwt.token-secret}")
    private String tokenSecret; //token秘钥
    @Value("${jwt.token-expiration}")
    private Long tokenExpiration; //token过期时间
    @Resource
    private UserService userService;

    @Override
    public void onAuthenticationSuccess(HttpServletRequest httpServletRequest, HttpServletResponse httpServletResponse, Authentication authentication) throws IOException, ServletException {

        httpServletResponse.setCharacterEncoding("UTF-8");
        UrlResponse response = new UrlResponse();
        response.setSuccess(true);
        response.setCode("200");
        response.setMessage("Login Success!");

        String username = (String) authentication.getPrincipal(); //表单输入的用户名
        Map<String, Object> userInfo = userService.findMenuInfoByUsername(username, response); //用户可访问的菜单信息
        response.setData(userInfo);

        // 生成token并设置响应头
        Claims claims = Jwts.claims();
        claims.put("role", authentication.getAuthorities().stream().map(GrantedAuthority::getAuthority).collect(Collectors.toList()));
        String token = Jwts.builder()
                .setClaims(claims)
                .setSubject(username) //设置用户名
                .setExpiration(new Date(System.currentTimeMillis() + tokenExpiration)) //设置token过期时间
                .signWith(SignatureAlgorithm.HS512, tokenSecret).compact(); //设置token签名算法及秘钥
        httpServletResponse.addHeader(tokenHeaderKey, tokenPrefix + " " + token); //设置token响应头

        httpServletResponse.getWriter().write(GsonUtil.GSON.toJson(response));
    }
}
参考之前的博文或者github项目有详细的记录:前后端分离 SpringBoot整合SpringSecurity权限控制(动态拦截url)
1.模拟多系统(或分布式集群)启动三个端口8018、8028、8038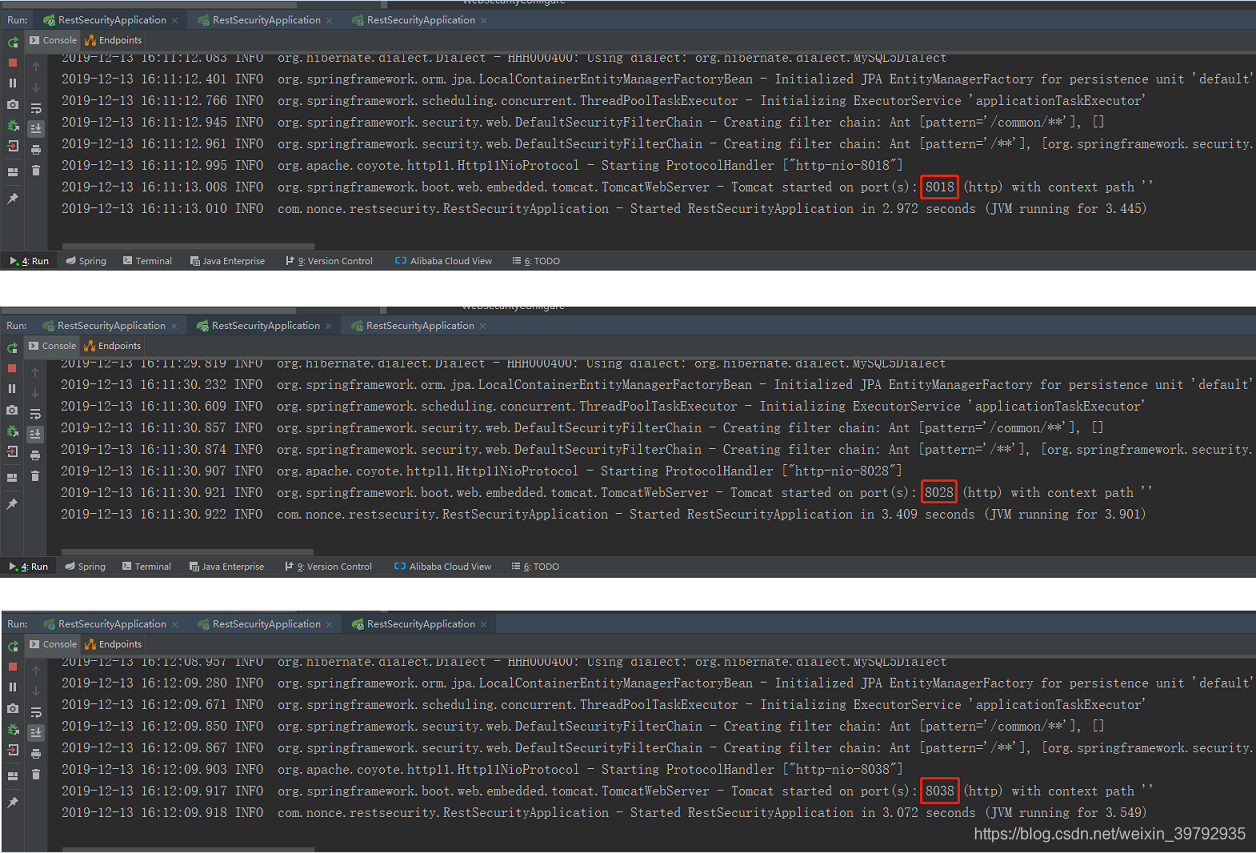
2.没有登录也没有携带token访问系统A,响应401(需要认证)
3.在系统B的登录接口,响应头中得到了签名token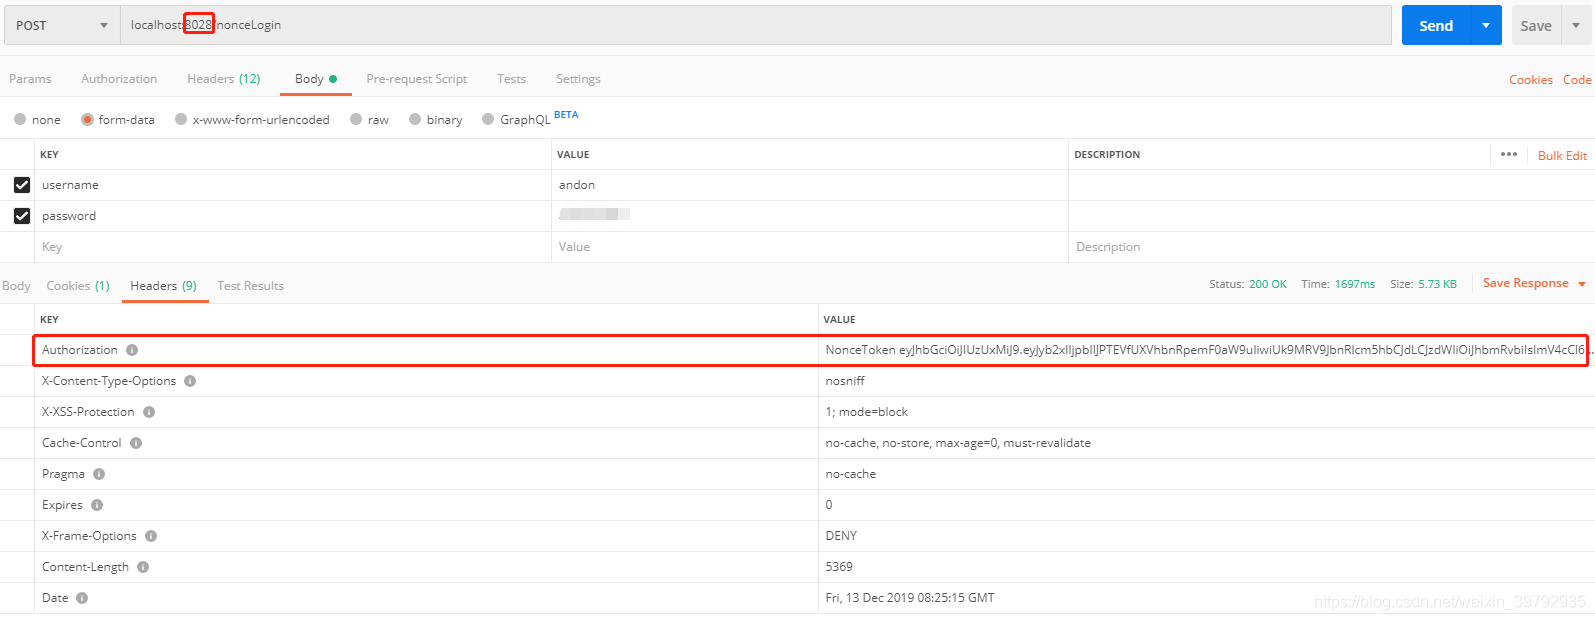
4.携带token访问系统A的获取所有用户信息的接口,此token没有该接口访问权限,响应403(权限不足)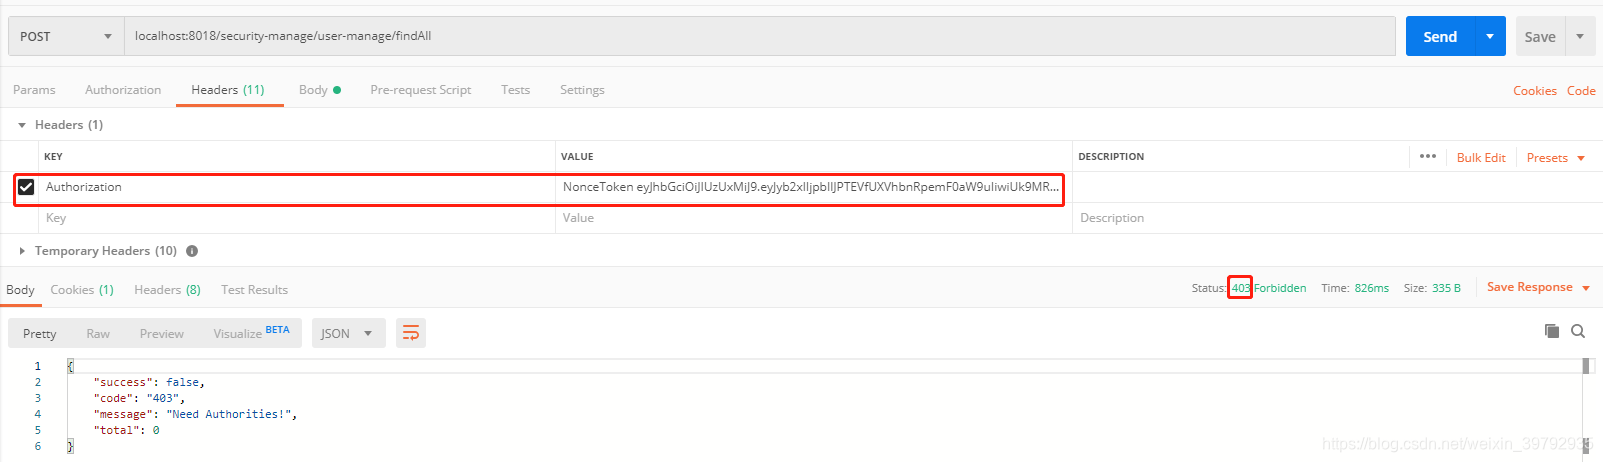
5.在系统A登录具有获取所有用户信息权限的用户,并在响应头中获得签名token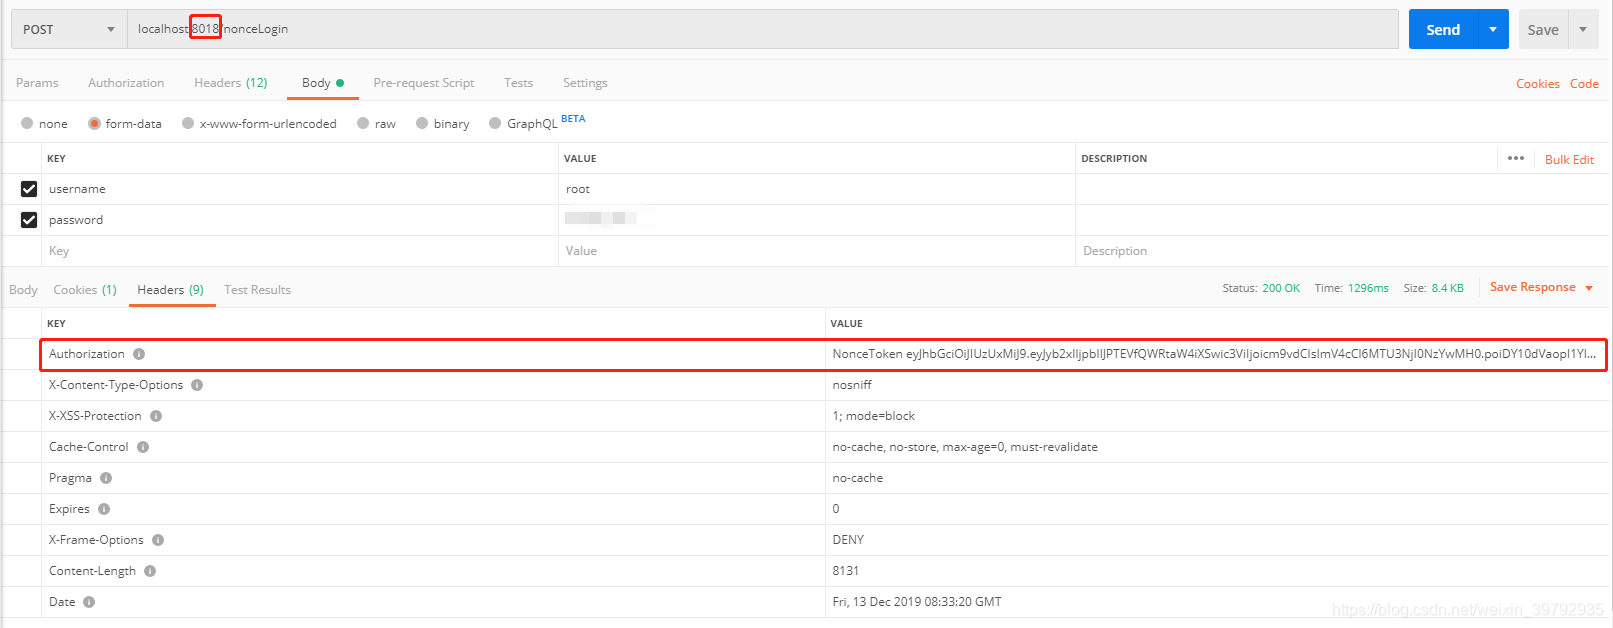
6.此时携带具有权限的token,访问系统C的获取所用用户信息接口,系统C解析并校验成功,响应json数据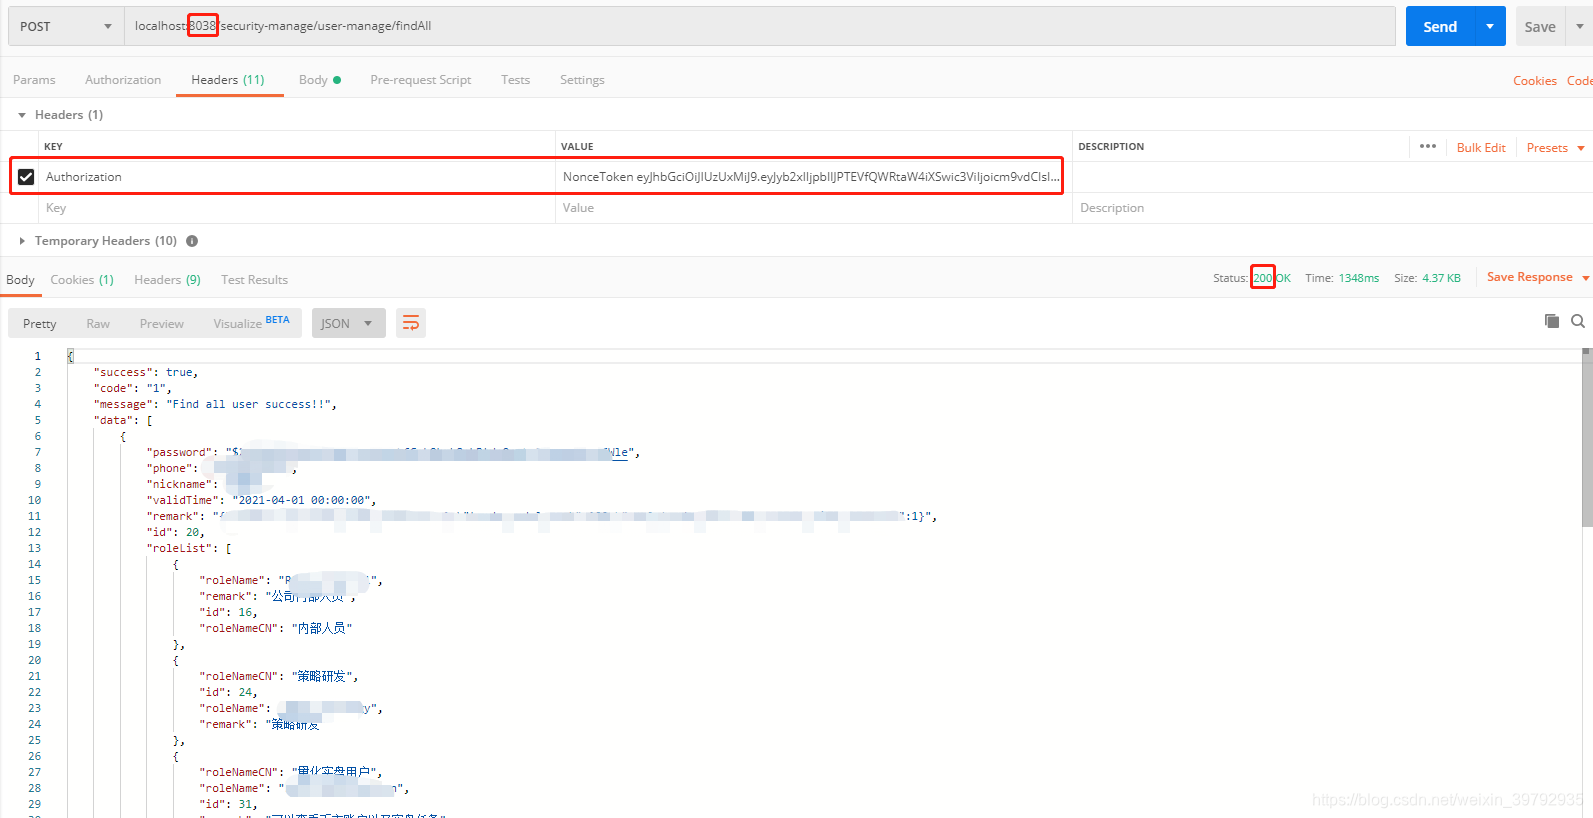
GitHub: link. 欢迎star
如果觉得我的文章对您有用,请随意打赏。你的支持将鼓励我继续创作!
