社区微信群开通啦,扫一扫抢先加入社区官方微信群

社区微信群
数据库大作业是用Android写了一个学生管理系统,后台是用的sqlite,相当于一个app每次安装都带着一个SQLITE数据库跑,但是这样并不是当今主流app的实现方式,在互联网时代,不联网是不行的(这里共享数据的联网)。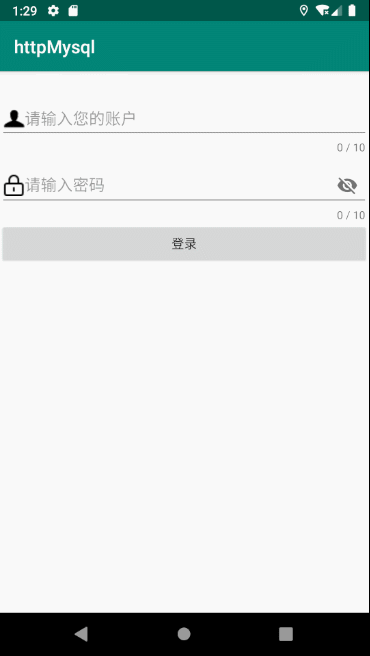
效果显示:
1.通过java的JDBC连接服务器上的数据库/本地数据库
2.通过http连接服务器上的数据库
毫无疑问,第二种方式是常用的也是推荐的,因为http的方式可以保证传输数据的安全性,并且减轻服务器的压力。如果用jdbc你相当于直接连接的服务器上的数据库,第二种是你向服务器发送数据,服务器帮你验证。
首先,你应该把app当成浏览器一样的存在,学过javaWeb中jsp的同学可能了解或使用过request、response对象在http请求中接收数据和发送数据,没错,app也是这样http连接的。
JSP中,你的步骤可能是这样的:

Login可以接受用户输入,提供表单给Servlet对象,Servlet通过接收到的request对象获取用户输入,最后进行逻辑处理。
APP中http连接服务器上mysql数据库的过程也大同小异: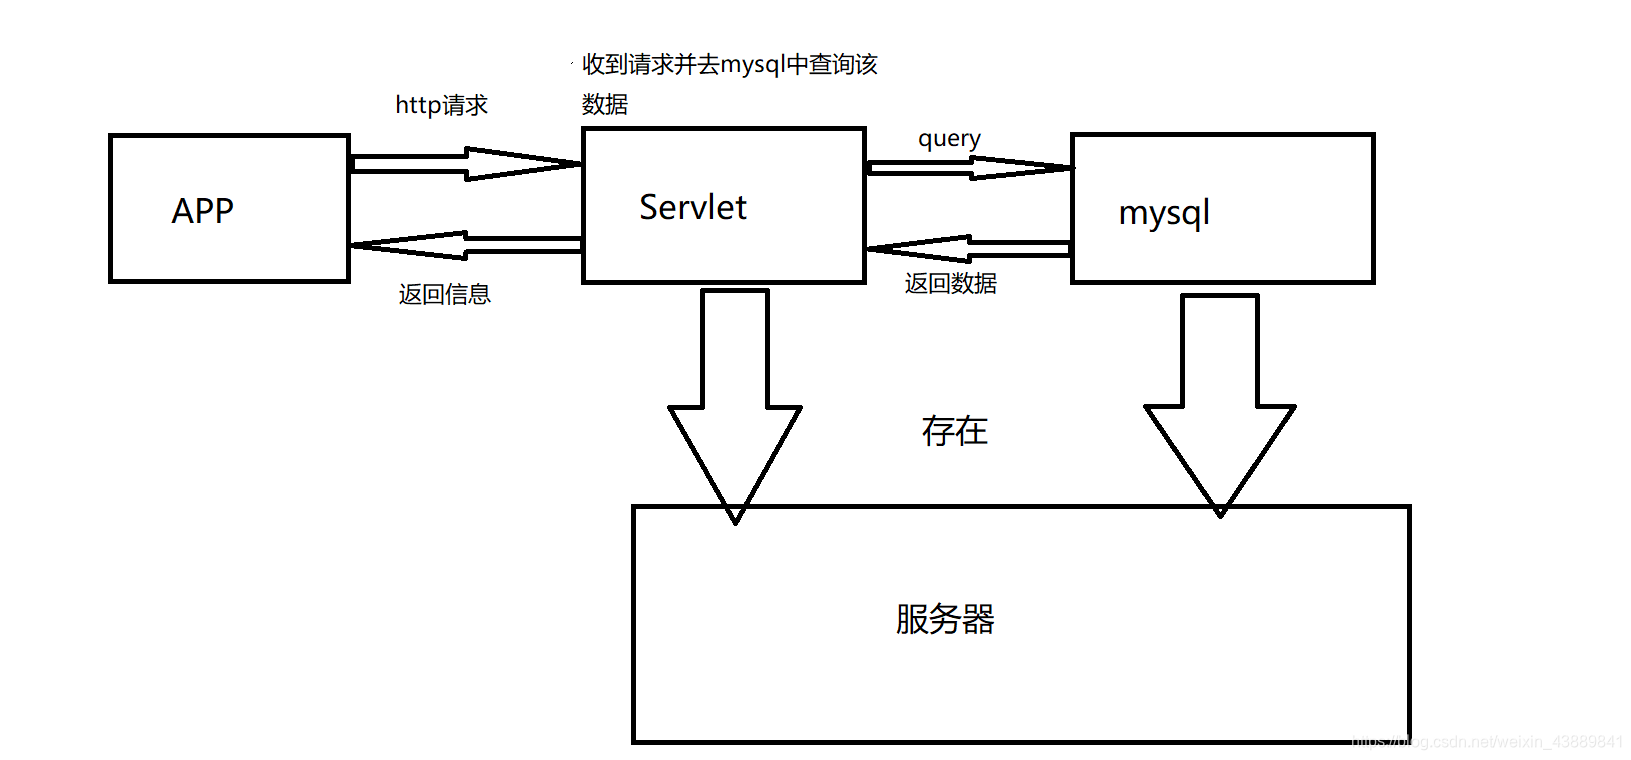
环境准备:
Tomacat服务器配置
mysql配置,其中新建一个数据库+一张用于存放账户信息的表。
服务器端:
LoginServlet.java,“中转站”,用于处理Get请求/Post请求和返回数据。
import java.io.IOException;
import java.io.PrintWriter;

import javax.servlet.ServletException;
import javax.servlet.annotation.WebServlet;
import javax.servlet.http.HttpServlet;
import javax.servlet.http.HttpServletRequest;
import javax.servlet.http.HttpServletResponse;
import javax.servlet.http.HttpSession;

import loginDem.DBUtil;

/**
 * Servlet implementation class LoginServlet
 */
@WebServlet("/LoginServlet")
public class LoginServlet extends HttpServlet {
	private static final long serialVersionUID = 1L;


    public LoginServlet() {
        super();

    }
	protected void doGet(HttpServletRequest request, HttpServletResponse response) throws ServletException, IOException {

				//接受客户端信息
				if(request!=null)
				{
					String username = "";

					username = request.getParameter("username");

					username = new String(username.getBytes("ISO-8859-1"),"UTF-8");

					String password = "";

					password =request.getParameter("password");

					password = new String(password.getBytes("ISO-8859-1"),"UTF-8");

					PrintWriter out = null;

					System.out.println(username+" "+password);

					if(DBUtil.isRight(username, password))
					{

						System.out.println("密码正确");
			            // 返回信息到客户端
			            response.setCharacterEncoding("UTF-8");

			            response.setContentType("text/html");


			            out = response.getWriter();

			            out.print("success");
					}
					else
					{

						System.out.println("error");

					}
					out.flush();
					out.close();

				}
				else {
					System.out.println("request为空");
				}

	}


	protected void doPost(HttpServletRequest request, HttpServletResponse response) throws ServletException, IOException {

		doGet(request, response);
	}

}
DBUtil.java,用于声明一些操作数据库的公共方法。
package loginDem;

import java.sql.PreparedStatement;
import java.sql.ResultSet;
import java.sql.SQLException;

/**
* @author 作者 WuYueHang:
* @version 创建时间:2019年6月22日 下午7:37:15
* 类说明
*/
public class DBUtil {
	public static void insertUser(String username, String password,int age ,String sex )
	{
		String sql = "insert into user values(?,?,?,?);";

		try {
			PreparedStatement statement = DBConnection.getPreparedStatement(sql);

			statement.setString(1, username);

			statement.setString(2, password);

			statement.setInt(3, age);

			statement.setString(4, sex);

			statement.executeUpdate();

		} catch (SQLException e)
		{
			e.printStackTrace();
		}
	}
	public static boolean judgeIsExist(String username)
	{
		String sql = "select username  from user where username = ?";

		try {

			PreparedStatement statement = DBConnection.getPreparedStatement(sql);

			statement.setString(1, username);

			statement.executeQuery();

			ResultSet rs = statement.getResultSet();

			if(!rs.next())
			{
				return false;
			}
			else
			{

				return true;

			}
		} catch (Exception e)
		{

			e.printStackTrace();
		}


		return false;
	}
	public static boolean isRight(String username,String password)
	{
		String sql = "select * from user where username = ?";

		try {

			PreparedStatement statement = DBConnection.getPreparedStatement(sql);

			statement.setString(1, username);

			statement.executeQuery();

			ResultSet rs = statement.getResultSet();

			//如果根本就不存在这个用户名
			if(!rs.next())
			{
				return false;
			}
			else
			{
				//如果密码正确的话
				if(password.equals(rs.getString(2)))
				{
					return true;
				}
				else {

					return false;
				}

			}
		}
		catch (Exception e)
		{

			e.printStackTrace();
		}

		return false;
	}
}
DBConnection.java 用于获得连接数据库的Connection对象,我在这里更进一步,通过传入sql语句获取PreparedStatement对象。
package loginDem;

import java.sql.Connection;
import java.sql.DriverManager;
import java.sql.PreparedStatement;
import java.sql.ResultSet;
import java.sql.ResultSetMetaData;
import java.sql.SQLException;


/**
* @author 作者 WuYueHang:
* @version 创建时间:2019年6月22日 下午7:39:20
* 类说明
*/
public class DBConnection {
	public static PreparedStatement getPreparedStatement(String sql) {

		//temp是我的数据名称,大家可以替换为自己的数据库名称,再后是时区表示,不然会报异常
		String url = "jdbc:mysql://localhost:3306/temp?serverTimezone=GMT%2B8";

		//登录数据库的账号和密码
		String username = "root";

		String password = "123456";

		PreparedStatement statement = null;
		/////////////
		try {


		//反射加载jdbc的Driver类
		Class.forName("com.mysql.cj.jdbc.Driver");

		//通过DriverManager获取Connection对象
		Connection con = DriverManager.getConnection(url,username,password);

		//通过PrepardStatement 准备sql语句
		 statement= con.prepareStatement(sql);


		}
		catch(Exception e)
		{
			e.printStackTrace();
		}

		return statement;
	}


//	//用于调试,判断自己连接是否有问题
//	public static void main(String[] args)
//	{
//		PreparedStatement statement = getPreparedStatement("select * from offices" );
//
//		ResultSet rs;
//
//		int Count=0;
//		try {
//			rs = statement.executeQuery();
//
//
//			ResultSetMetaData rsmd = rs.getMetaData();
//
//			Count= rsmd.getColumnCount();
//		} catch (SQLException e) {
//
//			e.printStackTrace();
//		}
//
//
//
//		System.out.println(Count);
//	}
}
最后我们需要打包成war包以部署项目到我们的Tomcat服务器上。
在eclipse中,右键项目名->导出->war file
从刚刚保存的路径中,复制war包到Tomacat的WebApp下。
客户端实现:
WebServiceGet.java
package com.example.httpmysql;

import java.io.BufferedReader;

import java.io.IOException;
import java.io.InputStream;
import java.io.InputStreamReader;
import java.net.HttpURLConnection;
import java.net.MalformedURLException;
import java.net.URL;


/**
 * 使用get方法获取Http服务器数据
 */

public class WebServiceGet {

    public static String executeHttpGet(String username,String password,String address){
        HttpURLConnection connection = null;
        InputStream in = null;

        try{
            //声明我们Servlet的地址
            String Url = "http://10.0.2.2:8080/AndroidLoginDemo/" + address;

            String path = Url + "?username=" + username + "&password=" + password;
            try {
                URL url = new URL(path);

                connection = (HttpURLConnection)url.openConnection();

                //使用GET方式,因为我们是验证登录,是在取数据,效率更高一些
                connection.setRequestMethod("GET");

                //建立连接超时
                connection.setConnectTimeout(10000);

                //传递数据超时
                connection.setReadTimeout(8000);

                //获取输入流
                in = connection.getInputStream();

                //返回信息
                return parseInfo(in);
            }
            catch (MalformedURLException e)
            {
                e.printStackTrace();
            }
            catch (IOException e)
            {
                e.printStackTrace();
            }

        }
        catch (Exception e){
            e.printStackTrace();
        }finally {
            //意外退出时,连接关闭保护
            if(connection != null){

                connection.disconnect();
            }
            if(in != null){

                try{

                    in.close();
                }catch (Exception e){
                    e.printStackTrace();
                }
            }
        }
        return "error";
    }

    //得到字节输入流,将字节输入流转化为String类型
    public static String parseInfo(InputStream inputStream){
        BufferedReader reader = null;
        String line = "";
        StringBuilder response = new StringBuilder();

        try {
            reader = new BufferedReader(new InputStreamReader(inputStream));
            while((line = reader.readLine()) != null){
                response.append(line);
            }
            return response.toString();
        }catch (Exception e){
            e.printStackTrace();
        }finally {
            if(reader != null){
                try{
                    reader.close();
                }catch (Exception e){
                    e.printStackTrace();
                }
            }
        }
        return "error";
    }
}
MainActivity.java
package com.example.httpmysql;

import android.app.ProgressDialog;
import android.os.Bundle;
import android.support.design.widget.TextInputLayout;
import android.support.v7.app.AppCompatActivity;
import android.text.TextUtils;
import android.view.View;
import android.widget.Button;
import android.widget.EditText;
import android.widget.Toast;

public class MainActivity extends AppCompatActivity implements View.OnClickListener {

    private EditText username;
    private TextInputLayout inputOne;
    private EditText password;
    private TextInputLayout inputTwo;
    private Button buttonLogin;
    private ProgressDialog dialog;

    private String infoString;


    @Override
    protected void onCreate(Bundle savedInstanceState) {
        super.onCreate(savedInstanceState);
        setContentView(R.layout.activity_main);
        initView();
    }

    private void initView() {
        username = (EditText) findViewById(R.id.username);
        inputOne = (TextInputLayout) findViewById(R.id.input_one);
        password = (EditText) findViewById(R.id.password);
        inputTwo = (TextInputLayout) findViewById(R.id.input_two);
        buttonLogin = (Button) findViewById(R.id.button_login);

        buttonLogin.setOnClickListener(this);
    }

    @Override
    public void onClick(View v) {
        switch (v.getId()) {
            case R.id.button_login:
                dialog = new ProgressDialog(MainActivity.this);
                dialog.setTitle("正在登陆");
                dialog.setMessage("请稍后");
                dialog.setCancelable(false);//设置可以通过back键取消
                dialog.show();

                //设置子线程,分别进行Get和Post传输数据

                new Thread(new MyThread()).start();

                break;
        }
    }


    public class MyThread implements Runnable{
        @Override
        public void run() {

            infoString = WebServiceGet.executeHttpGet(username.getText().toString(),password.getText().toString(),"LoginServlet");//获取服务器返回的数据
            dialog.dismiss();

          	//更新界面UI需要使用runOnUiThread方法
           runOnUiThread(new Runnable() {
                @Override
                public void run() {
                    if(infoString.equals("success"))
                    {
                        Toast.makeText(MainActivity.this,"登陆成功", Toast.LENGTH_SHORT).show();
                    }
                    else
                    {
                        Toast.makeText(MainActivity.this,"登陆失败", Toast.LENGTH_SHORT).show();
                    }

                }
            });
        }
    }

}
activity_main.xml,布局文件
<?xml version="1.0" encoding="utf-8"?>
<LinearLayout xmlns:app="http://schemas.android.com/apk/res-auto"
    xmlns:tools="http://schemas.android.com/tools"
    xmlns:android="http://schemas.android.com/apk/res/android"
    android:layout_width="match_parent"
    android:layout_height="match_parent"
    android:orientation="vertical"
    tools:context=".MainActivity">
    <LinearLayout
        android:orientation="vertical"
        android:layout_width="match_parent"
        android:layout_height="wrap_content">
        <android.support.design.widget.TextInputLayout
            android:layout_marginTop="20dp"
            android:id="@+id/input_one"
            android:layout_width="match_parent"
            app:counterEnabled="true"
            app:counterMaxLength="10"


            android:hint="请输入您的账户"
            app:errorEnabled

                            版权声明:本文来源CSDN,感谢博主原创文章,遵循 CC 4.0 by-sa 版权协议,转载请附上原文出处链接和本声明。

                            原文链接:https://blog.csdn.net/weixin_43889841/article/details/93774836

                            站方申明:本站部分内容来自社区用户分享,若涉及侵权,请联系站方删除。
如果觉得我的文章对您有用,请随意打赏。你的支持将鼓励我继续创作!
