社区微信群开通啦,扫一扫抢先加入社区官方微信群

社区微信群
Android系统内置一个Sqlite数据库,如果app需要使用Sqlite数据库数据库存储数据,Android会为此app生成一个.db文件。这个数据库在data/data/<package_name>/databases里面,其中<package_name>为该安卓app的工程包名,这个目录必须root后才能看到。在Windows,单机的应用程序,存储数据,基本放到一个文件里面,正如游戏的存档,基本就是把当前的游戏状态存到一个用户很难找到的文件里面。每次存档读档就是一个从这个存档文件读写数据的过程。由于Android系统内置一个Sqlite数据库,如果我们的app需要在手机上存储一些诸如游戏等数据,可以不用自己建立文件,之后利用读写文件的方法读写里面。可以直接利用sql语句,读写里面的数据,多用于读写一些用户对此app的配置。下面,举一个例子,说明Android中的Sqlite数据库增删改查如何进行增删改查。
如图,还是经典的用户系统,包括登录、注册、修改密码,同时还有删除用户,根据用户输入给出提示。这个系统在《【php】利用原生态的JavaScript Ajax为php进行MVC分层设计,兼容IE6》(点击打开链接)、《【Struts2+Hibernate3+Spring3】利用SSH整合,完成打印用户表,用户登录、注册、修改密码系统》(点击打开链接)、《【Servlet】根据MVC思想设计用户登陆、用户注册、修改密码系统》(点击打开链接)、《【mfc】利用文件的读写,theApp全局变量来现实登录帐号管理系统》(点击打开链接)等已经做了多次,不用再说了吧?主要是就是一个数据库的增删改查的过程。
一、数据库逻辑实现
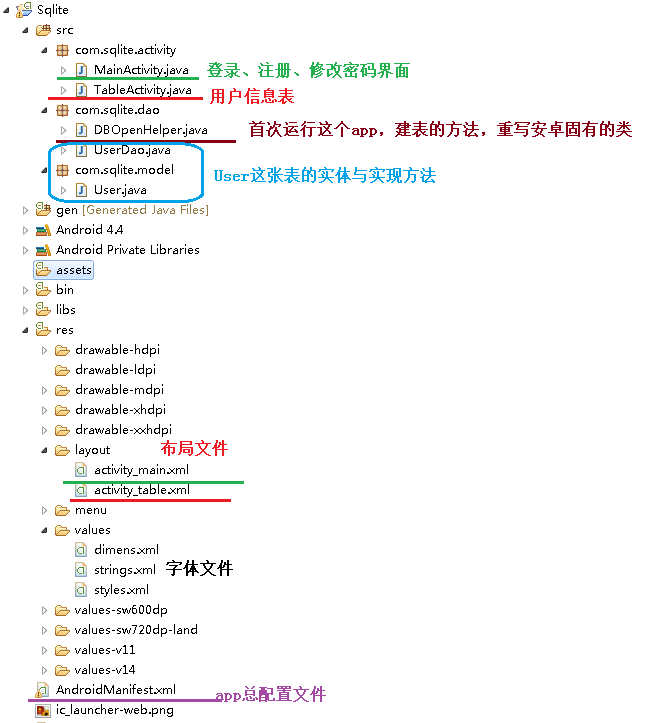
首先整个安卓工程目录如下图,首先新建一个Sqlite工程,设置其主包为com.Sqlite.Activity,MainActivity最好在新建工程的时候就将其放在com.Sqlite.Activity里面,不然搞好工程再移比较麻烦,主要是区分com.Sqlite.dao用来放数据库执行方法的类,com.Sqlite.model用来放数据库实体的类,直接在src中新建这两个包。
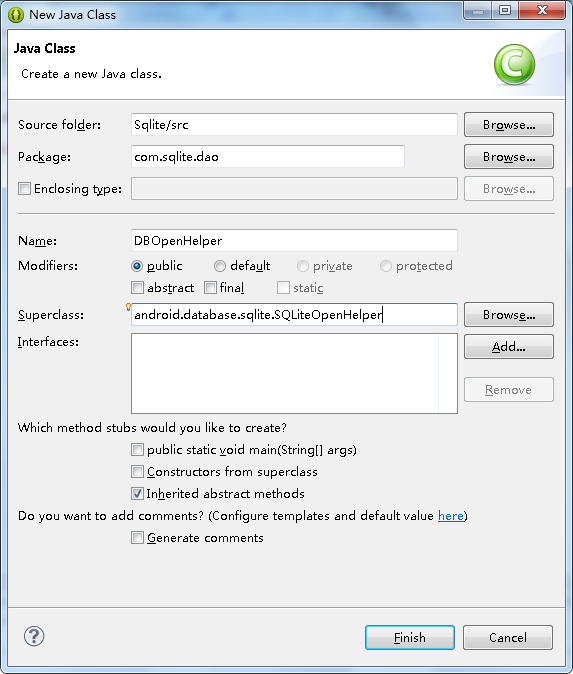
Sqlite数据库的使用无需在AndroidManifest.xml申请任何权限。只要写好一个继承安卓固有接口SQLiteOpenHelper的类,之后这个类作为所有数据库的操作方法dao的构造方法继承这个类就OK了。
先在com.Sqlite.dao新建一个DBOpenHelper继承android.database.sqlite.SQLiteDatabase;
代码如下,具体见注释,其中onCreate中的SQL语句其实已经直接定义这个app在Sqlite数据库的表的结构。
package com.sqlite.dao;

import android.content.Context;
import android.database.sqlite.SQLiteDatabase;
import android.database.sqlite.SQLiteDatabase.CursorFactory;
import android.database.sqlite.SQLiteOpenHelper;

public class DBOpenHelper extends SQLiteOpenHelper {

	public DBOpenHelper(Context context, String name, CursorFactory factory,
			int version) {
		super(context, "SqliteTest.db", null, 1);//向系统申请一个SqliteTest.db文件存这个数据库,其中1是数据库版本。
	}

	@Override
	public void onCreate(SQLiteDatabase sqliteDatabase) {
		String sql=
				"create table if not exists t_user("+
						"id INTEGER NOT NULL PRIMARY KEY AUTOINCREMENT,"+
						"username VARCHAR(255),"+
						"password VARCHAR(255),"+
						"isDel INTEGER DEFAULT 0"+
				")";//如果初次运行,建立一张t_user表,建表的时候注意,自增是AUTOINCREMENT,而不是mysql的AUTO_INCREMENT
		sqliteDatabase.execSQL(sql);

	}

	@Override
	public void onUpgrade(SQLiteDatabase arg0, int arg1, int arg2) {
		//这里是更新数据库版本时所触发的方法
	}

}
package com.sqlite.model;

public class User {
	private int id;
	private String username;
	private String password;
	private int isDel;
	public int getId() {
		return id;
	}
	public void setId(int id) {
		this.id = id;
	}
	public String getUsername() {
		return username;
	}
	public void setUsername(String username) {
		this.username = username;
	}
	public String getPassword() {
		return password;
	}
	public void setPassword(String password) {
		this.password = password;
	}
	public int getIsDel() {
		return isDel;
	}
	public void setIsDel(int isDel) {
		this.isDel = isDel;
	}


}
package com.sqlite.dao;

import java.util.ArrayList;
import android.content.Context;
import android.database.Cursor;
import android.database.sqlite.SQLiteDatabase;
import com.sqlite.model.*;

public class UserDao {
	private DBOpenHelper dbOpenHelper;// 创建DBOpenHelper对象
	private SQLiteDatabase sqliteDatabase;// 创建SQLiteDatabase对象

	public UserDao(Context context)// 定义构造函数
	{
		dbOpenHelper = new DBOpenHelper(context, null, null, 0);// 初始化DBOpenHelper对象
	}

	// 插入用户数据
	public void dbInsert(String username, String password) {
		sqliteDatabase = dbOpenHelper.getWritableDatabase();// 以读写方法打开数据库,不仅仅是写,getReadableDatabase()是只读
		String sql = "insert into t_user(username,password,isDel) values (?,?,0)";
		// 传递过来的username与password分别按顺序替换上面sql语句的两个?,自动转换类型,下同,不再赘述
		Object bindArgs[] = new Object[] { username, password };
		// 执行这条无返回值的sql语句
		sqliteDatabase.execSQL(sql, bindArgs);
	}

	// 求出表中有多少条数据
	public int dbGetUserSize() {
		sqliteDatabase = dbOpenHelper.getWritableDatabase();
		String sql = "select count(*) from t_user where isDel=0";
		Cursor cursor = sqliteDatabase.rawQuery(sql, null);
		if (cursor.moveToNext())// 判断Cursor中是否有数据
		{
			return cursor.getInt(0);// 返回总记录数
		}
		return 0;// 如果没有数据,则返回0
	}

	// 根据用户名查阅用户
	public User dbQueryOneByUsername(String username) {
		sqliteDatabase = dbOpenHelper.getWritableDatabase();
		String sql = "select * from t_user where username=? and isDel=0";
		String[] selectionArgs = new String[] { username };
		Cursor cursor = sqliteDatabase.rawQuery(sql, selectionArgs);
		if (cursor.moveToNext())// 判断Cursor中是否有数据
		{
			// 如果有用户,则把查到的值填充这个用户实体
			User user = new User();
			user.setId(cursor.getInt(cursor.getColumnIndex("id")));
			user.setUsername(cursor.getString(cursor.getColumnIndex("username")));
			user.setPassword(cursor.getString(cursor.getColumnIndex("password")));
			return user;// 返回一个用户给前台
		}
		return null;// 没有返回null
	}

	// 根据用户名,修改密码
	public void dbUpdatePassword(String username, String newPassword) {
		sqliteDatabase = dbOpenHelper.getWritableDatabase();
		String sql = "update t_user set password=? where username=? and isDel=0";
		Object bindArgs[] = new Object[] { newPassword, username };
		sqliteDatabase.execSQL(sql, bindArgs);
	}

	// 查询所有用户
	public ArrayList<User> dbQueryAll() {
		ArrayList<User> userArrayList = new ArrayList<User>();
		sqliteDatabase = dbOpenHelper.getWritableDatabase();
		String sql = "select * from t_user where isDel=0";
		Cursor cursor = sqliteDatabase.rawQuery(sql, null);
		// 游标从头读到尾
		for (cursor.moveToFirst(); !(cursor.isAfterLast()); cursor.moveToNext()) {
			if (cursor.getInt(cursor.getColumnIndex("isDel")) != 1) {
				User user = new User();
				user.setId(cursor.getInt(cursor.getColumnIndex("id")));
				user.setUsername(cursor.getString(cursor
						.getColumnIndex("username")));
				user.setPassword(cursor.getString(cursor
						.getColumnIndex("password")));
				userArrayList.add(user);
			}
		}
		return userArrayList;
	}

	// 删除用户,其实是把相应的isDel值从0改1
	public void dbDeleteUser(int id) {
		sqliteDatabase = dbOpenHelper.getWritableDatabase();
		String sql = "update t_user set isDel=1 where id=?";
		Object bindArgs[] = new Object[] { id };
		sqliteDatabase.execSQL(sql, bindArgs);

	}

}
至此,数据库的逻辑实现结束了,下面开始界面的设置。
1、首先完成字符文件resvaluesstrings.xml修改如下,包括一会儿的TableActivity.java所用到的字体
<?xml version="1.0" encoding="utf-8"?>
<resources>

    <string name="app_name">Sqlite数据库的增删改查</string>
    <string name="action_settings">Settings</string>
    <string name="textViewA">用户登录:</string>
    <string name="textViewB">用户注册:</string>
    <string name="textViewC">修改密码:</string>
    <string name="textView1">用户名:</string>
    <string name="textView2">密码:</string>
    <string name="textView3">再次输入密码:</string>
    <string name="textView4">旧密码:</string>
    <string name="textView5">新密码:</string>
    <string name="button1">确定</string>
    <string name="button2">查看用户表</string>
    <string name="button3">返回</string>

</resources><ScrollView xmlns:android="http://schemas.android.com/apk/res/android"
android:layout_width="match_parent"
android:layout_height="match_parent"
android:orientation="vertical" >
<LinearLayout
android:layout_width="match_parent"
android:layout_height="wrap_content"
android:orientation="vertical" >
<TextView
android:layout_width="match_parent"
android:layout_height="wrap_content"
android:text="@string/textViewA"
android:textSize="24sp" />
<LinearLayout
android:layout_width="match_parent"
android:layout_height="wrap_content"
android:orientation="horizontal" >
<TextView
android:layout_width="wrap_content"
android:layout_height="match_parent"
android:text="@string/textView1"
android:textSize="18sp" />
<EditText
android:id="@+id/editTextA1"
android:layout_width="match_parent"
android:layout_height="match_parent"
android:inputType="text"
android:textSize="18sp" />
</LinearLayout>
<LinearLayout
android:layout_width="match_parent"
android:layout_height="wrap_content"
android:orientation="horizontal" >
<TextView
android:layout_width="wrap_content"
android:layout_height="match_parent"
android:text="@string/textView2"
android:textSize="18sp" />
<EditText
android:id="@+id/editTextA2"
android:layout_width="match_parent"
android:layout_height="match_parent"
android:inputType="textPassword"
android:textSize="18sp" />
</LinearLayout>
<LinearLayout
android:layout_width="match_parent"
android:layout_height="wrap_content"
android:gravity="center_horizontal" >
<Button
android:id="@+id/buttonA1"
android:layout_width="wrap_content"
android:layout_height="match_parent"
android:text="@string/button1"
android:textSize="18sp" />
</LinearLayout>
<TextView
android:layout_width="match_parent"
android:layout_height="wrap_content"
android:text="@string/textViewB"
android:textSize="24sp" />
<LinearLayout
android:layout_width="match_parent"
android:layout_height="wrap_content"
android:orientation="horizontal" >
<TextView
android:layout_width="wrap_content"
android:layout_height="match_parent"
android:text="@string/textView1"
android:textSize="18sp" />
<EditText
android:id="@+id/editTextB1"
android:layout_width="match_parent"
android:layout_height="match_parent"
android:inputType="text"
android:textSize="18sp" />
</LinearLayout>
<LinearLayout
android:layout_width="match_parent"
android:layout_height="wrap_content"
android:orientation="horizontal" >
<TextView
android:layout_width="wrap_content"
android:layout_height="match_parent"
android:text="@string/textView2"
android:textSize="18sp" />
<EditText
android:id="@+id/editTextB2"
android:layout_width="match_parent"
android:layout_height="match_parent"
android:inputType="textPassword"
android:textSize="18sp" />
</LinearLayout>
<LinearLayout
android:layout_width="match_parent"
android:layout_height="wrap_content"
android:orientation="horizontal" >
<TextView
android:layout_width="wrap_content"
android:layout_height="match_parent"
android:text="@string/textView3"
android:textSize="18sp" />
<EditText
android:id="@+id/editTextB3"
android:layout_width="match_parent"
android:layout_height="match_parent"
android:inputType="textPassword"
android:textSize="18sp" />
</LinearLayout>
<LinearLayout
android:layout_width="match_parent"
android:layout_height="wrap_content"
android:gravity="center_horizontal" >
<Button
android:id="@+id/buttonB1"
android:layout_width="wrap_content"
android:layout_height="match_parent"
android:text="@string/button1"
android:textSize="18sp" />
</LinearLayout>
<TextView
android:layout_width="match_parent"
android:layout_height="wrap_content"
android:text="@string/textViewC"
android:textSize="24sp" />
<LinearLayout
android:layout_width="match_parent"
android:layout_height="wrap_content"
android:orientation="horizontal" >
<TextView
android:layout_width="wrap_content"
android:layout_height="match_parent"
android:text="@string/textView1"
android:textSize="18sp" />
<EditText
android:id="@+id/editTextC1"
android:layout_width="match_parent"
android:layout_height="match_parent"
android:inputType="text"
android:textSize="18sp" />
</LinearLayout>
<LinearLayout
android:layout_width="match_parent"
android:layout_height="wrap_content"
android:orientation="horizontal" >
<TextView
android:layout_width="wrap_content"
android:layout_height="match_parent"
android:text="@string/textView4"
android:textSize="18sp" />
<EditText
android:id="@+id/editTextC2"
android:layout_width="match_parent"
android:layout_height="match_parent"
android:inputType="textPassword"
android:textSize="18sp" />
</LinearLayout>
<LinearLayout
android:layout_width="match_parent"
android:layout_height="wrap_content"
android:orientation="horizontal" >
<TextView
android:layout_width="wrap_content"
android:layout_height="match_parent"
android:text="@string/textView5"
android:textSize="18sp" />
<EditText
android:id="@+id/editTextC3"
android:layout_width="match_parent"
android:layout_height="match_parent"
android:inputType="textPassword"
android:textSize="18sp" />
</LinearLayout>
<LinearLayout
android:layout_width="match_parent"
android:layout_height="wrap_content"
android:orientation="horizontal" >
<TextView
android:layout_width="wrap_content"
android:layout_height="match_parent"
android:text="@string/textView3"
android:textSize="18sp" />
<EditText
android:id="@+id/editTextC4"
android:layout_width="match_parent"
android:layout_height="match_parent"
android:inputType="textPassword"
android:textSize="18sp" />
</LinearLayout>
<LinearLayout
android:layout_width="match_parent"
android:layout_height="wrap_content"
android:gravity="center_horizontal" >
<Button
android:id="@+id/buttonC1"
android:layout_width="wrap_content"
android:layout_height="match_parent"
android:text="@string/button1"
android:textSize="18sp" />
</LinearLayout>
<Button
android:id="@+id/button2"
android:layout_width="match_parent"
android:layout_height="wrap_content"
android:text="@string/button2"
android:textSize="18sp" />
</LinearLayout>
</ScrollView>package com.sqlite.activity;
import com.sqlite.dao.*;
import com.sqlite.model.*;
import android.os.Bundle;
import android.view.View;
import android.view.View.OnClickListener;
import android.widget.Button;
import android.widget.EditText;
import android.widget.Toast;
import android.app.Activity;
import android.content.Intent;
public class MainActivity extends Activity {
// 用户登录
private EditText editTextA1;
private EditText editTextA2;
private Button buttonA1;
// 用户注册
private EditText editTextB1;
private EditText editTextB2;
private EditText editTextB3;
private Button buttonB1;
// 修改密码
private EditText editTextC1;
private EditText editTextC2;
private EditText editTextC3;
private EditText editTextC4;
private Button buttonC1;
//打开用户表
private Button button2;
// 数据库操作类
private UserDao userDao;
@Override
protected void onCreate(Bundle savedInstanceState) {
super.onCreate(savedInstanceState);
setContentView(R.layout.activity_main);
// 注册组件
userDao = new UserDao(this);
editTextA1 = (EditText) findViewById(R.id.editTextA1);
editTextA2 = (EditText) findViewById(R.id.editTextA2);
editTextB1 = (EditText) findViewById(R.id.editTextB1);
editTextB2 = (EditText) findViewById(R.id.editTextB2);
editTextB3 = (EditText) findViewById(R.id.editTextB3);
editTextC1 = (EditText) findViewById(R.id.editTextC1);
editTextC2 = (EditText) findViewById(R.id.editTextC2);
editTextC3 = (EditText) findViewById(R.id.editTextC3);
editTextC4 = (EditText) findViewById(R.id.editTextC4);
buttonA1 = (Button) findViewById(R.id.buttonA1);
buttonB1 = (Button) findViewById(R.id.buttonB1);
buttonC1 = (Button) findViewById(R.id.buttonC1);
button2 = (Button) findViewById(R.id.button2);
// 用户登录
buttonA1.setOnClickListener(new OnClickListener() {
@Override
public void onClick(View arg0) {
String username = editTextA1.getText() + "";
String password = editTextA2.getText() + "";
if (username.equals(null) || username == ""
|| password.equals(null) || password == "") {
Toast.makeText(MainActivity.this, "用户名或密码不得为空!",
Toast.LENGTH_SHORT).show();
} else {
User user = userDao.dbQueryOneByUsername(username);
if (userDao.dbQueryOneByUsername(username) == null) {
Toast.makeText(MainActivity.this, "此用户不存在!",
Toast.LENGTH_SHORT).show();
} else {
if (!user.getPassword().equals(password)) {
Toast.makeText(MainActivity.this, "密码错误!",
Toast.LENGTH_SHORT).show();
} else {
Toast.makeText(MainActivity.this, "登录成功!",
Toast.LENGTH_SHORT).show();
}
}
}
}
});
// 用户注册
buttonB1.setOnClickListener(new OnClickListener() {
@Override
public void onClick(View arg0) {
String username = editTextB1.getText() + "";
String password = editTextB2.getText() + "";
if (username.equals(null) || username == ""
|| password.equals(null) || password == "") {
Toast.makeText(MainActivity.this, "用户名或密码不得为空!",
Toast.LENGTH_SHORT).show();
} else {
String confirmPwd = editTextB3.getText() + "";
if (!password.equals(confirmPwd)) {
Toast.makeText(MainActivity.this, "两次输入密码不一致!",
Toast.LENGTH_SHORT).show();
} else {
if (userDao.dbQueryOneByUsername(username) == null) {
userDao.dbInsert(username, password);
Toast.makeText(
MainActivity.this,
"注册成功!用户名:" + username + ",密码:" + password
+ ",请牢记!", Toast.LENGTH_SHORT)
.show();
} else {
Toast.makeText(MainActivity.this, "该用户已被注册",
Toast.LENGTH_SHORT).show();
}
}
}
}
});
// 修改密码
buttonC1.setOnClickListener(new OnClickListener() {
@Override
public void onClick(View arg0) {
String username = editTextC1.getText() + "";
String password = editTextC2.getText() + "";
if (username.equals(null) || username == ""
|| password.equals(null) || password == "") {
Toast.makeText(MainActivity.this, "用户名或密码不得为空!",
Toast.LENGTH_SHORT).show();
} else {
User user = userDao.dbQueryOneByUsername(username);
if (userDao.dbQueryOneByUsername(username) == null) {
Toast.makeText(MainActivity.this, "此用户不存在!",
Toast.LENGTH_SHORT).show();
} else {
if (!user.getPassword().equals(password)) {
Toast.makeText(MainActivity.this, "密码错误!",
Toast.LENGTH_SHORT).show();
} else {
String newPwd = editTextC3.getText() + "";
String confirmNewPwd = editTextC4.getText() + "";
if (!newPwd.equals(confirmNewPwd)) {
Toast.makeText(MainActivity.this, "两次输入密码不一致!",
Toast.LENGTH_SHORT).show();
} else {
userDao.dbUpdatePassword(username, newPwd);
Toast.makeText(MainActivity.this,
"修改密码成功!新密码:" + newPwd + ",请牢记!",
Toast.LENGTH_SHORT).show();
}
}
}
}
}
});
//打开用户表
button2.setOnClickListener(new OnClickListener() {
@Override
public void onClick(View arg0) {
finish();
Intent intent = new Intent(MainActivity.this, TableActivity.class);
startActivity(intent);
}
});
}
}
<?xml version="1.0" encoding="utf-8"?>
<manifest xmlns:android="http://schemas.android.com/apk/res/android"
    package="com.sqlite.activity"
    android:versionCode="1"
    android:versionName="1.0" >

    <uses-sdk
        android:minSdkVersion="8"
        android:targetSdkVersion="18" />

    <application
        android:allowBackup="true"
        android:icon="@drawable/ic_launcher"
        android:label="@string/app_name"
        android:theme="@style/AppTheme" >
        <activity
            android:name="com.sqlite.activity.MainActivity"
            android:label="@string/app_name" >
            <intent-filter>
                <action android:name="android.intent.action.MAIN" />

                <category android:name="android.intent.category.LAUNCHER" />
            </intent-filter>
        </activity>
        <!-- TableActivity的注册 -->
        <activity
            android:name="com.sqlite.activity.TableActivity"
            android:label="@string/app_name" >
        </activity>
    </application>

</manifest>
<ScrollView xmlns:android="http://schemas.android.com/apk/res/android"
    android:layout_width="match_parent"
    android:layout_height="match_parent"
    android:orientation="vertical" >

    <LinearLayout
        android:id="@+id/linearLayout1"
        android:layout_width="match_parent"
        android:layout_height="wrap_content"
        android:orientation="vertical" >

        <View
            android:layout_width="match_parent"
            android:layout_height="wrap_content"
            android:tag="1" />

        <View
            android:layout_width="match_parent"
            android:layout_height="wrap_content"
            android:tag="2" />

        <Button
            android:id="@+id/button3"
            android:layout_width="match_parent"
            android:layout_height="wrap_content"
            android:text="@string/button3" />
    </LinearLayout>

</ScrollView>package com.sqlite.activity;
import java.util.ArrayList;
import com.sqlite.model.User;
import com.sqlite.dao.UserDao;
import android.app.Activity;
import android.content.Intent;
import android.os.Bundle;
import android.view.KeyEvent;
import android.view.View;
import android.view.View.OnClickListener;
import android.view.ViewGroup;
import android.widget.Button;
import android.widget.LinearLayout;
import android.widget.TableLayout;
import android.widget.TableRow;
import android.widget.TextView;
import android.widget.Toast;
public class TableActivity extends Activity {
// 数据库操作类
private UserDao userDao;
//线性布局
private LinearLayout linearLayout1;
//返回按钮
private Button button3;
@Override
protected void onCreate(Bundle savedInstanceState) {
super.onCreate(savedInstanceState);
setContentView(R.layout.activity_table);
// 注册组件
userDao = new UserDao(this);
button3 = (Button) findViewById(R.id.button3);
linearLayout1 = (LinearLayout) findViewById(R.id.linearLayout1);
//求出用户的数量,并且显示
int userSize = userDao.dbGetUserSize();
TextView textView1 = new TextView(this);
textView1.setText("共有" + userSize + "个用户");
textView1.setTextSize(24);
linearLayout1.addView(textView1, 1);//添加的textView1放到activity_table.xml中tag=1的View那个位置
//如果用户数量为0就不用搞这么东西添加表格布局了
if (userSize > 0) {
ArrayList<User> userList = userDao.dbQueryAll();//查出表中的所有用户放到一个ArrayList中
TableLayout tableLayout1 = new TableLayout(this);//新建一个表格布局
tableLayout1.setStretchAllColumns(true);//自动宽度,使表格在横向占据100%
//打印表头
TableRow tableRow = new TableRow(this);//新建一行
TextView textView = new TextView(this);//新建一个TextView
textView.setTextSize(24);//设置字体
textView.setText("用户名");
tableRow.addView(textView);//放到行中,自动增加一个单元格
textView = new TextView(this);
textView.setTextSize(24);
textView.setText("密码");
tableRow.addView(textView);
textView = new TextView(this);
textView.setTextSize(24);
textView.setText("操作");
tableRow.addView(textView);
// 新建的行TableRow添加到表格TableLayout之中
tableLayout1.addView(tableRow, new TableLayout.LayoutParams(
ViewGroup.LayoutParams.WRAP_CONTENT,
ViewGroup.LayoutParams.MATCH_PARENT));
//打印用户信息
for (int i = 0; i < userSize; i++) {
User user = userList.get(i);
// 一个用户占据一行
tableRow = new TableRow(this);
textView = new TextView(this);
textView.setTextSize(18);
textView.setText(user.getUsername());
tableRow.addView(textView);
textView = new TextView(this);
textView.setTextSize(18);
textView.setText(user.getPassword());
tableRow.addView(textView);
Button button = new Button(this);
button.setText("删除");
button.setTextSize(18);
button.setId(user.getId());//设置按钮的id就是用户的id
button.setOnClickListener(new OnClickListener() {
@Override
public void onClick(View view) {
userDao.dbDeleteUser(view.getId());//这样可以获取按钮的id
//修改密码,更新数据库之后,刷新一下这个TableActivity
finish();
Intent intent = new Intent(TableActivity.this,
TableActivity.class);
startActivity(intent);
Toast.makeText(TableActivity.this, "删除成功!",
Toast.LENGTH_SHORT).show();
}
});
tableRow.addView(button);//将这个按钮添加到这行中
// 新建的TableRow添加到TableLayout
tableLayout1.addView(tableRow, new TableLayout.LayoutParams(
ViewGroup.LayoutParams.WRAP_CONTENT,
ViewGroup.LayoutParams.MATCH_PARENT));
}
linearLayout1.addView(tableLayout1, 2);//把这个表格放到activity_table.xml中tag=2的View那个位置
}
//返回MainActivity
button3.setOnClickListener(new OnClickListener() {
@Override
public void onClick(View arg0) {
finish();
Intent intent = new Intent(TableActivity.this, MainActivity.class);
startActivity(intent);
}
});
}
// 对物理按钮的监听
@Override
public boolean onKeyDown(int keyCode, KeyEvent event) {
switch (keyCode) {
case KeyEvent.KEYCODE_BACK:
finish();// 关闭这个Activity。
Intent intent = new Intent(TableActivity.this, MainActivity.class);
startActivity(intent);
break;
}
return super.onKeyDown(keyCode, event);
}
}
如果觉得我的文章对您有用,请随意打赏。你的支持将鼓励我继续创作!