社区微信群开通啦,扫一扫抢先加入社区官方微信群

社区微信群
参考:http://blog.csdn.net/pz789as/article/details/53212318
在项目开发中,经常需要使用第三方授权登录,比如QQ,FB,TWTR等等,今天就把我自己研究的Google授权登录写出来。
当然,一开始你也可以去第三方库搜索GOOGLE,有人已经贡献出来了。点击打开链接
我自己最开些想找FB和TWITTER的,然后都不好用,所以都是自己动手写的,于是这个GOOGLE的也就顺手写了。后面才去js.coach上去查的。
GOOGLE的登录有点坑人,根据官网的提示写的代码死活跑步起来,最后看他的demo才知道,需要实现两个接口,并且还得使用原生的Navigator,让人用起来很不舒服!不过还好坑踩完了,就是关于Navigator的副作用目前还不得而知,毕竟没做过原生的~哈哈
我这里是实现IOS端的,如果需要Android,可以使用我上面说的那个第三方插件,或者根据官网自己动手吧,时间不紧还是自己动手比较好,这样对RN的理解也会更加深刻!
首先要根据官网将GOOGLESDK下载下来,翻墙自己下的,跟着官网的步骤做的请无视。
我这里已经下了:(IOS的)链接: https://pan.baidu.com/s/1pLpSdbP 密码: vyx2
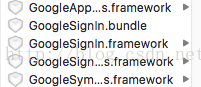
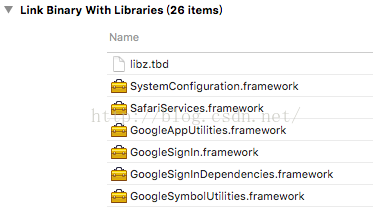
将下载的zip包解压,把里面的这几个文件复制到你的IOS项目文件夹下:
然后将framework和bundle放到对应的位置:
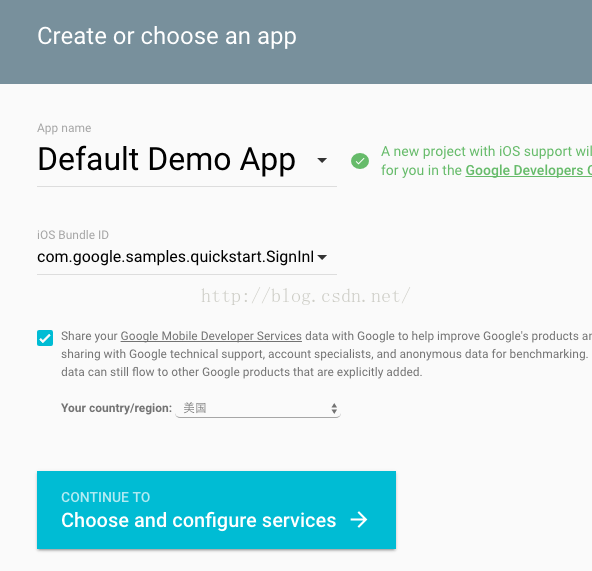
接着需要去谷歌官网申请APP了,链接:创建APP (需要科学上网)
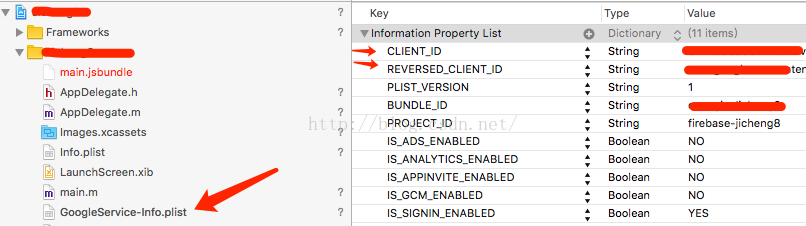
这里过后可以下载到一个plist文件,里面有很多谷歌的各种ID后面需要用到,可以把这个文件拖到工程中来:
接下来是用设置 Project > Target > Info > URL Types
创建一个新URL Types,然后把上面plist里面的REVERSED_CLIENT_ID复制,填入URL Schemes和Identitier里面。
到这里基本设置都完成了,接下来就是写代码了!
我们首先在工程的AppDelegate.h里面添加一个NavigatorController:
#import <UIKit/UIKit.h>

@interface AppDelegate : UIResponder <UIApplicationDelegate>

@property (nonatomic, strong) UIWindow *window;
@property(strong, nonatomic) UINavigationController *navigationController;

@end#import "AppDelegate.h"
#import "RCTBundleURLProvider.h"
#import "RCTRootView.h"
#import <GoogleSignIn/GoogleSignIn.h>//添加库
@implementation AppDelegate
- (BOOL)application:(UIApplication *)application didFinishLaunchingWithOptions:(NSDictionary *)launchOptions
{
NSURL *jsCodeLocation;
jsCodeLocation = [[RCTBundleURLProvider sharedSettings] jsBundleURLForBundleRoot:@"index.ios" fallbackResource:nil];
RCTRootView *rootView = [[RCTRootView alloc] initWithBundleURL:jsCodeLocation
moduleName:@"Jicheng8"
initialProperties:nil
launchOptions:launchOptions];
rootView.backgroundColor = [[UIColor alloc] initWithRed:1.0f green:1.0f blue:1.0f alpha:1];
[GIDSignIn sharedInstance].clientID = @"your app client id";//设置clientID,在下载的Google plist文件中有
self.window = [[UIWindow alloc] initWithFrame:[UIScreen mainScreen].bounds];
UIViewController *rootViewController = [UIViewController new];
rootViewController.view = rootView;
self.navigationController = [[UINavigationController alloc] initWithRootViewController:rootViewController];//初始化navigationController
[self.navigationController setNavigationBarHidden:YES];//隐藏导航栏
[self.navigationController setToolbarHidden:YES];//隐藏工具栏,这里是在网上找的。
self.window.rootViewController = self.navigationController;//将navigationController当做root传入window中。
[self.window makeKeyAndVisible];
return YES;
}
- (BOOL)application:(UIApplication *)application openURL:(NSURL *)url sourceApplication:(NSString *)sourceApplication annotation:(id)annotation {
BOOL handledgi =[[GIDSignIn sharedInstance]handleURL:url sourceApplication:sourceApplication annotation:annotation];//添加openURL
return handledgi;
}
@end创建新类,取名叫GoogleLogin:
//
//  GoogleLogin.h
//  Jicheng8
//
//  Created by guojicheng on 16/11/17.
//  Copyright © 2016年 Facebook. All rights reserved.
//

#import <UIKit/UIKit.h>
#import "RCTEventEmitter.h"
//常量,主要是返回到JS端时,根据类型判断返回的结果
#define CB_CODE_ERROR @"0"
#define CB_CODE_LOGIN @"1"
#define CB_CODE_LOGOUT @"2"
#define CB_CODE_EXPIRED @"3"
#define CB_CODE_DISCONNECT @"4"

#define ERROR_LOGIN @"0"
#define ERROR_DISCONNECT @"1"

#define EXPIRED_IN @"0"
#define EXPIRED_OUT @"1"

@interface GoogleLogin : RCTEventEmitter

@end
实现GoogleLogin.m
//
// GoogleLogin.m
// Jicheng8
//
// Created by guojicheng on 16/11/17.
// Copyright © 2016年 Facebook. All rights reserved.
//
#import "GoogleLogin.h"
#import <GoogleSignIn/GoogleSignIn.h>
#import "AppDelegate.h"
@interface GoogleLogin()<GIDSignInDelegate, GIDSignInUIDelegate>//这里就需要实现Google的两个interface才可以,不然会有问题,报错。
@end
@implementation GoogleLogin
-(instancetype)init
{
self = [super init];
if (self){
[GIDSignIn sharedInstance].shouldFetchBasicProfile = YES;
[GIDSignIn sharedInstance].delegate = self;//设置代理,这个是结果回调
[GIDSignIn sharedInstance].uiDelegate = self;//设置代理,这个是调用授权登录页面的
// [[GIDSignIn sharedInstance] setScopes:[NSArray arrayWithObject:@"https://www.googleapis.com/auth/plus.login"]];
}
return self;
}
- (dispatch_queue_t)methodQueue
{
return dispatch_get_main_queue();//放在主线程中运行
}
RCT_EXPORT_MODULE();//导出模块
RCT_EXPORT_METHOD(Login)//导出login方法
{
[[GIDSignIn sharedInstance]signIn];//google的login接口
}
RCT_EXPORT_METHOD(LoginSilently)
{
[[GIDSignIn sharedInstance]signInSilently];//静默登录,如果已经登录并且token还未过期,就可以直接使用这个登录
}
RCT_EXPORT_METHOD(Logout)
{
[[GIDSignIn sharedInstance]signOut];//登出
NSLog(@"signOut success!");
[self gglCallback:CB_CODE_LOGOUT
result:@"logout success!"];//自定义回调函数,将需要传递给js的信息统一发送回去
}
RCT_EXPORT_METHOD(IsExpired)//判断是否到期
{
BOOL ret = [[GIDSignIn sharedInstance]hasAuthInKeychain];
if (ret){
NSLog(@"not expired!");
[self gglCallback:CB_CODE_EXPIRED result:EXPIRED_IN];
}else{
NSLog(@"is expired!");
[self gglCallback:CB_CODE_EXPIRED result:EXPIRED_OUT];
}
}
RCT_EXPORT_METHOD(Disconnect)//这个是清空keychain,具体作用不知道,我没有使用
{
[[GIDSignIn sharedInstance]disconnect];
}
- (NSArray<NSString *> *)supportedEvents//导出JS回调监控函数名
{
return @[@"gglCallback"];//有几个就写几个
}
-(void)gglCallback:(NSString*)code result:(NSString*) result//向JS发送消息
{
[self sendEventWithName:@"gglCallback"
body:@{
@"code": code,
@"result": result,
}];
}
-(NSDictionary*)constantsToExport//导出常量,可以使两边的做同样的处理
{
return @{
@"CB_CODE_ERROR": @"0",
@"CB_CODE_LOGIN": @"1",
@"CB_CODE_LOGOUT": @"2",
@"CB_CODE_EXPIRED": @"3",
@"CB_CODE_DISCONNECT": @"4",
@"ERROR_LOGIN": @"0",
@"ERROR_DISCONNECT": @"1",
@"EXPIRED_IN": @"0",
@"EXPIRED_OUT": @"1"
};
}
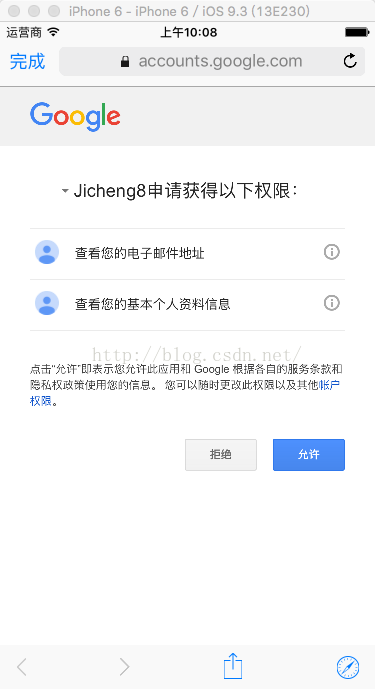
//登录成功之后,会回调这个函数,属于GIDSignInDelegate,会得到用户的基本信息
-(void)signIn:(GIDSignIn *)signIn didSignInForUser:(GIDGoogleUser *)user withError:(NSError *)error
{
// Perform any operations on signed in user here.
// NSString *userId = user.userID; // For client-side use only!
// NSString *idToken = user.authentication.idToken; // Safe to send to the server
// NSString *fullName = user.profile.name;
// NSString *givenName = user.profile.givenName;
// NSString *familyName = user.profile.familyName;
// NSString *email = user.profile.email;
// ...
if (error){
[self gglCallback:CB_CODE_ERROR
result:[NSString stringWithFormat:@"{"id":"%@", "dsc":"%@"}",
ERROR_LOGIN,
[error localizedDescription]]];
}else{
NSLog(@"signIn as %@", user.profile.name);
[self gglCallback:CB_CODE_LOGIN
result:[NSString stringWithFormat:
@"{"userID":"%@", "idToken":"%@", "fullName":"%@", "email":"%@"}",
user.userID,
user.authentication.idToken,
user.profile.name,
user.profile.email]];
}
}
//这个只用调用的disconnect之后才会回调,属于GIDSignInDelegate
-(void)signIn:(GIDSignIn *)signIn didDisconnectWithUser:(GIDGoogleUser *)user withError:(NSError *)error
{
if (error) {
[self gglCallback:CB_CODE_ERROR
result:[NSString stringWithFormat:@"{"id":"%@", "dsc":"%@"}",
ERROR_DISCONNECT,
[error localizedDescription]]];
}else{
NSLog(@"disconnent as %@", user.profile.name);
[self gglCallback:CB_CODE_DISCONNECT
result:[NSString stringWithFormat:
@"{"userID":"%@", "idToken":"%@", "fullName":"%@", "email":"%@"}",
user.userID,
user.authentication.idToken,
user.profile.name,
user.profile.email]];
}
}
//-(void)signInWillDispatch:(GIDSignIn *)signIn error:(NSError *)error
//{
// if (error) {
// NSLog(@"error: %@", [error localizedDescription]);
// }else{
// NSLog(@"signIn as %@", signIn.currentUser.profile.name);
// }
//}
//当登录完毕之后,需要将授权登录页面从Navigator中剔除,这是属于GIDSignInUIDelegate的回调
-(void)signIn:(GIDSignIn *)signIn dismissViewController:(UIViewController *)viewController
{
NSLog(@"dismiss as %@", signIn.currentUser.profile.name);
UINavigationController* ui = [[UIApplication sharedApplication] valueForKeyPath:@"delegate.navigationController"];//拿到navigationController句柄
[ui popViewControllerAnimated:YES];//将之前的授权登录页面从navigationController里面出栈。
}
//点击登录之后的回调,需要将授权登录页面加入到navigationController中来,属于GIDSignInUIDelegate
-(void)signIn:(GIDSignIn *)signIn presentViewController:(UIViewController *)viewController
{
NSLog(@"present as %@", signIn.currentUser.profile.name);
UINavigationController* ui = [[UIApplication sharedApplication] valueForKeyPath:@"delegate.navigationController"];//拿到navigationController句柄
[ui pushViewController:viewController animated:YES];//将授权登录页面viewController加入到navigationController中
}
@end
在需要使用Login的地方,导入NativeModules和NativeEventEmitter模块,这两个的作用就是和原生对应的
import React, { Component } from 'react';
import {
  AppRegistry,
  StyleSheet,
  Text,
  View,
  Image,
  TouchableOpacity,
  Dimensions,
  NativeModules,//导入模块类
  NativeEventEmitter,//导入事件类
} from 'react-native';

var ScreenWidth = Dimensions.get('window').width;
var ScreenHeight = Dimensions.get('window').height;

var GoogleLogin = NativeModules.GoogleLogin;//获取原生模块,没有定义名字,以类名做名字
const glLoginCB = new NativeEventEmitter(GoogleLogin);//创建事件接口componentDidMount() {
this.glListener = glLoginCB.addListener('gglCallback', this.gglCallback.bind(this));//在组件显示之后,添加原生回调监听,注意看名字,是和原生对应的哦
}
componentWillUnmount() {
this.glListener && this.glListener.remove();//在组件即将销毁前,注销掉监听
this.glListener = null;
}
gglCallback(data){//绑定的回调监听函数,在这里处理yuan'sheng'd
if (data.code == GoogleLogin.CB_CODE_ERROR){//我们在原生端导出的常量,可以在这里直接使用了!
var ret = JSON.parse(data.result);
if (ret.id == GoogleLogin.ERROR_LOGIN){
alert('登录失败:' + ret.dsc);
}else if (ret.id == GoogleLogin.ERROR_DISCONNECT){
alert('断开连接失败:' + ret.dsc);
}else {
alert("未知错误!");
}
}else if (data.code == GoogleLogin.CB_CODE_LOGIN){
var ret = JSON.parse(data.result);
console.log('登录成功:' + ret.fullName + '!');
this.setState({
glName: ret.fullName,
glEmail: ret.email,
glLoginStatus: true
});
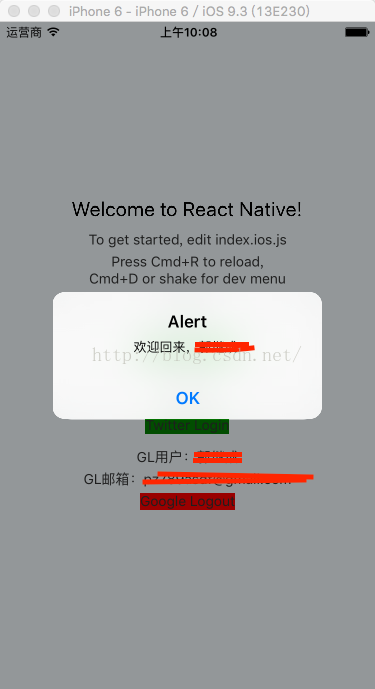
alert('欢迎回来,' + ret.fullName + '!');
}else if (data.code == GoogleLogin.CB_CODE_LOGOUT){
this.setState({
glName: '',
glEmail: '',
glLoginStatus: false,
});
alert('登出成功!');
}else if (data.code == GoogleLogin.CB_CODE_EXPIRED){
if (data.result == GoogleLogin.EXPIRED_OUT){
console.log('登录已经过期');
this.LoginGoolge();
}else {
console.log('登录成功!');
this.LoginGoogleSilently();
}
}else if (data.code == GoogleLogin.CB_CODE_DISCONNECT){
this.setState({
glName: '',
glEmail: '',
glLoginStatus: false,
});
alert('登出成功:' + ret.fullName);
}
}然后包装好原生端的调用,这么写是可以加一个等待界面处理,毕竟是异步的,还要联网:
onGooglePress(){
    if (this.state.glLoginStatus){
      this.LogoutGoogle();
    }else{
      this.ExpiredGoogle();
    }
  }
  LoginGoolge(){
    GoogleLogin.Login();
  }
  LogoutGoogle(){
    GoogleLogin.Logout();
  }
  LoginGoogleSilently(){
    GoogleLogin.LoginSilently();
  }
  ExpiredGoogle(){
    GoogleLogin.IsExpired();
}render() {
return (
<View style={styles.container}>
<Text style={styles.instructions}>
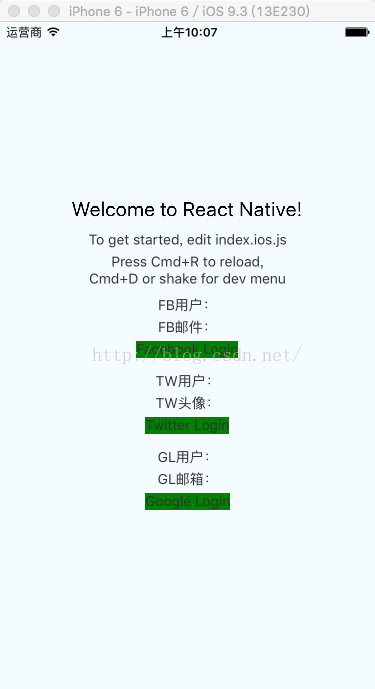
GL用户:{this.state.glName}//显示获取到的名字
</Text>
<Text style={styles.instructions}>
GL邮箱:{this.state.glEmail}//获取到的email
</Text>
<TouchableOpacity style={{marginBottom: 10}} onPress={this.onGooglePress.bind(this)}>
<Text style={[styles.instructions, {backgroundColor: this.state.glLoginStatus ? 'red' : 'green'}]}>
{this.state.glLoginStatus ? 'Google Logout' : 'Google Login'} //根据状态改变按钮的显示
</Text>
</TouchableOpacity>
{this.state.isWaiting ? //添加waiting,这里我没有用,可以在调用原生的时候设置isWaiting为true,当回调了gglCallback再设置成false即可
<View style={{
position: 'absolute',
left: 0,
top: 0,
width: ScreenWidth,
height: ScreenHeight,
backgroundColor: 'black',
opacity: 0.5}} /> : null
}
</View>
);
}
问题补充: 今天测试发现,如果在登录出错或者网络不好时,点击了cancel并没有返回到应用中来,这个问题需要在login函数的error中加入一段代码,主要是检测到error之后,使用导航将google登录页面pop出去即可:
-(void)signIn:(GIDSignIn *)signIn didSignInForUser:(GIDGoogleUser *)user withError:(NSError *)error
{
  if (error){//主要是下面这两句代码
    UINavigationController* ui = [[UIApplication sharedApplication] valueForKeyPath:@"delegate.navigationController"];
    [ui popViewControllerAnimated:YES];
    //...
  }else{
    //...
  }
}如果觉得我的文章对您有用,请随意打赏。你的支持将鼓励我继续创作!