社区微信群开通啦,扫一扫抢先加入社区官方微信群

社区微信群
首先MQTT是啥子东西?新的项目要用到这个,不过我之前从来没有听说过啊。

没办法,许多事情是不能等你准备就绪才可以去做的,生活就是这样。

好了,接下来通过上网查阅资料,关于MQTT的初步认识已经形成了,下面是摘录的一些介绍:
轮询:客户端定时向服务器请求数据。伪推送。缺点:费电,费流量。
拦截短信消息。服务器需要向客户端发通知时,发送一条短信,客户端收到特定短信之后,先获取信息,然后拦截短信。伪推送。缺点:贵而且短信可能被安全软件拦截。
持久连接(Push)方式:客户端和服务器之间建立长久连接。真正的推送。
Google的C2DM(Cloudto Device Messaging)。需要科学上网,国内大多数用户无法使用。
XMPP。XMPP(可扩展通讯和表示协议)是基于可扩展标记语言(XML)的协议。androidpn是一个基于XMPP协议的java开源Android push notification实现。它包含了完整的客户端和服务器端。
MQTT。MQTT是一个轻量级的消息发布/订阅协议,它是实现基于手机客户端的消息推送服务器的理想解决方案。
客户机较小并且 MQTT 协议高效地使用网络带宽,在这个意义上,其为轻量级。MQTT 协议支持可靠的传送和即发即弃的传输。 在此协议中,消息传送与应用程序脱离。 脱离应用程序的程度取决于写入 MQTT 客户机和 MQTT 服务器的方式。脱离式传送能够将应用程序从任何服务器连接和等待消息中解脱出来。 交互模式与电子邮件相似,但在应用程序编程方面进行了优化。
协议具有许多不同的功能:
它针对消息传送提供三种服务质量:
重复或丢失消息可能会导致不便或收取错误费用。
关于服务器这块,大家就自行查阅资料吧(毕竟这一块是后端负责的) 
可以参考下面的文章:
【MQTT】在Windows下搭建MQTT服务器
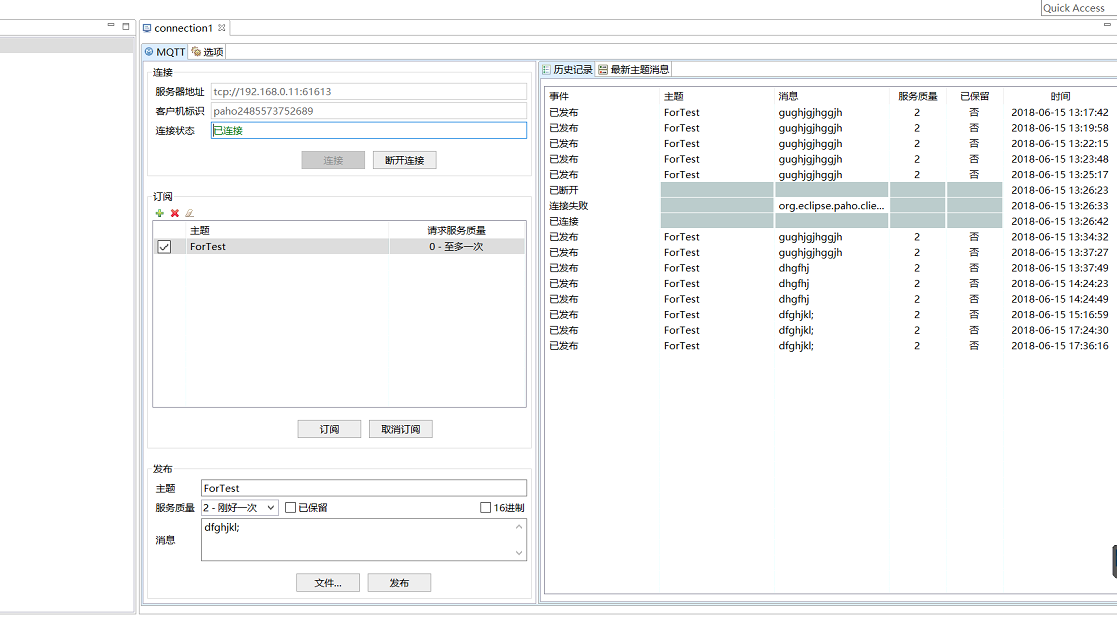
可以使用时候大概就是这样子的:
图一:
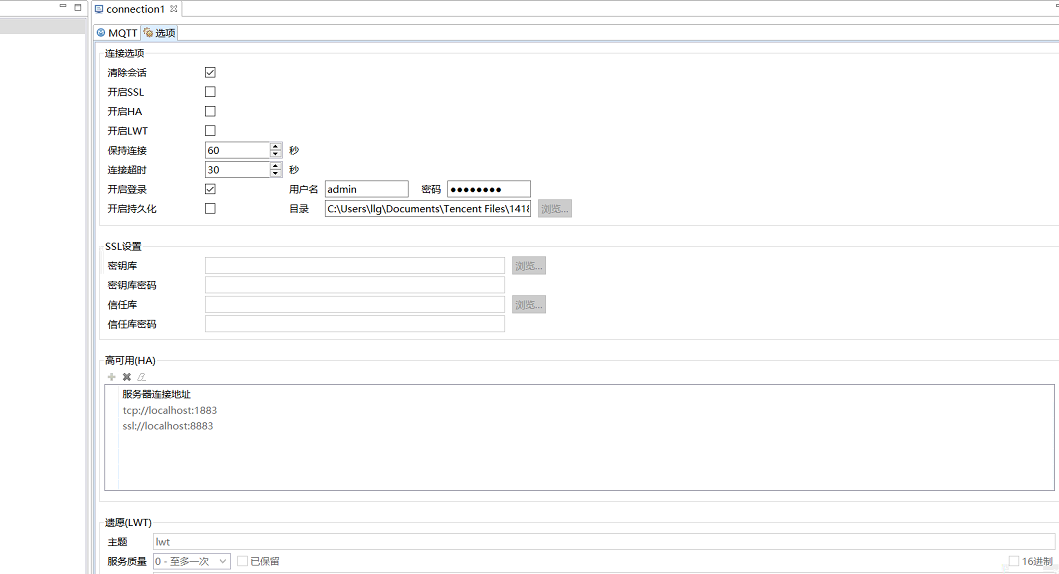
图二:
好了,接下来就开始准备去使用了!
在使用之前,配置android端的mqtt需要下面这些参数:
好了,了解上面这些参数后,然后就是配置android中的mqtt相关库了。
在项目根目录下的build.gradle中添加:
repositories {
    maven {
        url "https://repo.eclipse.org/content/repositories/paho-releases/"
    }
}
然后在app目录下的build.gradle中添加:
dependencies {
    compile 'org.eclipse.paho:org.eclipse.paho.android.service:1.1.1'
    compile 'org.eclipse.paho:org.eclipse.paho.client.mqttv3:1.1.1'
}在AndroidManifest.xml中添加:
    <uses-permission android:name="android.permission.WAKE_LOCK" />
    <uses-permission android:name="android.permission.WRITE_EXTERNAL_STORAGE" />
    <uses-permission android:name="android.permission.ACCESS_NETWORK_STATE" />
    <uses-permission android:name="android.permission.READ_PHONE_STATE" />
    <uses-permission android:name="android.permission.READ_EXTERNAL_STORAGE" />
<uses-permission android:name="android.permission.INTERNET" />同样是在AndroidManifest.xml中添加:
    <!-- Mqtt服务 -->
    <service android:name="org.eclipse.paho.android.service.MqttService" />
OK,上面这些都完成后,就是具体的实现了:
我们可以把MQTTD的配置放入Service中去,所以需要创建一个Service,Android studio中可以快捷创建Service,具体操作是【File→New→Service→Service】。
这样会自动在AndroidManifest.xml声明该服务,如果你是通过创建Java类的方式创建服务的,千万别忘了在AndroidManifest.xml中进行声明。
下面是Service的代码:
public class MQTTService extends Service {

    public static final String TAG = MQTTService.class.getSimpleName();

    private static MqttAndroidClient client;
    private MqttConnectOptions conOpt;

    private String host = "tcp://192.168.0.11:61613";
    private String userName = "admin";
    private String passWord = "password";
    private static String myTopic = "ForTest";      //要订阅的主题
    private String clientId = "androidId";//客户端标识
    private IGetMessageCallBack IGetMessageCallBack;


    @Override
    public void onCreate() {
        super.onCreate();
        Log.e(getClass().getName(), "onCreate");
        init();
    }

    public static void publish(String msg){
        String topic = myTopic;
        Integer qos = 0;
        Boolean retained = false;
        try {
            if (client != null){
                client.publish(topic, msg.getBytes(), qos.intValue(), retained.booleanValue());
            }
        } catch (MqttException e) {
            e.printStackTrace();
        }
    }

    private void init() {
        // 服务器地址(协议+地址+端口号)
        String uri = host;
        client = new MqttAndroidClient(this, uri, clientId);
        // 设置MQTT监听并且接受消息
        client.setCallback(mqttCallback);

        conOpt = new MqttConnectOptions();
        // 清除缓存
        conOpt.setCleanSession(true);
        // 设置超时时间,单位:秒
        conOpt.setConnectionTimeout(10);
        // 心跳包发送间隔,单位:秒
        conOpt.setKeepAliveInterval(20);
        // 用户名
        conOpt.setUserName(userName);
        // 密码
        conOpt.setPassword(passWord.toCharArray());     //将字符串转换为字符串数组

        // last will message
        boolean doConnect = true;
        String message = "{"terminal_uid":"" + clientId + ""}";
        Log.e(getClass().getName(), "message是:" + message);
        String topic = myTopic;
        Integer qos = 0;
        Boolean retained = false;
        if ((!message.equals("")) || (!topic.equals(""))) {
            // 最后的遗嘱
            // MQTT本身就是为信号不稳定的网络设计的,所以难免一些客户端会无故的和Broker断开连接。
            //当客户端连接到Broker时,可以指定LWT,Broker会定期检测客户端是否有异常。
            //当客户端异常掉线时,Broker就往连接时指定的topic里推送当时指定的LWT消息。

            try {
                conOpt.setWill(topic, message.getBytes(), qos.intValue(), retained.booleanValue());
            } catch (Exception e) {
                Log.i(TAG, "Exception Occured", e);
                doConnect = false;
                iMqttActionListener.onFailure(null, e);
            }
        }

        if (doConnect) {
            doClientConnection();
        }

    }


    @Override
    public void onDestroy() {
        stopSelf();
        try {
            client.disconnect();
        } catch (MqttException e) {
            e.printStackTrace();
        }
        super.onDestroy();
    }

    /** 连接MQTT服务器 */
    private void doClientConnection() {
        if (!client.isConnected() && isConnectIsNormal()) {
            try {
                client.connect(conOpt, null, iMqttActionListener);
            } catch (MqttException e) {
                e.printStackTrace();
            }
        }

    }

    // MQTT是否连接成功
    private IMqttActionListener iMqttActionListener = new IMqttActionListener() {

        @Override
        public void onSuccess(IMqttToken arg0) {
            Log.i(TAG, "连接成功 ");
            try {
                // 订阅myTopic话题
                client.subscribe(myTopic,1);
            } catch (MqttException e) {
                e.printStackTrace();
            }
        }

        @Override
        public void onFailure(IMqttToken arg0, Throwable arg1) {
            arg1.printStackTrace();
            // 连接失败,重连
        }
    };

    // MQTT监听并且接受消息
    private MqttCallback mqttCallback = new MqttCallback() {

        @Override
        public void messageArrived(String topic, MqttMessage message) throws Exception {

            String str1 = new String(message.getPayload());
            if (IGetMessageCallBack != null){
                IGetMessageCallBack.setMessage(str1);
            }
            String str2 = topic + ";qos:" + message.getQos() + ";retained:" + message.isRetained();
            Log.i(TAG, "messageArrived:" + str1);
            Log.i(TAG, str2);
        }

        @Override
        public void deliveryComplete(IMqttDeliveryToken arg0) {

        }

        @Override
        public void connectionLost(Throwable arg0) {
            // 失去连接,重连
        }
    };

    /** 判断网络是否连接 */
    private boolean isConnectIsNormal() {
        ConnectivityManager connectivityManager = (ConnectivityManager) this.getApplicationContext()
                .getSystemService(Context.CONNECTIVITY_SERVICE);
        NetworkInfo info = connectivityManager.getActiveNetworkInfo();
        if (info != null && info.isAvailable()) {
            String name = info.getTypeName();
            Log.i(TAG, "MQTT当前网络名称:" + name);
            return true;
        } else {
            Log.i(TAG, "MQTT 没有可用网络");
            return false;
        }
    }


    @Override
    public IBinder onBind(Intent intent) {
        Log.e(getClass().getName(), "onBind");
        return new CustomBinder();
    }

    public void setIGetMessageCallBack(IGetMessageCallBack IGetMessageCallBack){
        this.IGetMessageCallBack = IGetMessageCallBack;
    }

    public class CustomBinder extends Binder {
        public MQTTService getService(){
            return MQTTService.this;
        }
    }

    public  void toCreateNotification(String message){
        PendingIntent pendingIntent = PendingIntent.getActivity(this, 1, new Intent(this,MQTTService.class), PendingIntent.FLAG_UPDATE_CURRENT);
        NotificationCompat.Builder builder = new NotificationCompat.Builder(this);//3、创建一个通知,属性太多,使用构造器模式

        Notification notification = builder
                .setTicker("测试标题")
                .setSmallIcon(R.mipmap.ic_launcher)
                .setContentTitle("")
                .setContentText(message)
                .setContentInfo("")
                .setContentIntent(pendingIntent)//点击后才触发的意图,“挂起的”意图
                .setAutoCancel(true)        //设置点击之后notification消失
                .build();
        NotificationManager notificationManager = (NotificationManager) getSystemService(NOTIFICATION_SERVICE);
        startForeground(0, notification);
        notificationManager.notify(0, notification);

    }
}
之前看过的博客中都是通过startService去启动服务的,这里改成了通过BindService去启动服务,所以没有onStartCommond方法。
同时,当获取从服务器推送过来的消息时,是使用回调去更新UI,这样做是为了方便代码的迁移。
上面的代码中还需要注意一个MqttAndroidClient.publish()方法,相当于服务器发布一个消息。
下面是回调接口:
public interface IGetMessageCallBack {
    public void setMessage(String message);
}
为了实现通过这个回调去传递从服务端获取到的消息,我们需要实现一个ServiceConnection类,并且通过onBind来从Service和Activity之间传递数据:
public class MyServiceConnection implements ServiceConnection {

    private MQTTService mqttService;
    private IGetMessageCallBack IGetMessageCallBack;

    @Override
    public void onServiceConnected(ComponentName componentName, IBinder iBinder) {
        mqttService = ((MQTTService.CustomBinder)iBinder).getService();
        mqttService.setIGetMessageCallBack(IGetMessageCallBack);
    }

    @Override
    public void onServiceDisconnected(ComponentName componentName) {

    }

    public MQTTService getMqttService(){
        return mqttService;
    }

    public void setIGetMessageCallBack(IGetMessageCallBack IGetMessageCallBack){
        this.IGetMessageCallBack = IGetMessageCallBack;
    }
}
最后就是测试环节的代码了:
public class MainActivity extends AppCompatActivity implements IGetMessageCallBack {

    private TextView textView;
    private Button button;
    private MyServiceConnection serviceConnection;
    private MQTTService mqttService;

    @Override
    protected void onCreate(Bundle savedInstanceState) {
        super.onCreate(savedInstanceState);
        setContentView(R.layout.activity_main);

        textView = (TextView) findViewById(R.id.text);
        button = (Button) findViewById(R.id.button);

        serviceConnection = new MyServiceConnection();
        serviceConnection.setIGetMessageCallBack(MainActivity.this);

        Intent intent = new Intent(this, MQTTService.class);

        bindService(intent, serviceConnection, Context.BIND_AUTO_CREATE);


        button.setOnClickListener(new View.OnClickListener() {
            @Override
            public void onClick(View view) {
                MQTTService.publish("测试一下子");
            }
        });
    }

    @Override
    public void setMessage(String message) {
        textView.setText(message);
        mqttService = serviceConnection.getMqttService();
        mqttService.toCreateNotification(message);
    }

    @Override
    protected void onDestroy() {
        unbindService(serviceConnection);
        super.onDestroy();
    }
}
最后,看一下效果吧,界面的代码就不贴出来了,就是一个Button和TextView:
如果觉得我的文章对您有用,请随意打赏。你的支持将鼓励我继续创作!