社区微信群开通啦,扫一扫抢先加入社区官方微信群

社区微信群
spring boot分页显示数据(1)
记录一下~
我们从简入繁,先使用一种通过页面刷新来实现分页数据展示的方法~
下面是一个简单的栗子
使用工具:spring-data-jpa,thymeleaf
实体类: 实体类中不要忘记定义空的构造方法哦~否则会出错
package com.example.demo.domain;

import javax.persistence.Entity;
import javax.persistence.GeneratedValue;
import javax.persistence.Id;
import javax.persistence.Table;

/**
 * Created by 18274 on 2017/9/18.
 */
@Entity
public class Person {
    @Id
    @GeneratedValue
    private Long id;
    private String name;
    public Person(){}

    public Long getId() {
        return id;
    }

    public String getName() {
        return name;
    }

    public void setId(Long id) {
        this.id = id;
    }

    public void setName(String name) {
        this.name = name;
    }
}
PersonRepository类
package com.example.demo.dao;

import com.example.demo.domain.Person;
import org.springframework.data.jpa.repository.JpaRepository;

import java.util.List;

/**
 * Created by 18274 on 2017/9/18.
 */
public interface PersonRepository extends JpaRepository<Person,Long>{
        List<Person> findByIdBetween(long id1,long id2);

}
Control控制层:
测试页面中我们设置了每页展示的数据条数为5条,可以根据需求在
long top1=top/5+1 中进行修改,比如改为long top1=top/6+1,则页面最多显示的数据条数将变为6条
package com.example.demo.control;

import com.example.demo.dao.PersonRepository;
import com.example.demo.domain.Person;
import org.springframework.beans.factory.annotation.Autowired;
import org.springframework.stereotype.Controller;
import org.springframework.ui.Model;
import org.springframework.web.bind.annotation.RequestMapping;
import org.springframework.web.bind.annotation.RequestMethod;
import org.springframework.web.bind.annotation.RequestParam;
import org.springframework.web.bind.annotation.ResponseBody;

import java.util.ArrayList;
import java.util.List;

/**
 * Created by 18274 on 2017/9/18.
 */
@Controller
public class Control {
    @Autowired
    PersonRepository personRepository;
    @RequestMapping(value="/fenye")
    public String fenye(@RequestParam(value="number",defaultValue = "1") long number,
                        Model model){
        List<Person> person=personRepository.findAll();
        long top=(long) person.size();
        long top1=top/5+1;
        if(number==0)
            number=1L;
        if(number==top1+1)
            number=top1;
        long di=(number-1)*5+1;
        long gao=number*5;
        List<Person> persons=personRepository.findByIdBetween(di,gao);
        model.addAttribute("persons",persons);
        model.addAttribute("number",number);
        model.addAttribute("top1",top1);
        System.out.println(number);
        return "fenye";
    }
}
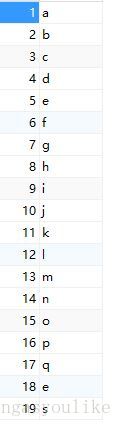
MySql数据库中对应的Person表
fenye.html
<!DOCTYPE html>
<html lang="en" xmlns:th="http://www.thymeleaf.org">
<head>
<meta charset="UTF-8"/>
<title>Title</title>
</head>
<body>
<ul class="list-group">
<li class="list-group-item" th:each="person:${persons}">
<span th:text="${person.name}"></span>
</li>
</ul>
<div>
<!--页码-->
<a th:href="@{/fenye(number=1)}">1</a>
<a th:href="@{/fenye(number=2)}">2</a>
<a th:href="@{/fenye(number=3)}">3</a>
<span th:if="${number} ge 10">...</span>
<span th:each="i :${#numbers.sequence(1,top1)}">
<a th:if="(${i} le ${number}+3 and ${i} le ${top1}-3) and (${i} ge ${number}-3 and ${i} ge 4)" th:href="@{/fenye(number=${i})}" th:text="${i}"></a>
</span>
<span th:if="${number} le ${top1}-10">...</span>
<a th:href="@{/fenye(number=${top1}-2)}" th:text="${top1}-2">1</a>
<a th:href="@{/fenye(number=${top1}-1)}" th:text="${top1}-1">1</a>
<a th:href="@{/fenye(number=${top1})}" th:text="${top1}"></a>
<a th:href="@{/fenye(number=${number}-1)}">上一页</a>
<a th:href="@{/fenye(number=${number}+1)}">下一页</a>
</div>
</body>
</html>
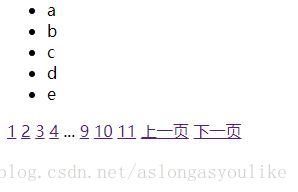
<!--分页显示数据-->生成页面展示:
页面做的很简单~没有添加样式~
页面中的页码是通过thymeleaf来实现的,设计的比较简单~
如果觉得我的文章对您有用,请随意打赏。你的支持将鼓励我继续创作!