社区微信群开通啦,扫一扫抢先加入社区官方微信群

社区微信群
JRBM项目中无论是好友私聊,公开聊天室,还是比赛平台都需要用到长连接,之前没有接触过网络通信等知识,更别说框架了,因此直接上手netty确实有些困难,在前期主要是在b站上看(https://www.bilibili.com/video/av26415011)这个视频,但是一些名词根本没有接触过,看着代码也只能照着敲,根本不知道网络通信是什么原理,什么是http协议,什么是socket,什么是编解码等,于是跟着敲了几节课的代码之后准备从实际项目入手,于是看了(https://www.bilibili.com/video/av16767113)这个聊天室的搭建,至少明白了聊天室的基本结构,然后再入手了《Netty权威指南2》,基本了解了Netty的各个组件的基本用法和基本含义,于是花了两天时间从头搭建了一个能够群聊和私聊的聊天室,仅仅代表本人的粗浅理解,也希望能帮助小白入门,大佬绕行!
开发环境:android+javaweb,前端(客户端)使用android studio,后端(服务端)使用idea
所需jar包:
主要是三个:
netty的jar包,直接去官网(https://netty.io/)下载最新即可,然后只要压缩包中的netty-all-4.1.29.Final即可
messagepack的jar包,去这个链接(http://repo1.maven.org/maven2/org/msgpack/msgpack/0.6.12/)直接下载msgpack-0.6.12.jar
javassist的jar包,去这个链接(https://github.com/jboss-javassist/javassist/releases)下载最新版的jar包
这三个jar包的作用是,netty负责通信的整体框架,messagepack负责消息的编码和解码,javassist在编解码中需要用到
创建一个web项目(也可以是javase项目),虽然我写的时候用到了spring,但是这篇文章中就不用spring来管理类了
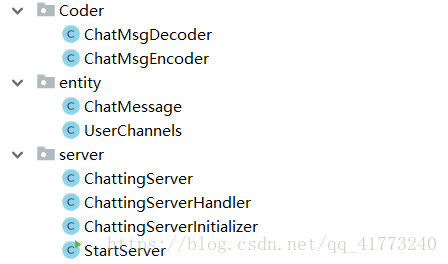
首先看一下项目的结构,
一共三个包,Coder包放编码和解码器的类,entity包放两个实体类,一个是消息的实体类,所有消息都会被包装成这个ChatMessage类,便于读取,UserChannels用于放当前在线的用户的用户名和其channel地址,这样私聊的时候就可以通过用户名调用目标用户的channel进行消息传送,server包中的类前三个是netty创建连接通道需要用到的比较固定的类,StartServer用于启动服务器。
接下来是服务端搭建的步骤:
我们希望传输的数据不仅是简简单单的一个字符串,而是一个有很多信息的实体,因此我们创建一个实体模板,所有的消息都被解码包装成这个类,然后直接对这个类的对象进行读写操作即可
import org.msgpack.annotation.Index;
import org.msgpack.annotation.Message;

//消息实体,协议
@Message
public class ChatMessage {
    @Index(0)
    private String sendUser;
    @Index(1)
    private String receiveUser;
    @Index(2)
    private String message;
    @Index(3)
    private int messagetype;//1:初始化认证消息,2:聊天消息

    public ChatMessage() {
    }

    public ChatMessage(String sendUser, String receiveUser, String message, int messagetype){
        this.sendUser=sendUser;
        this.receiveUser=receiveUser;
        this.message=message;
        this.messagetype=messagetype;
    }

    public String getSendUser() {
        return sendUser;
    }

    public void setSendUser(String sendUser) {
        this.sendUser = sendUser;
    }

    public String getReceiveUser() {
        return receiveUser;
    }

    public void setReceiveUser(String receiveUser) {
        this.receiveUser = receiveUser;
    }

    public String getMessage() {
        return message;
    }

    public void setMessage(String message) {
        this.message = message;
    }

    public int getMessagetype() {
        return messagetype;
    }

    public void setMessagetype(int messagetype) {
        this.messagetype = messagetype;
    }

    @Override
    public String toString() {
        return "ChatMessage{" +
                "sendUser='" + sendUser + ''' +
                ", receiveUser='" + receiveUser + ''' +
                ", message='" + message + ''' +
                '}';
    }
}
这个类包含了发送消息的用户、接受消息的用户、消息的内容、消息的类型,分别生成他们的get和set方法,并且为了方便调试,生成他的tostring方法。
1.在这个实体类之前加上@message注解,并且创建他的无参构造函数!!!否则消息是无法被序列化编码再传出去的!!!!!(详情见https://github.com/msgpack/msgpack-java/issues/226)
2.在成员变量前添加@index()标签,以表明数据的顺序,否则会出现类似这样的错误org.msgpack.MessageTypeException:Expected array, but got raw value
这两步非常非常关键,我也是在这两步卡了很久,网上资料比较少,找了很久才查出的原因,所以重点提示!
我们需要把一个ChatMessage编码成字节在通道中进行发送传输,并在接受时用解码器将字节流解码成ChatMessage对象,因此创建两个工具类用于编解码
首先是编码器,让他继承MessageToByteEncoder并指定实体类模板作为泛型,重写encode方法,将创建的ChatMessage对象编码为字节
import com.jrbm.chatting.entity.ChatMessage;
import io.netty.buffer.ByteBuf;
import io.netty.channel.ChannelHandlerContext;
import io.netty.handler.codec.MessageToByteEncoder;
import org.msgpack.MessagePack;

public class ChatMsgEncoder extends MessageToByteEncoder<ChatMessage> {
    @Override
    protected void encode(ChannelHandlerContext channelHandlerContext, ChatMessage chatMessage, ByteBuf byteBuf) throws Exception {
        MessagePack msgpack=new MessagePack();
        byte[] msg=msgpack.write(chatMessage);
        byteBuf.writeBytes(msg);
    }
}
然后是解码器,让其继承MessageToMessageDecoder并指定接受参数泛型为ByteBuf,重新decode方法,将字节流解码为一个ChatMessage对象。
import com.jrbm.chatting.entity.ChatMessage;
import io.netty.buffer.ByteBuf;
import io.netty.channel.ChannelHandlerContext;
import io.netty.handler.codec.MessageToMessageDecoder;
import org.msgpack.MessagePack;

import java.util.List;

public class ChatMsgDecoder extends MessageToMessageDecoder<ByteBuf> {
    @Override
    protected void decode(ChannelHandlerContext channelHandlerContext, ByteBuf byteBuf, List<Object> list) throws Exception {
        final int length=byteBuf.readableBytes();
        final byte[] array=new byte[length];
        byteBuf.getBytes(byteBuf.readerIndex(),array,0,length);
        list.add(new MessagePack().read(array, ChatMessage.class));
    }
}
至此,一些需要的工具类都已经创建完毕。
这里直接在主函数中创建一个ChattingServer对象,并调用其startServer方法启动服务,ChattingServer类后面会创建
public class StartServer {
    public static void main(String[] args) {
        ChattingServer cs= new ChattingServer();
        cs.startServer();
    }
}
public class ChattingServer {

    private final int port = 8888;

    public void startServer() {

        EventLoopGroup bossGroup=new NioEventLoopGroup();
        EventLoopGroup workerGroup=new NioEventLoopGroup();


        try {
            ServerBootstrap bootstrap=new ServerBootstrap();
            bootstrap.group(bossGroup, workerGroup)
                    .channel(NioServerSocketChannel.class)
                    .option(ChannelOption.SO_BACKLOG, 1024)
                    .option(ChannelOption.SO_KEEPALIVE, true)
                    .childHandler(new ChattingServerInitializer());
            ChannelFuture channelFuture = bootstrap.bind(port).sync();
            System.out.println("服务器已启动!");
            channelFuture.channel().closeFuture().sync();
        } catch (InterruptedException e) {
            e.printStackTrace();
        } finally {
            bossGroup.shutdownGracefully();
            workerGroup.shutdownGracefully();
        }
    }
}
这段代码无论是官方文档还是视频教程还是书上基本都可以看到,就不详细解释了,都是些固定流程
public class ChattingServerInitializer extends ChannelInitializer<SocketChannel> {
    @Override
    protected void initChannel(SocketChannel socketChannel) throws Exception {
        ChannelPipeline pipeline=socketChannel.pipeline();

        pipeline.addLast("frameDecoder", new LengthFieldBasedFrameDecoder(65536, 0, 2, 0, 2));
        pipeline.addLast("msgpack decoder",new ChatMsgDecoder());
        pipeline.addLast("frameEncoder", new LengthFieldPrepender(2));
        pipeline.addLast("msgpack encoder",new ChatMsgEncoder());

        pipeline.addLast("handler",new ChattingServerHandler());
    }
}
这里在进入真正的业务处理类ChattingServerHandler之前需要对信息进行编码/解码以及处理半包的消息
import io.netty.channel.Channel;
import java.util.HashMap;
import java.util.Map;

public class UserChannels {


    private Map<String, Channel> onlineUsers=new HashMap<String,Channel>();
    public void addOnlineUser(String username,Channel channel){
        onlineUsers.put(username,channel);
    }
    public void removeOnlineUser(String username){
        onlineUsers.remove(username);
    }
    public void removeChannel(Channel channel){
        for (Map.Entry<String, Channel> entry : onlineUsers.entrySet()) {
            if(entry.getValue()==channel){
                onlineUsers.remove(entry.getKey());
            }
        }
    }
    public Channel getChannel(String username){
        return onlineUsers.get(username);
    }
    public Map<String, Channel> getOnlineUsers() {
        return onlineUsers;
    }

}
我们将连接到服务器的用户的用户名和其对应的通道存储到Map中,并提供通过用户名查找通道的方法,这样就可以实现私聊了
import com.jrbm.chatting.entity.ChatMessage;
import com.jrbm.chatting.entity.UserChannels;
import io.netty.channel.*;
import io.netty.channel.group.ChannelGroup;
import io.netty.channel.group.DefaultChannelGroup;
import io.netty.util.concurrent.GlobalEventExecutor;

import java.util.Map;

public class ChattingServerHandler extends ChannelInboundHandlerAdapter{
    public static ChannelGroup channels=new DefaultChannelGroup(GlobalEventExecutor.INSTANCE);
    public static UserChannels uc=new UserChannels();
    //新客户端进入时,将其加入channel队列
    @Override
    public void handlerAdded(ChannelHandlerContext ctx) throws Exception {
        Channel newchannel=ctx.channel();
        System.out.println("欢迎新客户端:"+newchannel.remoteAddress());
        for(Channel ch:channels){
            if(ch!=newchannel){
                ch.writeAndFlush("欢迎新客户端:"+newchannel.remoteAddress());
            }
        }
        channels.add(newchannel);
    }

    //有客户端断开连接后,将其移出队列
    @Override
    public void handlerRemoved(ChannelHandlerContext ctx) throws Exception {
        Channel newchannel =ctx.channel();
        for(Channel ch:channels) {
            if (ch != newchannel) {
                ch.writeAndFlush(newchannel.remoteAddress() + "退出聊天室");
            }
        }
        channels.remove(newchannel);

    }

    //如果有客户端有写数据,则转发给其他人

    @Override
    public void channelRead(ChannelHandlerContext ctx, Object msg) throws Exception {
        Channel newchannel=ctx.channel();
        ChatMessage cmsg=(ChatMessage)msg;
        for (Map.Entry<String, Channel> entry : uc.getOnlineUsers().entrySet()) {
            System.out.println("Key = " + entry.getKey() + ", Value = " + entry.getValue());
        }
        if(cmsg.getMessagetype()==1){//如果是初始化认证消息,则将该用户加入在线用户
            uc.addOnlineUser(cmsg.getSendUser(),newchannel);
            System.out.println(uc.getOnlineUsers());
            ChatMessage cmwarning=new ChatMessage("服务器", cmsg.getSendUser(),"欢迎你,"+cmsg.getSendUser() ,2);
            newchannel.writeAndFlush(cmwarning);
        }else if(cmsg.getMessagetype()==2){//如果是聊天消息,则判断发送的对象

            if(cmsg.getReceiveUser().equals("")){//发给所有人
                for(Channel ch:channels) {
                    ch.writeAndFlush(cmsg);
                }
            }else{//发给指定用户
                System.out.println("666"+uc.getChannel(cmsg.getReceiveUser()).remoteAddress());
                if(uc.getChannel(cmsg.getReceiveUser())==null){
                    ChatMessage cmwarning=new ChatMessage("服务器", cmsg.getSendUser(),"该用户不在线!" ,2);
                    newchannel.writeAndFlush(cmwarning);
                }else{
                    uc.getChannel(cmsg.getReceiveUser()).writeAndFlush(cmsg);
                }

            }
        }
    }


    //服务器监听到客户端活动时
    @Override
    public void channelActive(ChannelHandlerContext ctx) throws Exception {
        Channel newchannel=ctx.channel();
        System.out.println("["+newchannel.remoteAddress()+"]:在线");
    }

    @Override
    public void channelInactive(ChannelHandlerContext ctx) throws Exception {
        Channel newchannel=ctx.channel();
        System.out.println("["+newchannel.remoteAddress()+"]:离线了");
        uc.removeChannel(ctx.channel());
    }

    @Override
    public void exceptionCaught(ChannelHandlerContext ctx, Throwable cause) throws Exception {
        Channel newchannel=ctx.channel();
        System.out.println("["+newchannel.remoteAddress()+"]:通讯异常");
        System.out.println(cause.getMessage());
        newchannel.close();
    }
}
在开头先定义两个静态变量供方法使用,一个是channels,他负责将每个连接到服务器的channel放入channelgroup中,另一个是uc,也就是UserChannels的实例化对象,用于私聊使用。
然后主要讲一下channelread中的逻辑,当channel获取到客户端发来的消息后,先将获取的msg转化为ChatMessage对象,然后通过getMessageType方法判断发来的是初始化认证消息还是聊天消息(客户端连接时会发来认证消息),如果是认证消息,就将客户端的用户名和channel存入UserChannels的map中,并向客户端返回一条欢迎消息,如果是聊天消息, 那么再判断是私聊还是公开,这里默认receiveUser是空的时候发送给所有人,非空的时候就是私聊,发给所有人就遍历所有channel,依次放松消息,私聊就通过用户名从UserChannels的map中找到对应的channel并发送消息,如果map中没有该人的channel则返回“该用户不在线”。
至此,聊天室的服务端就搭建完毕了!
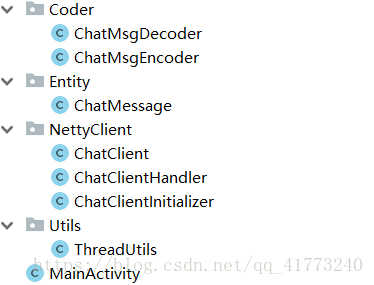
创建一个安卓项目,我这里的名字是NettyChattingRoomAndroid,依然先看一下目录结构
Coder包和Entity包同服务端的一样,直接复制过来即可,然后是客户端的三个类, 以及用于切换线程的工具类(该本文没有使用该工具类)。
客户端和服务端的编写基本一致,下面直接放NettyClient包下的三个类的代码
import com.jrsports.nettychattingroomandroid.Entity.ChatMessage;

import io.netty.bootstrap.Bootstrap;
import io.netty.channel.ChannelFuture;
import io.netty.channel.EventLoopGroup;
import io.netty.channel.nio.NioEventLoopGroup;
import io.netty.channel.socket.nio.NioSocketChannel;

import java.io.IOException;


public class ChatClient {
    private String host;
    private int port;
    private ChannelFuture channelFuture;
    public ChatClient(String host,int port){
        this.host=host;
        this.port=port;
    }

    public void start() throws IOException {
        EventLoopGroup workGroup=new NioEventLoopGroup();
        try {
        Bootstrap bootstrap=new Bootstrap();
        bootstrap.group(workGroup)
                .channel(NioSocketChannel.class)
                .handler(new ChatClientInitializer());
            channelFuture=bootstrap.connect(host,port).sync();
            System.out.println("已连接到服务器!");

            channelFuture.channel().closeFuture().sync();
            System.out.println("已从服务器断开!");
        } catch (InterruptedException e) {
            e.printStackTrace();
        }finally {
            workGroup.shutdownGracefully();
        }

    }
    public void sendMsg(ChatMessage cmsg){
        System.out.println(cmsg.toString());
            channelFuture.channel().writeAndFlush(cmsg);
    }

}
import com.jrsports.nettychattingroomandroid.Coder.ChatMsgDecoder;
import com.jrsports.nettychattingroomandroid.Coder.ChatMsgEncoder;

import io.netty.channel.ChannelInitializer;
import io.netty.channel.ChannelPipeline;
import io.netty.channel.socket.SocketChannel;
import io.netty.handler.codec.LengthFieldBasedFrameDecoder;
import io.netty.handler.codec.LengthFieldPrepender;

public class ChatClientInitializer extends ChannelInitializer<SocketChannel> {
    @Override
    protected void initChannel(SocketChannel channel) throws Exception {
        ChannelPipeline pipeline=channel.pipeline();//建立管道

        pipeline.addLast("frameDecoder", new LengthFieldBasedFrameDecoder(65536, 0, 2, 0, 2));
        pipeline.addLast("msgpack decoder",new ChatMsgDecoder());
        pipeline.addLast("frameEncoder", new LengthFieldPrepender(2));
        pipeline.addLast("msgpack encoder",new ChatMsgEncoder());

        pipeline.addLast("handler",new ChatClientHandler());

    }
}
import android.os.Bundle;
import android.os.Message;
import com.jrsports.nettychattingroomandroid.Entity.ChatMessage;
import com.jrsports.nettychattingroomandroid.MainActivity;
import io.netty.channel.Channel;
import io.netty.channel.ChannelHandlerContext;
import io.netty.channel.ChannelInboundHandlerAdapter;

import static com.jrsports.nettychattingroomandroid.MainActivity.SHOW_MSG;

public class ChatClientHandler extends ChannelInboundHandlerAdapter {

    @Override
    public void channelActive(ChannelHandlerContext ctx) throws Exception {
        ChatMessage msg=new ChatMessage(MainActivity.username, "服务器","认证消息!" ,1);
        System.out.println(msg);
        ctx.channel().writeAndFlush(msg);
    }


    @Override
    public void channelRead(ChannelHandlerContext ctx, Object msg) throws Exception {
        String strmsg="";
        ChatMessage cmsg=(ChatMessage)msg;
        if(cmsg.getReceiveUser().equals("")){//发给所有人
            strmsg="[全体-"+cmsg.getSendUser()+":]"+cmsg.getMessage();
        }else{//发给指定用户
            strmsg="[私聊-"+cmsg.getSendUser()+":]"+cmsg.getMessage();

        }
        Message message=new Message();
        message.what=SHOW_MSG;
        Bundle bundle=new Bundle();
        bundle.putString("msg",strmsg);
        message.setData(bundle);
        MainActivity.getMainActivity().getMsghandler().sendMessage(message);
    }

    @Override
    public void exceptionCaught(ChannelHandlerContext ctx, Throwable cause) throws Exception {
        Channel newchannel=ctx.channel();
        System.out.println("["+newchannel.remoteAddress()+"]:通讯异常");
        System.out.println(cause.getMessage());
        newchannel.close();
    }
}
在channel激活的时候会触发channelactive方法,向服务端发送验证信息,以便让服务端记录在线用户,在读取到服务器传来的信息后通过handler将message传给主线程,并显示在textview中。
import android.os.Handler;
import android.os.Message;
import android.support.v7.app.AppCompatActivity;
import android.os.Bundle;
import android.view.View;
import android.widget.Button;
import android.widget.EditText;
import android.widget.TextView;

import com.jrsports.nettychattingroomandroid.Entity.ChatMessage;
import com.jrsports.nettychattingroomandroid.NettyClient.ChatClient;


import java.io.IOException;


public class MainActivity extends AppCompatActivity implements View.OnClickListener{

    public static String username;
    public static final int SHOW_MSG=1;
    private Button connectbtn;
    private Button sendbtn;
    private TextView messageview;
    private EditText editText;
    private EditText editsender;
    private EditText editreceiver;
    private ChatClient client;
    private static MainActivity mainActivity;
    public MainActivity(){
        mainActivity=this;
    }

    public static MainActivity getMainActivity() {
        return mainActivity;
    }

    @Override
    protected void onCreate(Bundle savedInstanceState) {
        super.onCreate(savedInstanceState);
        setContentView(R.layout.activity_main);
        connectbtn=(Button)findViewById(R.id.connectbtn);
        sendbtn=(Button)findViewById(R.id.sendbtn);
        messageview=(TextView)findViewById(R.id.messageview);
        editText=(EditText)findViewById(R.id.editmessage);
        editsender=(EditText)findViewById(R.id.editsender);
        editreceiver=(EditText)findViewById(R.id.editreceiver);
        connectbtn.setOnClickListener(this);
        sendbtn.setOnClickListener(this);


    }

    @Override
    public void onClick(View v) {
        if(v.getId()==R.id.connectbtn){
            System.out.println("连接服务器!");
            username=editsender.getText().toString();
            new Thread(){
                @Override
                public void run() {
                    connect();
                }
            }.start();

        }
        if(v.getId()==R.id.sendbtn){
            System.out.println("发送消息:"+editText.getText().toString());
            ChatMessage msg=new ChatMessage(editsender.getText().toString(), editreceiver.getText().toString(),editText.getText().toString() ,2);
            send(msg);
        }
    }
    public void connect(){
        try {
            client=new ChatClient("192.168.1.103",8888);
            client.start();

        } catch (IOException e) {
            e.printStackTrace();
        }
    }
    public void send(ChatMessage cmsg){
        client.sendMsg(cmsg);
    }

     private Handler msghandler=new Handler(){
        @Override
        public void handleMessage(Message msg) {
           if(msg.what==SHOW_MSG){
               messageview.setText(messageview.getText().toString()+msg.getData().getString("msg")+"n");
           }
        }
    };

    public Handler getMsghandler() {
        return msghandler;
    }
}
主类中主要是绑定连接和发送按钮的功能,并且添加handler接收子线程传来的数据,对ui进行操作。
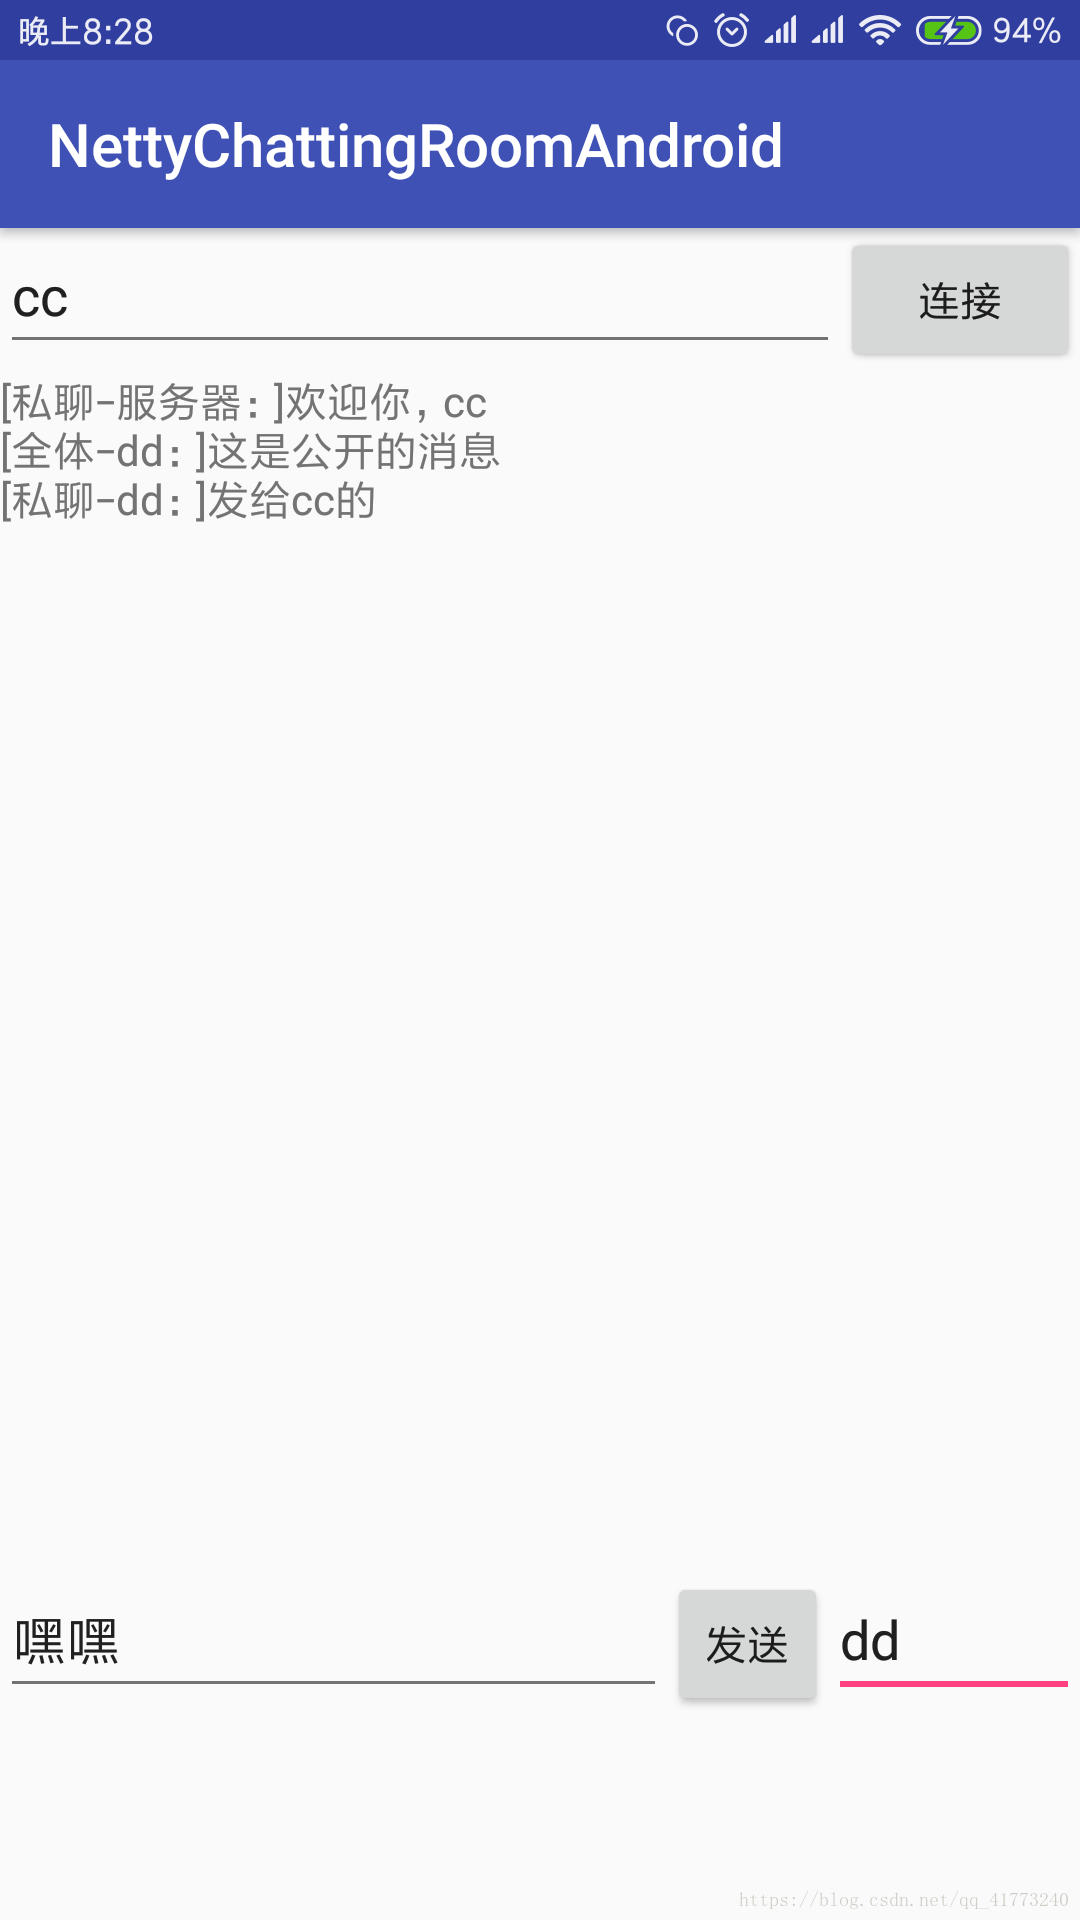
布局非常简单,输入用户名点击连接即可连接服务器,然后可以向全体或某个在线用户发送消息
<?xml version="1.0" encoding="utf-8"?>
<LinearLayout xmlns:android="http://schemas.android.com/apk/res/android"
    xmlns:tools="http://schemas.android.com/tools"
    android:layout_width="match_parent"
    android:layout_height="match_parent"
    android:orientation="vertical"
    tools:context=".MainActivity">

    <LinearLayout
        android:orientation="horizontal"
        android:layout_width="match_parent"
        android:layout_height="wrap_content">
        <EditText
            android:id="@+id/editsender"
            android:layout_width="match_parent"
            android:layout_height="wrap_content"
            android:layout_weight="2"
            />
        <Button
            android:id="@+id/connectbtn"
            android:layout_width="match_parent"
            android:layout_height="wrap_content"
            android:layout_weight="7"
            android:text="连接"
            />
    </LinearLayout>

    <TextView
        android:id="@+id/messageview"
        android:layout_width="match_parent"
        android:layout_height="400dp" />
    <LinearLayout
        android:orientation="horizontal"
        android:layout_width="match_parent"
        android:layout_height="wrap_content">

        <EditText
            android:id="@+id/editmessage"
            android:layout_width="match_parent"
            android:layout_height="wrap_content"
            android:layout_weight="4"/>
        <Button
            android:id="@+id/sendbtn"
            android:layout_width="wrap_content"
            android:layout_height="wrap_content"
            android:text="发送"
            android:layout_weight="1"
            />
        <EditText
            android:id="@+id/editreceiver"
            android:layout_width="match_parent"
            android:layout_height="wrap_content"
            android:layout_weight="8"/>
    </LinearLayout>


</LinearLayout>
大致就是这么个过程,中间参考了一些博主的文章
https://www.cnblogs.com/mymelody/p/5943427.html
https://blog.csdn.net/qq_20889581/article/details/50755449
其实网上的一些资料都是很零散的,需要靠自己一点一点拼起来,最后组成一个完整的项目,本文基本把像我这种小白第一次使用netty会遇到的麻烦都写上去了,供其他和我一样的新手作为参考,如果有错误的地方请多指教,一起学习,共同进步!
如果觉得我的文章对您有用,请随意打赏。你的支持将鼓励我继续创作!