社区微信群开通啦,扫一扫抢先加入社区官方微信群

社区微信群
redis是一种nosql无关系型缓存数据库,可以将一直需求不变的数据存放到redis中,redis底层是c语言编写,执行效率快,从redis中拿去数据比数据库中拿去数据更快!
上一次发的的是安装redis和可视化工具RedisDesktop,还没有安装的可以去看上一篇文章
https://blog.csdn.net/weixin_43890267/article/details/92770223
<dependencies>
        <!--整合springmvc-->
        <dependency>
            <groupId>org.springframework.boot</groupId>
            <artifactId>spring-boot-starter-web</artifactId>
        </dependency>
         <!--整合mysql-->
        <dependency>
            <groupId>mysql</groupId>
            <artifactId>mysql-connector-java</artifactId>
            <scope>runtime</scope>
        </dependency>
         <!--整合实体类getset方法-->
        <dependency>
            <groupId>org.projectlombok</groupId>
            <artifactId>lombok</artifactId>
            <optional>true</optional>
        </dependency>
         <!--单元测试-->
        <dependency>
            <groupId>org.springframework.boot</groupId>
            <artifactId>spring-boot-starter-test</artifactId>
            <scope>test</scope>
        </dependency>
         <!--整合Mybatis-Plus-->
        <dependency>
            <groupId>com.baomidou</groupId>
            <artifactId>mybatis-plus-boot-starter</artifactId>
            <version>3.1.1</version>
        </dependency>
         <!--整合redis-->
        <dependency>
            <groupId>org.springframework.boot</groupId>
            <artifactId>spring-boot-starter-data-redis</artifactId>
        </dependency>
    </dependencies>
spring:
  datasource:
    #数据库地址
    url: jdbc:mysql://localhost:3306/test?serverTimezone=GMT%2B8
    #用户名
    username: root
    #密码
    password: root
    #mysql驱动
    driver-class-name: com.mysql.cj.jdbc.Driver
  redis:
  #连接池
    jedis:
      pool:
      #最大连接个数
        max-active: 10
        #等待时间
        max-wait: 6000ms
        #最大空闲
        max-idle: 8
        #初始化最小
        min-idle: 5
        #操作第几个库
    database: 1
    #redis路径
    host: 192.168.7.127
mybatis-plus:
  configuration:
  #sql日志
    log-impl: org.apache.ibatis.logging.stdout.StdOutImpl
    map-underscore-to-camel-case: true
    #控制台打印加载
#debug: true
//开启缓存注解
@EnableCaching
@SpringBootApplication
@MapperScan("com.xxx.dao")
public class Demo01RedisApplication {

    public static void main(String[] args) {
        SpringApplication.run(Demo01RedisApplication.class, args);
    }

}
@Configuration
public class RedisConfig {
    //redis连接工厂
    private RedisConnectionFactory redisConnectionFactory;

    /*调用实例时使用*/
   @Bean
    public RedisTemplate<String, Serializable> redisTemplate(RedisConnectionFactory redisConnectionFactory){
        RedisTemplate<String,Serializable> redisTemplate = new RedisTemplate<String,Serializable>();
        redisTemplate.setKeySerializer(new GenericJackson2JsonRedisSerializer());
        redisTemplate.setValueSerializer(new GenericJackson2JsonRedisSerializer());
        redisTemplate.setHashKeySerializer(new GenericJackson2JsonRedisSerializer());// Hash key序列化
        redisTemplate.setHashValueSerializer(new GenericJackson2JsonRedisSerializer());// Hash value序列化
        redisTemplate.setConnectionFactory(redisConnectionFactory);
        return redisTemplate;
    }

    /*注解时使用*/
     /*@Bean
    public RedisCacheConfiguration redisCacheConfiguration(){
        RedisCacheConfiguration redisCacheConfiguration = RedisCacheConfiguration.defaultCacheConfig();
        redisCacheConfiguration = redisCacheConfiguration.serializeValuesWith(RedisSerializationContext.SerializationPair
                .fromSerializer(new Jackson2JsonRedisSerializer<Object>(Object.class)))
                .entryTtl(Duration.ofSeconds(10));
                return redisCacheConfiguration;
    }*/
}
@Data
@ToString
@TableName("t_user")
public class User implements Serializable{
    @TableId(type = IdType.AUTO)
    private Integer id;
    private String name;
    private Integer age;
    private String address;
}
@Service
@Transactional
public class UserServiceImpl implements UserService {

    @Autowired
    private UserDao userDao;
    //创建redisTemplate实例
    @Autowired
    private RedisTemplate redisTemplate;

    //注解,保存以user文件夹为名称,#id为key名的数据
    // @Cacheable(value = "user",key = "#id")
    @Override
    public User getEntity(Integer id) {
        //从redis中获得key名为user的数据
        User user = (User) redisTemplate.opsForValue().get("user");
        //判断是否获得
        if (user==null) {
            //如果为空,数据库查询
             user = userDao.selectById(id);
            //再次赋值给redis中,key名为user
            redisTemplate.opsForValue().set("user",user,10, TimeUnit.SECONDS);
        }
        return user;
    }

}
上述代码完成使用redis的一个简单的小demo,查询数据时redis中存在直接获得,如果不存在,数据库查询再存储在redis中,方便下次查询。
在springboot中有三种缓存的注解
@Cacheable
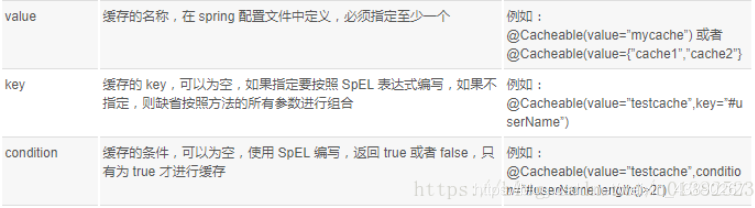
@CachePut
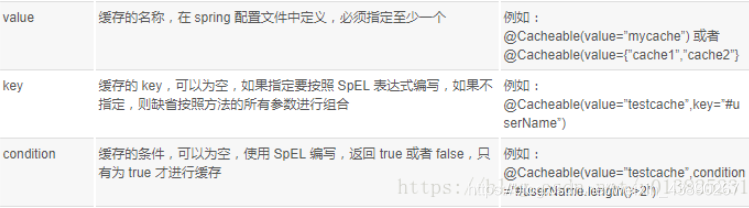
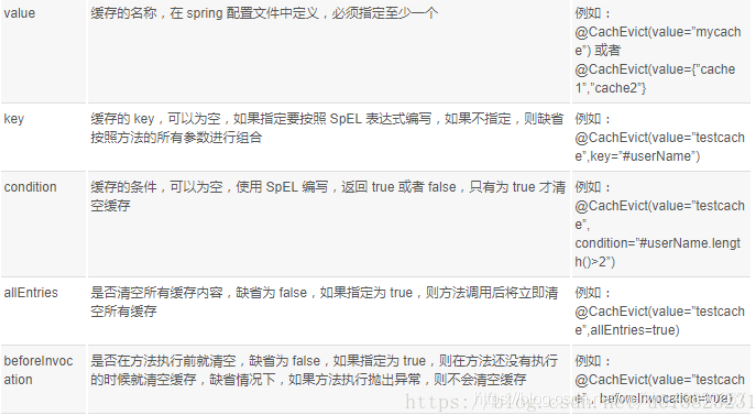
@CacheEvict
本次就是整合redis的过程,如果细节不是很全面,请大家及时提出意见,我进行改正,下次我将编写文章RabbitMQ的安装即使用。
如果觉得我的文章对您有用,请随意打赏。你的支持将鼓励我继续创作!
