社区微信群开通啦,扫一扫抢先加入社区官方微信群

社区微信群
社区微信群开通啦,扫一扫抢先加入社区官方微信群

社区微信群
在Redis5最新版本安装完成后就带有哨兵模式管理工具,是Redis独立组件工具,位于安装目录下(与redis-cli同级),执行文件为:redis-sentinel。
Redis目前可以轻松实现哨兵模式的管理,实现的底层原理这里不作探讨。Redis哨兵顾名思义是监控检查的作用,不提供Redis缓存存取功能,所以我们需要启动几个不同的Redis服务,然后通过哨兵去监听,这里提示下,程序使用端要自行开发使用哨兵的代码来获取Redis链接,因为哨兵监听Redis,会返回可用的Redis链接,给客户端来创建Redis缓存服务链接,是的,哨兵的作用相当于管理Redis服务链接的工具,而redis实际链接需要客户端接收到哨兵的redis服务链接,再进行redis创建,然后进行缓存存取。
Redis高可以用有三种常用配置方式:
Redis自带主从配置,可以直接实现,多机器为从,只读,master可写
主节点Master可读、可写.
从节点Slave只读。(read-only)
主从模型可以提高读的能力,在一定程度上缓解了写的能力。因为能写仍然只有Master节点一个,
可以将读的操作全部移交到从节点上,变相提高了写能力
Redis Sentinel
主从配置是存在缺陷的,因为从机器或主机器是会出现宕机的,此时某个节点将无法访问,这时候业务某一部分将会引发无法访问甚至影响业务访问,损失巨大。
而哨兵模式正是为了解决这一问题而生的。
说明
Redis Sentinel 属于主从备份的范畴,主从数据同步使用的是redis自带的主从配置,不同的是sentinel是在此基础上加入的故障检测和转移,防止Redis单点故障。
友情提示: 哨兵模式是redis一个架构模式,但业务使用该架构是需要业务代码端实现的,不能直接连接redis,而是链接redis的哨兵端口
哨兵检查redis节点并返回正确的哨兵连接的Redis节点链接配置,有业务端根据链接创建Redis进程池或TCP握手进程。
Redis主从复制是直接通过tcp进行数据交流的,不是像mysql的文件复制。

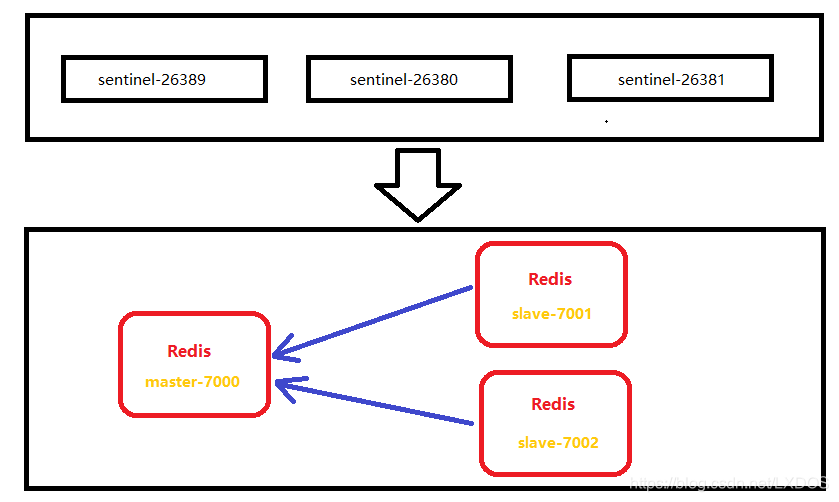
Redis Sentinel 最终搭建目标架构图
redis sentinel 节点1:redis-sentinel-26379.conf
可从 /urs/redis/redis-sentinel.conf 复制到 /urs/redis/config/redis-sentinel.conf
在config 目录下执行cp ../redis-sentinel.conf ./redis-sentinel-26379.conf
修改配置 redis-sentinel-26379.conf:
port 26379
daemonize yes
pidfile /var/run/redis-sentinel-26379.pid
logfile "redis-sentinel-26379.log"
# 监控节点,且超过2个sentinel 任务故障,方可执行故障转移
sentinel monitor mymaster 127.0.0.1 7000 2
# 如果节点在 30000毫秒内未回应,就认为故障
sentinel down-after-milliseconds mymaster 30000
# 如果故障转移后,同时进行主从复制数为 1
sentinel parallel-syncs mymaster 1
# 故障转移的超时时间
sentinel failover-timeout mymaster 180000
sentinel deny-scripts-reconfig yes
redis sentinel 节点2:redis-sentinel-26380.conf
创建 touch redis-sentinel-26380.conf
修改配置 redis-sentinel-26380.conf:
port 26380
daemonize yes
pidfile /var/run/redis-sentinel-26380.pid
logfile "redis-sentinel-26380.log"

# 监控节点,且超过2个sentinel 任务故障,方可执行故障转移
sentinel monitor mymaster 127.0.0.1 7000 2
# 如果节点在 30000毫秒内未回应,就认为故障
sentinel down-after-milliseconds mymaster 30000
# 如果故障转移后,同时进行主从复制数为 1
sentinel parallel-syncs mymaster 1
# 故障转移的超时时间
sentinel failover-timeout mymaster 180000
sentinel deny-scripts-reconfig yes
redis sentinel 节点3:redis-sentinel-26381.conf
创建 touch redis-sentinel-26381.conf
port 26381
daemonize yes
pidfile /var/run/redis-sentinel-26381.pid
logfile "redis-sentinel-26381.log"

# 监控节点,且超过2个sentinel 任务故障,方可执行故障转移
sentinel monitor mymaster 127.0.0.1 7000 2
# 如果节点在 30000毫秒内未回应,就认为故障
sentinel down-after-milliseconds mymaster 30000
# 如果故障转移后,同时进行主从复制数为 1
sentinel parallel-syncs mymaster 1
# 故障转移的超时时间
sentinel failover-timeout mymaster 180000
sentinel deny-scripts-reconfig yes
启动命令:
./src/redis-sentinel ./config/redis-sentinel-26379.conf
./src/redis-sentinel ./config/redis-sentinel-26380.conf
./src/redis-sentinel ./config/redis-sentinel-26381.conf

redis-sentinel redis-sentinel-26379.conf
redis-sentinel redis-sentinel-26380.conf
redis-sentinel redis-sentinel-26381.conf
验证:ps -ef | grep redis-sentinel
./src/redis-cli -p 26379 info sentinel
至此 Redis 主从和 Redis Sentinel 已经搭建完成了。接下来验证故障转移。
laravel底层自带哨兵模式配置,所以只需要配置好哨兵连接即可,Redis在使用时无需做任何更改。
//配置文件`config/database.php`
 'redis' => [
    'client' => 'predis',	//指示redis客户端使用的是predis组件

    'default' => [
        'tcp://127.0.0.1:26379',
        'tcp://127.0.0.1:26381',
        'tcp://127.0.0.1:26382',    //这3个都是sentinel节点的地址
        'options' => [
            'replication' => 'sentinel',
            'service'     => env('REDIS_SENTINEL_SERVICE', 'mymaster'),    //sentinel
            'parameters'  => [
                'password' => env('REDIS_PASSWORD', null),    //redis的密码,没有时写null
                'database' => 0,
            ],
        ],
    ],
 ],
编写命令并使用
php artisan test
$redis = new IlluminateSupportFacadesRedis();

while (true) {
    sleep(1);
    try {
        $redis::set($key='test_sentinel:' . time(), 1);
        echo $redis::get($key);
    } catch (Exception $e) {
        echo $e->getMessage();
    }
    echo "n";
}
如果觉得我的文章对您有用,请随意打赏。你的支持将鼓励我继续创作!
