社区微信群开通啦,扫一扫抢先加入社区官方微信群

社区微信群
初级分析:使用webpack内置的stats
stats: 构建的统计信息
package.json中使用stats:
"scripts": { "build: stats":"webpack --env production --json > stats.json" }
stats,颗粒度太粗,看不出问题所在。
速度分析:使用speed-measure-webpack-plugin
const SpeedMeasurePlugin = require('speed-measure-webpack-plugin'); const smp = new SpeedMeasurePlugin(); const webpackConfig = smp.wrap({ plugins: [ new MyPlugin(), new MyOtherPlugin() ] });
可以看到每个loader和插件的执行耗时。
速度分析插件的作用:
1. 分析整个打包总耗时
2. 每个插件和loader的耗时情况
体积分析:使用webpack-bundle-analyzer
const BundleAnalyzerPlugin = require('webpack-bundle-analyzer').BundleAnalyzerPLugin; module.exports = { plugins: [ new BundleAnalyzerPlugin() ] }
可以分析哪些问题?
1. 依赖的第三方模块文件大小
2. 业务里面的组件代码大小
使用高版本的webpack和高版本的node.js:
使用webpack4: 优化原因

同样的,node版本也是高版本运行速度更高。
多进程多实例的构建:

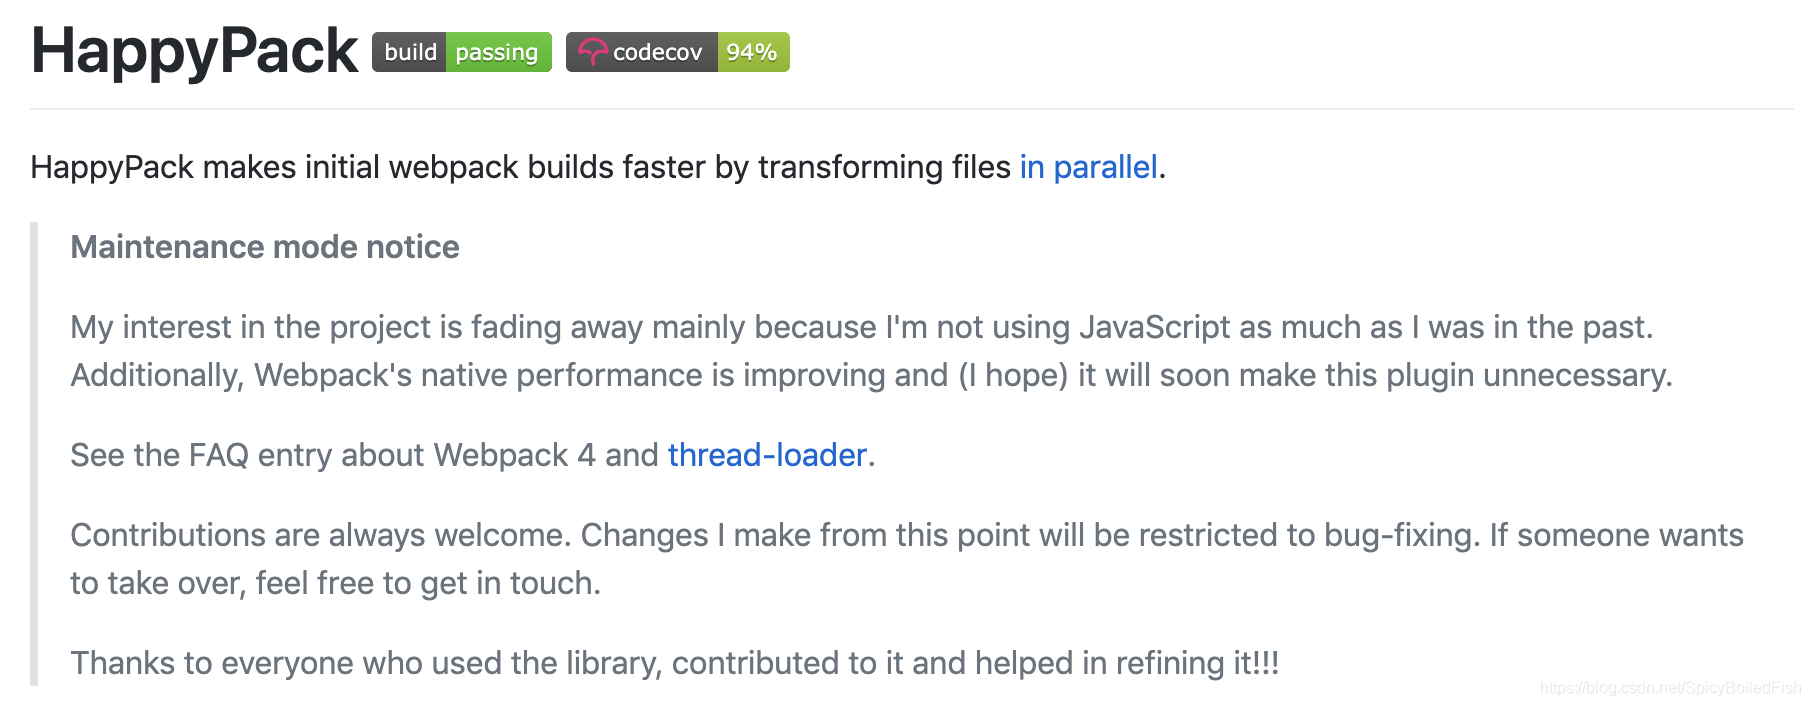
方法一:happypack和thread-loader
HappyPack:

happypack源作者已不再维护。
未使用happypack之前:
Time: 7025ms

默认happypack开启了三个线程。
Time: 5114ms
module: { rules: [ { test: /.js$/, exclude: /node_modules/, // use: ['babel-loader', 'eslint-loader'] use: 'happypack/loader' }, ... plugins: [ new Happypack({ loaders: [ 'babel-loader', 'eslint-loader' ] }) ]
采用thread-loader解析资源:
原理:每次webpack解析一个模块,thread-loader会将它及它的依赖分配给worker线程中.
module: { rules: [ { test: /.js$/, exclude: /node_modules/, use: [ { loader: 'thread-loader', options: { workers: 3 } }, 'babel-loader', 'eslint-loader' ] // use: ['babel-loader', 'eslint-loader'] }, ...
使用了thread-loader之后:
Time: 4973ms
多进程多实例并行压缩:
方法二:uglifyjs-webpack-plugin开启parallel参数
uglifyjs和tenserjs都是js压缩。但是tensorjs支持es6格式代码压缩,uglifyjs并不支持。但是会有一个parallel并行参数可以添加。

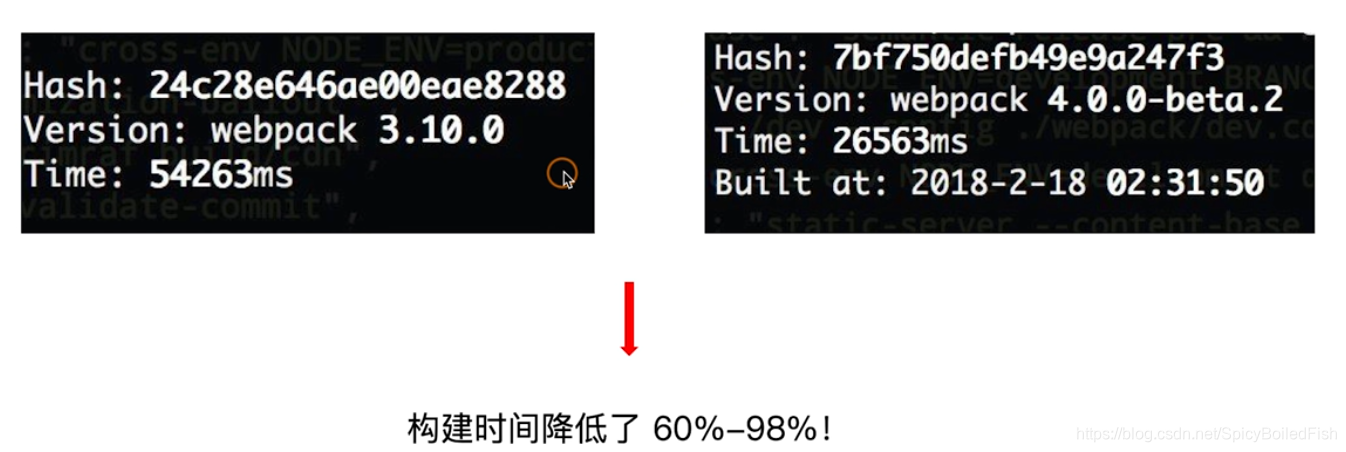
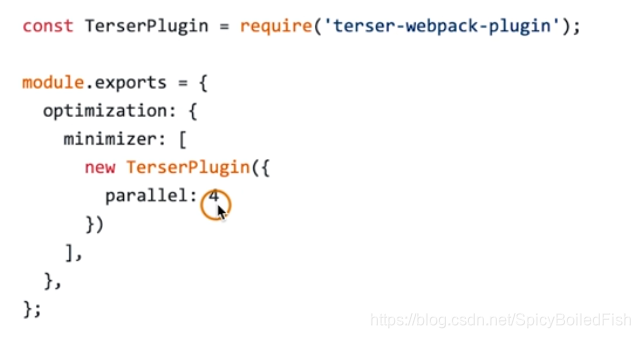
方法三:terser-webpack-plugin 开启parallel参数:
使用terser-webpack-plugin之后:
将parallel关闭:
Time: 20592ms
将parallel开启:
Time: 15568ms
进一步分包:预编译资源模块:

方法一: 设置Externals (缺点:需要增加多个基础包cdn以及业务包分包)
方法二: splitChunks(缺点:需要对每个基础包进行分析)
方法三: 预编译资源模块

使用DLLPlugin分包的方法步骤:
entry: { library: [ 'react', 'react-dom', 'redux', 'react-redux' ] }, output: { filename: '[name]'.dll.js, path: path.resolve(__dirname, './build/library') library: '[name]' }, plugins:[ new webpack.DLLPlugin({ name: '[name]', path: './build/library/[name].json' }) ]
在webpack.config.js中引入:
module.exports = { plugins: [ new webpack.DLLReferencePlugin({ manifest: require('./build/library/manifest.json') }) ] }
最后打完包之后引用的效果就是:
<script src="/build/library/library.dll.js"></script>
使用了DLLReferencePlugin之后:
Time: 13986ms
充分利用缓存提升二次构建速度:
缓存:目的是提升二次构建速度。
缓存思路:
'babel-loader?cacheDirectory=true',
开启了babel-loader的cache之后:
Time: 13625ms
在node_modules里面已经可以看到.cache有一个文件夹babel-loader,再次构建时,Time: 11876ms
optimization: { minimizer: [ new TerserPlugin({ parallel: true, cache: true }), ], },
开启了terser-webpack-plugin的cache之后:
Time: 12111ms
在node_modules里面的.cache增加了一个文件夹terser-webpack-plugin, 再次构建时:Time: 5127ms
const HardSourceWebpackPlugin = require('hard-source-webpack-plugin'); plugins:[ new HardSourceWebpackPlugin() ]
开启了hard-source-webpack-plugin之后:
本地报错:TypeError: Function.prototype.toString requires that 'this' be a Function
大致的报错地方在于:
// cli.js: try {
compiler = webpack(options); } catch (err) {
// console.log('err:::::', err);
if (err.name === "WebpackOptionsValidationError") {
if (argv.color)
console.error(`u001b[1mu001b[31m${err.message}u001b[39mu001b[22m`);
else console.error(err.message);
// eslint-disable-next-line no-process-exit
process.exit(1); }
throw err; }
// HardSourceWebpackPlugin/index.js:
if (options.configHash) {
if (typeof options.configHash === 'string') {
this.configHash = options.configHash; }
else if (typeof options.configHash === 'function') {
// console.log('configHash:::::', compiler.options)
this.configHash = options.configHash(compiler.options); }
compiler.__hardSource_configHash = this.configHash;
compiler.__hardSource_shortConfigHash = this.configHash.substring(0, 8); }
采用cache-loader, 用在耗时较多的loader上面,可以缓存loader
{ test: /.js$/, exclude: /node_modules/, use: [ 'cache-loader', { loader: 'thread-loader', options: { workers: 3 } }, 'babel-loader?cacheDirectory=true', 'eslint-loader' ] },
因为babel-loader耗时较多,所以我们用在这个loader之前。
Time: 5740ms。在.cache中增加了一个文件夹cache-loader. 再次构建时:Time: 3989ms
缩小构建目标:
目的:尽可能的少构建模块
比如 babel-loader不解析node_modules
module.exports = { rules: { test: /.js$/, loader:'happypack/loader', exclude: 'node_modules' } }
1. 减少文件搜索范围:
module.exports = { resolve: { alias: { react: path.resolve(__dirname, './node_modules/react/dist/react.min.js') }, modules: [path.resolve(__dirname, 'node_modules')], extensions: ['.js'], mainFields: ['main'] } },
没有开启exclude: node_modules之前:Time: 3066ms
开启了exclude: node_modules之后:Time: 2975ms
module: { rules: [ { test: /.js$/, include: path.resolve('src'), exclude: /node_modules/, use: [ { loader: 'thread-loader', options: { workers: 3 } }, 'cache-loader', 'babel-loader?cacheDirectory=true', 'eslint-loader' ] }, ]}, resolve: { alias: { 'react': path.resolve(__dirname, './node_modules/react/umd/react.production.min.js'), 'react-dom': path.resolve(__dirname, './node_modules/react-dom/umd/react-dom.production.min.js') }, extensions: ['.js'], mainFields: ['main'] }
开启以上配置之后,Time: 15567ms
再次构建时,Time: 3781ms.
使用Tree shaking擦除无用的JavaScript和CSS:
概念:1个模块可能有多个方法,只要其中的某个方法用到了,则整个文件都会被打包到bundle里面去,tree shaking 就是只把用到的方法打入到bundle, 没有用到的方法会在uglify阶段被擦除掉。
使用:webpack默认支持,在.babelrc里设置modules: false即可。production的mode情况下会默认开启。
要求:必须是ES6的语法,CJS的方式不支持
js的tree shaking: terser-webpack-plugin
css的tree shaking: purgecss-webpack-plugin
css的tree shaking需要注意:某些项目是在接口返回的富文本中的class名的样式需要保留。
无用的css如何删除掉?
1. PurifyCSS: 遍历代码,识别已经用到的CSS class
2. uncss: HTML需要通过jsdom加载,所有的样式通过PostCSS解析。通过document.querySelector来识别在html文件里面不存在的选择器。
在webpack中如何使用PurifyCSS?
使用purgecss-webpack-plugin和mini-css-extract-plugin配合使用。
const MiniCssExtractPlugin = require('mini-css-extract-plugin'); const PurgecssPlugin = require('purgecss-webpack-plugin'); const PATHS = { src: path.join(__dirname, 'src') }; module: { rules: [ { test: /.css$/, use: [ MiniCssExtractPlugin.loader, 'css-loader' ] }, ] } ... plugins:[ new MiniCssExtractPlugin({ filename: `[name]_[contenthash:8].css` }), new PurgecssPlugin({ paths: glob.sync(`${PATHS.src}/**/*`, { nodir: true }), }) ]
使用webpack进行图片压缩:
图片压缩:
要求:基于Node库的imagemin或者tinypng API
使用:配置image-webpack-loader
Imagemin的优点分析:
1. 有很多定制选项
2. 可以引入更多第三方的优化插件,例如:pngquant
3. 可以处理多种图片格式
Imagemin的压缩原理:

使用动态Polyfill服务:
Promises的浏览器支持情况:

构建体积优化:动态Polyfill
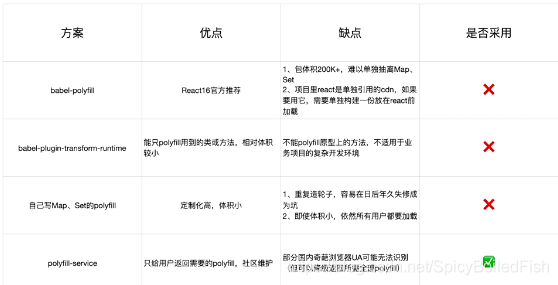
Polyfill Service原理:

构建体积优化:如何使用动态Polyfill service
polyfill.io官方提供的服务
<script src="https://cdn.polyfill.io/v3/polyfill.min.js"></script>
体积优化的策略:
Scope hoisting
tree-shaking
公共资源分离
图片压缩
动态polyfill
如果觉得我的文章对您有用,请随意打赏。你的支持将鼓励我继续创作!
