社区微信群开通啦,扫一扫抢先加入社区官方微信群

社区微信群
sudo apt-get install gnome-tweak-tool
安装使用主题必备的扩展user themes ,地址
其他扩展推荐:
使用的是mac osc,地址:https://www.opendesktop.org/s/Gnome/p/1241688/
这里我打包好了,包括壁纸、图标、shell,下载地址(注意:里面除了一张壁纸外,还有.icon和.themes文件夹,linux下是隐藏的,ls -a 即可看见)
我的是在当前用户下创建的主题,所以只对当前用户有效,在**/home/{你的名字}** 下面创建**.icons** 、.themes 文件夹
.icons放置的是图标,.themes里面放的是主题和Shell。
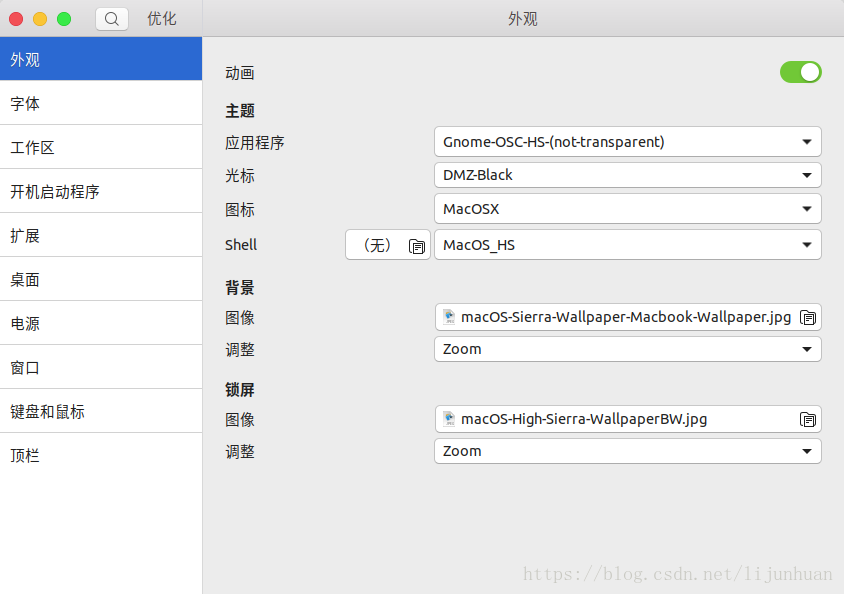
我打包的可直接在目录下解压即可,然后打开tweak tool(名字显示叫调试),在外观下选择下图对应的即可
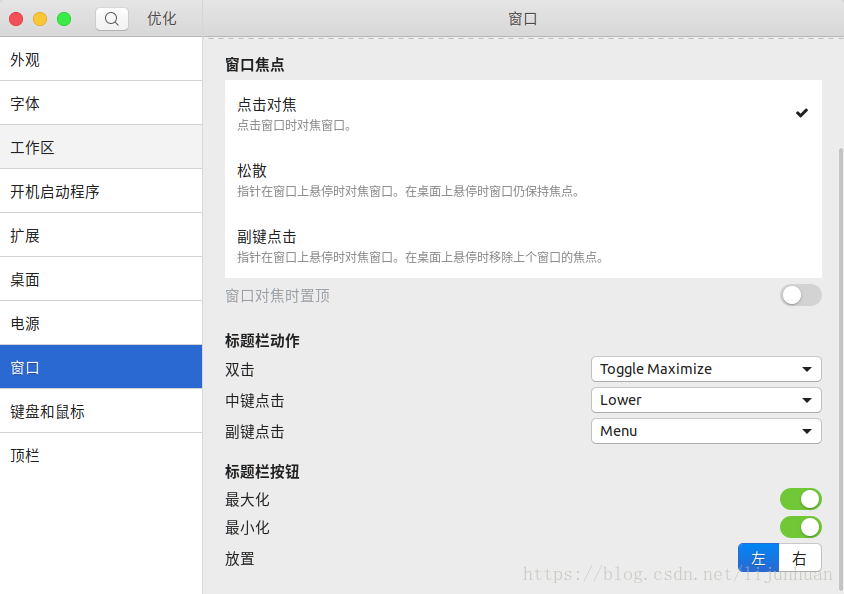
点击 “窗口”——“标题栏按钮”——“左”
大功告成
10.25更新
先看效果
本质上是个css文件,修改了登陆框的样式,添加了一个模糊处理的图片
这里分两步:
sudo cp /usr/share/gnome-shell/theme/ubuntu.css /usr/share/gnome-shell/theme/ubuntu.bak
sudo cp ubuntu.css /usr/share/gnome-shell/theme/
sudo chmod 777 /usr/share/backgrounds/

cp SetAsWallpaper  '/home/你的账户名/.local/share/nautilus/scripts/'
sudo chmod +x SetAsWallpaper
nautilus -q
完成之后,你右键到图片上的时候会有个“脚本”,选择“SetAsWallpaper”,当前图片就会变成壁纸,顺便会把图片模糊处理并设置成锁屏壁纸
这里要注意,css里面有个登录背景的路径,你可能要修改一下,还有就是SetAsWallpaper里面生成模糊图片的路径,这两个路径一样就行了
2019-01-13新增
win10的触摸板用起来不错,ubuntu自带的功能就显得很乏力,后来找到一个开源的工具fusuma,安装步骤按照作者的写法即可,我这边提供一个自己使用的配置。
简单说明一下:swipe 3就是3指的动作,分别是右左上下,我这边定义的是
向右滑动:关闭当前标签(比如浏览器或者文件夹的一个窗口);向左: 新开一个标签
向上:最大化窗口; 向下:恢复窗口
4指滑动操作的动作是
向右:最小化当前窗口;向左:关闭当前窗口(比如关闭浏览器)
向上:移动到上一个工作区; 向下:移动到下一个工作区
2指操作就是缩放
启动fusuma的时候可以带上参数 -d,这样会后台运行
设置开机启动
打开 “启动应用程序(或者在shell中输入命令回车 gnome-session-properties )” 然后添加
填写名称: fusuma
填写命令: /usr/local/bin/fusuma -d
swipe:
  3:
    right:
      command: 'xdotool key ctrl+t'
      threshold: 0.1
    left:
      command: 'xdotool key ctrl+w'
      threshold: 0.1
    up:
      command: 'xdotool key super+Up'
      threshold: 0.1
    down:
      command: 'xdotool key super+Down'
      threshold: 0.1
  4:
    right:
      command: 'xdotool key super+h'
      threshold: 0.1
    left:
      command: 'xdotool key alt+F4'
      threshold: 0.1
    up:
      command: 'xdotool key ctrl+alt+Up'
      threshold: 0.1
    down:
      command: 'xdotool key ctrl+alt+Down'
      threshold: 0.1

pinch:
  2:
    in:
      command: 'xdotool key ctrl+plus'
      threshold: 0.1
    out:
      command: 'xdotool key ctrl+minus'
      threshold: 0.1
threshold:
  swipe: 1
  pinch: 1

interval:
  swipe: 1
  pinch: 1
我的电脑开启夜灯后,整体显得很黄,看的时间久后,眼睛很不舒服
这里用到 dconf-editor 这个工具
安装如下:
sudo apt install dconf-editor
之后选择路径 /org/gnome/settings-daemon/plugins/color/night-light-temperature 可以看到如下界面
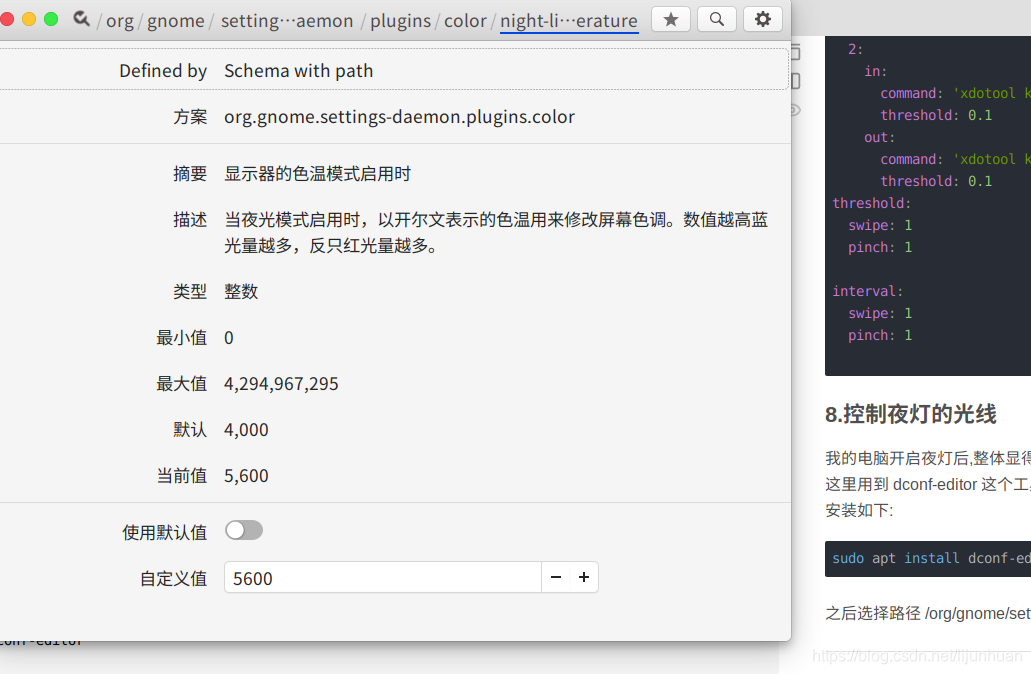
去掉默认值,改自定义值,个人感觉5600左右比较舒服,值越小,开启夜灯后屏幕越黄
如果觉得我的文章对您有用,请随意打赏。你的支持将鼓励我继续创作!