社区微信群开通啦,扫一扫抢先加入社区官方微信群

社区微信群
1.下载软件包:https://pypi.python.org/pypi/pyserial?#downloads
2.解压:tar -zxvf pyserial-3.4.tar.gz
3.进入解压目录:cd pyserial-3.4/
4.安装sudo python setup.py install(这里以ubuntu为例,其他linux操作系统可切换在root权限下进行安装操作)
【虚拟串口的建立形式】
根据python serial库的特殊性质,它可以产生两个相互短接的虚拟串口,通过对这两个串口进行读写,可以实现消息的收发。因此,笔者进行学习调研后,在下面的代码中,运用这个serial库的相关函数,打开了一个虚拟串口,同样也实现了发送端和接收端在同一个串口进行收发消息的功能。
由虚拟串口实现原理可以发现,它的设计是一个while(true)死循环,因为它要不停地检测在此串口下的数据流。
【发送端程序实现形式】
代码编写语言:python
对于串口实现的消息收发,python也有os.read()和os.write()这类针对数据读写的函数,因此发送端的设计采用raw_input()接收来自终端的消息,通过os.write()写入串口内的缓存,同时通过os.read()一次性读取接收端反馈的消息;
另外,考虑到实际工程需求,笔者将虚拟串口和发送端集成到一起,这样一来,只需要运行集成后的发送端代码,就可以同时开启虚拟串口和发送消息;
考虑到虚拟串口建立是一个不能被中断的死循环,因此,在集成代码时,将虚拟串口的建立作为父线程。要实现不停发送消息的工程需求,发送端也是一个死循环,它作为子线程依赖于父线程运行,一旦子线程break了,父线程发现子线程死了,那么父线程也结束。
【接收端验证程序】
代码编写语言采用C语言
设计模式是:接收端一旦在串口中读到数据,则向串口中发回执消息,向发送端通知消息已经成功接收。
下面的代码是笔者在补充学习python serial虚拟串口建立过程中,淘到的有意思的代码,贴出来做一个分享,同时结合笔者在开发过程中遇到的问题,对代码做一些浅显的分析。(后面笔者贴出的发送端代码也是基于这个代码的学习进行编写的)
#! /usr/bin/env python
#coding=utf-8
import pty
import os
import select

def mkpty():
    master1, slave = pty.openpty()
    slaveName1 = os.ttyname(slave)
    master2, slave = pty.openpty()
    slaveName2 = os.ttyname(slave)
    print 'nslave device names: ', slaveName1, slaveName2
    return master1, master2

if __name__ == "__main__":

    master1, master2 = mkpty()
    while True:
        rl, wl, el = select.select([master1,master2], [], [], 1)
        for master in rl:
            data = os.read(master, 128)
            print "read %d data." % len(data)
            if master==master1:
                os.write(master2, data)
            else:
                os.write(master1, data)
笔者的理解:
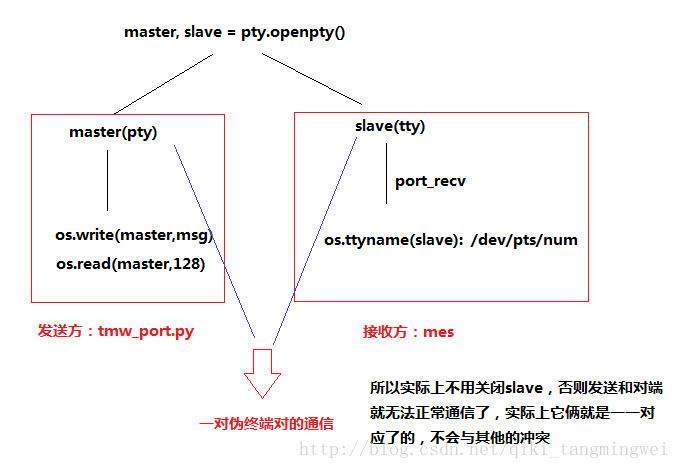
在创建虚拟串口的mkpty()函数中,master, slave = pty.openpty() 方法用于打开一个新的伪终端对。在调试程序时发现,若改成在slave端进行消息的收发, 发现消息发不出去,当然也收不到回执的OK消息,python发送端和c接收端的收发都是read/write,说明master是read/write、slave是port_recv, 也就是说 pty对应master ,用于read write ;tty对应slave用于port_recv…
为避免别的设备占用tty的slave口,笔者曾想着把slave这个端口强制关闭。
pty.openpty()分别为主机和从机端返回一对文件描述符(pty,tty)。后来对这两个描述符进行思考发现:
master和slave就像钥匙一样,它俩其实是随机的,跟最终生成的端口没有必然的规律。但是发送方和对端只有匹配了master和slave,才能打开它俩建立的“锁”—-/dev/pts/num。所以,根据这个发现,别的设备不会与我的指定设备占用tty的slave口,也不用关闭slave口,否则发送方就没法与对端通过master和slave建立的虚拟端口通信了。
从实际测试来看,创建虚拟串口虽然随机,但是不会同时建两个一样的串口,只要最终创建的虚拟串口不同,slave1和slave2即使相同也不会占用。
笔者经过思考后,对上面的代码进行修改,结合实际的工程需求,将建立虚拟串口和消息的发送集成到了一起,通过开辟不同的线程,让两者能同时正常运行。
下面贴出源代码:
import serial
import sys
import pty
import os
import time
import select
from time import ctime
from time import sleep
import threading  #multi thread working mode

#send & recv msg using mkpty port
def Vpsend(slaveName,master): #slaveName is the parameter from mkpty()
    print "n"
    print " Open the port.Please Waiting...n"
    sleep(1)
    ser=serial.Serial(slaveName,9600,timeout=0.5) #pass parameter:slaveName
    print "Open port successful! the port information:"
    print ser
    print "n"
    while ser.isOpen(): #the return is True or Faulse
        print "please write the msg(exit to break)"
        msg=raw_input()

        #add a break reason:::kill the child thread
        if msg == 'exit':
            print "n"
            print "Please waiting to close the connection......"
            sleep(1)
            break;

        msg=msg + 'r' + 'n'  #AT form define

        #data=ser.write(msg)
    os.write(master, msg)
        sys.stdout.flush()  #flush the buffer
        print "n"
        print ("waiting to recv the data...")
        sleep(2)
    msg_recv = os.read(master,128)
        print ("n")
        print ("tOK! The recv msg is %s"%(msg_recv))

#create only one virtual port
def mkpty():
    #make pair of pseudo tty
    master, slave = pty.openpty()
    slaveName = os.ttyname(slave)

    print "slave device names:", slaveName

    #set the Vpsend() as the child thread and set the 'slaveName' as pass parameter, Vpsend will use 'slaveName'
    t=threading.Thread(target=Vpsend,args=(slaveName,master))
    t.start()   #start this thread
    while True:
        sleep(1)
        if t.is_alive() == False:  #when the child thread killed, then this father thead break...
            break
mkpty()
(ps:由于实际工程平台中文会产生乱码,英文注解有点蹩脚,稍微将就一下。。。)
在设计上面代码的时候,笔者发现:
原参考的创建虚拟串口代码中,主线程里本身就有对该串口进行os.read和os.write的读写操作,再加上子线程也有对此串口的ser.read和ser.write读写操作,以及对端(接收端)对串口中的数据的read和write操作,使得子线程在接收对端数据时,会与主线程的os.read产生竞争。
针对此,笔者的解决方案是:删除主线程里对串口进行os.read和os.write的读写操作,只保留子线程与对端的通信联系。
为了测试我们的发送端主代码是否能正常工作,笔者设计了一个C的接收程序,源代码如下:
代码中,默认打开的端口是3,可以在命令行传参更改打开端口,执行命令如下:
gcc receive.c -o recv
./recv -p 4 //假设发送端打开的端口是4,接收端也打开4才能与发送端通信
//receive.c
#include <stdio.h>
#include <string.h>
#include <malloc.h>
#include <sys/types.h>
#include <sys/stat.h>
#include <fcntl.h>
#include <unistd.h>
#include <termios.h>
#include <math.h>
#include <stdlib.h>
#define MAX_BUFFER_SIZE 512
int fd, s;
char * g_pts = "/dev/pts/3";
int opt = -1;
/*open port*/
int open_port()
{
fd = open(g_pts, O_RDWR|O_NOCTTY|O_NDELAY);
if(fd == -1)
{
perror("open serial port error!n");
return -1;
}
printf("open /dev/ttyS0.n");
return 0;
}
int main(int argc, char* argv[])
{
char hd[MAX_BUFFER_SIZE], *rbuf;
int flag_close, result;
struct termios option;
while((opt = getopt(argc, argv,"p:")) != -1)
{
switch(opt)
{
case 'p':/*hook bind pts number*/
{
char pts[] = "/dev/pts/0";
int len = sizeof(pts);
char * tmp = (char *)malloc(100*sizeof(char));
memcpy(tmp, pts, len);
char * rec = optarg;
strcpy(tmp+len-2,rec );
g_pts = tmp;
break;
}
case '?':
case 'v':
default:
printf("UnKnown optionn");
break;
}
}
fprintf(stderr, "Current option is:n");
fprintf(stderr, "t -p MES AT com port Num: %s (default: 3) n", g_pts);
/*open port*/
result = open_port();
if(result < 0)
{
printf("Open port error!n");
return -1;
}
/*welcome msg*/
printf("open %s port successfully!!!~~~biubiubiubiubiu~~~n", g_pts);
printf("******OK~~ let's start to recv msg from the other side~~~********");
printf("n");
/*port set*/
tcgetattr(fd, &option);
cfmakeraw(&option);
cfsetispeed(&option, B9600);
cfsetospeed(&option, B9600);
tcsetattr(fd, TCSANOW, &option);
rbuf = hd;
memset(rbuf,'�', 10);
printf("Ready for receiving data...n");
/*star to recv msg*/
char get_buffer[1024];
memset(get_buffer, '�', 1024);
printf("fd = %dn", fd);
while(1)
{
while((result = read(fd, (void *)get_buffer, 1023)) > 0)
{
printf("%sn", get_buffer);
memset(get_buffer, '�', 1023);//clean the buffer to get the new full msg
/*send the feedback msg to the sender*/
char ans[100];
int reply = 0;
int re_len = 0;
strcpy(ans,"######[Attention]From recv fb msg::: OK,your msg has been recvd!n");
re_len = strlen(ans);
reply = write(fd, ans, re_len);
}
}
printf("n");
flag_close = close(fd);
if(flag_close == -1)
printf("Close the device failure!n");
return 0;
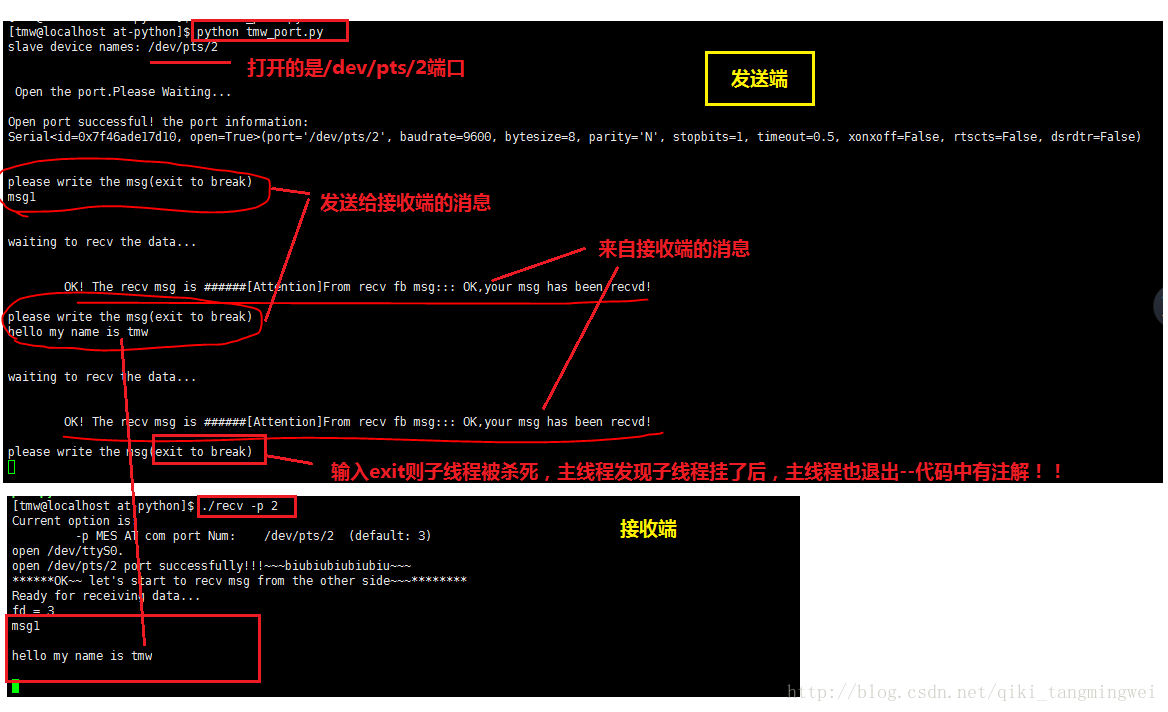
}连调中,发送端发了两次消息
第一个消息是:msg1
第二个消息是:hello my name is tmw
消息均成功发到接收端,并且收到接收端回执消息。
下图是跳出发送代码的调试结果:
梦想还是要有的,万一实现了呢~~~~ヾ(◍°∇°◍)ノ゙
如果觉得我的文章对您有用,请随意打赏。你的支持将鼓励我继续创作!