社区微信群开通啦,扫一扫抢先加入社区官方微信群

社区微信群
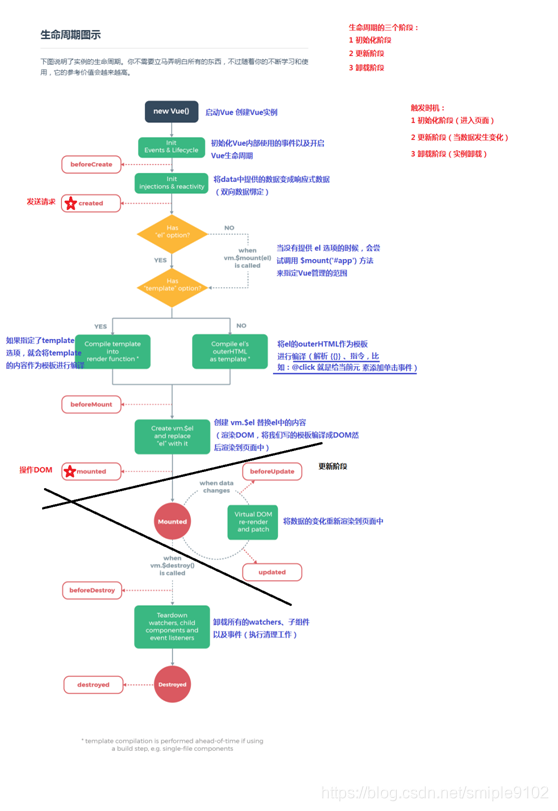
Vue在实例化的过程中,会调 beforeCreate, created, beforeMount, mounted, beforeUpdate, updated, beforeDestroy, destroyed ,些生命周期的钩子,给我们提供了执行自定义逻辑的机会。:
// An highlighted block
<div id="app">{{a}}</div>

var myVue = new Vue({
    el: "#app",
    data: {
    	a: "HelloWord"
    },
    beforeCreate: function() {
    	console.log("创建前")
	console.log(this.a) //undefined
	console.log(this.$el) //undefined
    },
    created: function() {
	console.log("创建之后");
	console.log(this.a) //HelloWord
	console.log(this.$el) //undefined
    },
    beforeMount: function() {
	console.log("mount之前")
	console.log(this.a) //HelloWord
	console.log(this.$el) //<div id="app">{{a}}</div>
    },
    mounted: function() {
	console.log("mount之后")
	console.log(this.a) //HelloWord
	console.log(this.$el) //<div id="app">HelloWord</div>
    },
    beforeUpdate: function() {
	alert("更新前");
	console.log(this.a) //Welcome to Vue,页面上显示的还是老的数据
    },
    updated: function() {
	console.log("更新完成");
	console.log(this.a) //Welcome to Vue,页面上更新为新数据
    },
    beforeDestroy: function() {
	console.log("销毁前");
	console.log(this.a) //Welcome to Vue
	console.log(this.$el) //<div id="app">Welcome to Vue</div>
    },
    destroyed: function() {
	console.log("已销毁");
	console.log(this.a) //Welcome to Vue
	console.log(this.$el) //<div id="app">Welcome to Vue</div>
    }
});
setTimeout(function(){
	myVue.a = "Welcome to Vue";
},500)
setTimeout(function(){
	myVue.$destroy();
},1000)
setTimeout(function(){
	alert("再次改变 a 的值")
	myVue.a = "HelloWord";
},1500)
注意点:
1、beforeMount实例化之前 data是a的值:HelloWord、DOM节点是虚拟的,就是先占了个坑(即
2、$destroy这个方法销毁的是监听器,而不是视图,也就是说之后视图不再受vue控制
如果觉得我的文章对您有用,请随意打赏。你的支持将鼓励我继续创作!
