社区微信群开通啦,扫一扫抢先加入社区官方微信群

社区微信群
前言
最早期方式: 前端写好代码之后本地构建, 通过服务器xftp或ftp把文件上传到服务器进行更新
使用Git后: 服务器通过git clone的项目, 在项目的根目录执行 git pull origin [branch] 拉去仓库中最新的代码
自动化部署: 通过配置WebHook及服务器后: 项目打包完成提交到代码库中, 服务器自动拉去git仓库中最新的代码
实现原理:
在github配置webhook的地方填写服务端的url, 每次push代码到github上, github都会向webhook中的url发送一条请求
服务端接收到请求后, 经过验证后执行本地的bash脚本, 脚本中编写从github拉去代码的命令。
使用环境: Centos7.*, Node, Git
代码库平台: Gitee / Github
Tips: 不同的操作环境可以进行不同的配置, 都可以实现
复制代码流程说明
一. 配置github项目中的WebHook
二. 配置服务器, 增加Node项目, 运行项目
一. 配置WebHook
1.1 进入到代码库配置webhook界面
这里以github为例
登录github -> 进入到repository中 -> 找到设置 -> 进入webhook
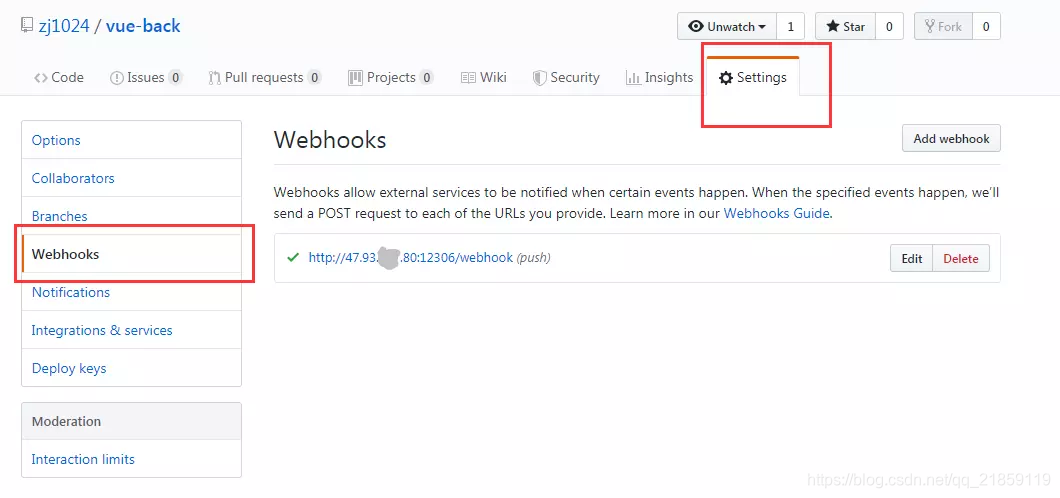
这是已经配置好的webhook
点击新增webhook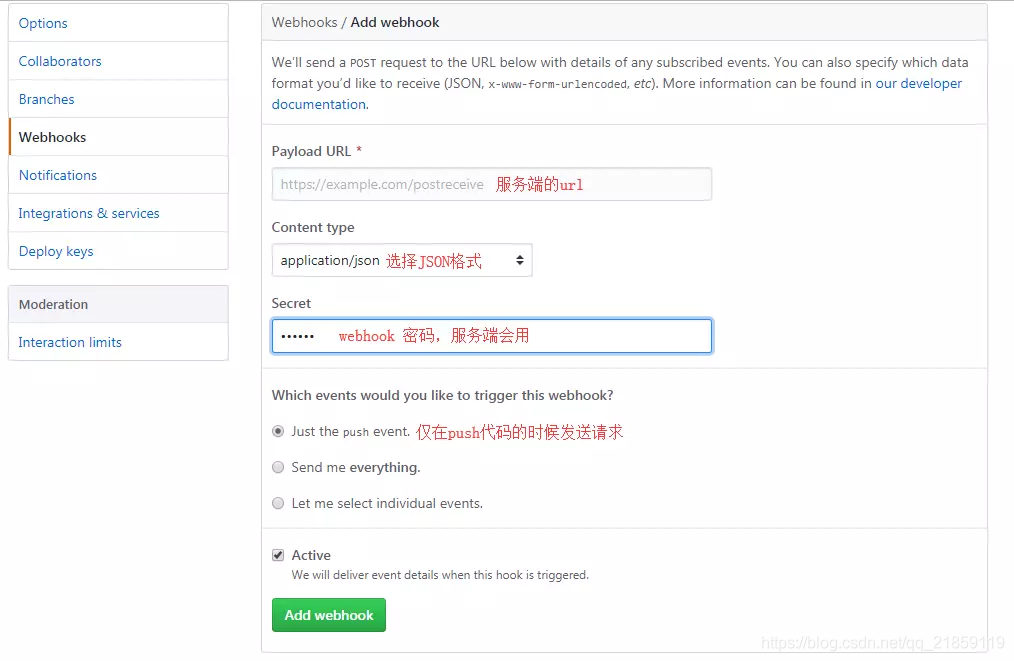
现在github中的webhook已经配置成功了, 接下来配置服务器
二. 配置服务器
配置环境
下载git, Node环境
创建一个Node项目, 最好保存到代码库中
可以参考web-hook,这是一个服务端Node项目demo
使用Node编写自动化部署脚本
参考web-hook
const http = require('http') // http模块
const { spawn } = require('child_process') // 子进程, 用来执行脚本
const { PORT, SECRET } = require('./src/config') // 配置文件
const { sign } = require('./src/utils') // 工具文件
const { resultString } = require('./src/resModel') // 服务端返回JSON

const server = http.createServer((req, res) => {
  // 打印进来的请求
  console.log(`--- ${req.method} --- ${req.url} ---`)
  // 设置header为json格式
  res.setHeader('Content-Type', 'application/json')

  if (req.method === 'POST' && req.url === '/webhook') {
    // post /webhook 都为github发来的请求
    console.log('--- 命中webhook ---')
    // 获取body
    let buffers = []
    req.on('data', buffer => {
      buffers.push(buffer)
    })
    req.on('end', () => {
      let body = Buffer.concat(buffers)
      // 获取header中event的字段, github 为push, gitee为 Push Hook
      let event = req.headers['x-github-event'] || req.headers['x-gitee-event']
      console.log(`--- Event 名字: ${event}  ---`)
      if (req.headers['user-agent'] === 'git-oschina-hook') {
        // gitee
        console.log('--- Gitee 平台 ---')
        // SECRET是在config.js中配置了
        if (req.headers['x-gitee-token'] === SECRET) {
          if (event === 'Push Hook') {
            console.log('--- push 任务命中 ---')
            let payload = JSON.parse(body)
            console.log(
              `--- 任务名称: ${payload.repository.name}, 路径: ${payload.repository.path} ---`
            )
            // 开启子进程执行对应的脚本
            // payload.repository.path 是gitee/github传来的repo的路径
            // 通过path的值执行sh目录下对应的脚本
            // 比如项目名字叫web_hook path的值就是web_hook
            // 执行的脚本就是./sh/web_hook.sh
            let child = spawn('sh', [`./sh/${payload.repository.path}.sh`])
            // 接收子进程传来的数据
            let buffers = []
            child.stdout.on('data', buffer => {
              console.log(`--- 接受data ${buffer.toString()} ---`)
              buffers.push(buffer)
            })
            child.stdout.on('end', () => {
              let log = Buffer.concat(buffers)
              console.log(log.toString())
              console.log('自动化拉取完毕')
            })
          }
          // 返回的json, 配置在./src/resModel中
          res.end(resultString('success', 0))
        } else {
          // 其他的请求返回不允许
          return res.end(resultString('Not Allowed', 1))
        }
      } else {
        // github
        // 基本和上面的gitee一样, 多一个校验身份的步骤
        console.log('--- Github 平台 ---')
        let signature = req.headers['x-hub-signature']
        // sign 方法配置在utils.js中
        if (signature !== sign(body, SECRET)) {
          return res.end(resultString('Not Allowed', 1))
        }
        if (event === 'push') {
          console.log('--- push 任务命中 ---')
          let payload = JSON.parse(body)
          console.log(payload.repository.name)
          let child = spawn('sh', [`./sh/${payload.repository.name}.sh`])
          let buffers = []
          child.stdout.on('data', buffer => {
            buffers.push(buffer)
          })
          child.stdout.on('end', () => {
            let log = Buffer.concat(buffers)
            console.log(log.toString())
            console.log('自动化拉取完毕')
          })
        }
        res.end(resultString('success', 0))
      }
    })
  }
  res.end(resultString('Not Found', 1))
})

// 监听端口, PORT配置在config.js中
server.listen(PORT, () => {
  console.log(`web-hook listen on http://localhost:${PORT}`)
})
Tips: 接收github发送来的post参数: Webhooks | GitHub Developer Guide
建议看gitee平台的说明(中文的, 参数差不多) Gitee
#!/bin/bash
WORK_PATH="/home/wwwroot/tools/vue-back"
echo "------ 进入项目目录 ------"
cd $WORK_PATH
echo "------ 已进项目目录 ------"
echo "------ 开始清理代码 防止冲突 ------"
git reset --hard origin/master
git clean -f
echo "------ 清理代码完毕 ------"
echo "------ 拉取master分支代码 ------"
git pull origin master
echo "------ vue-back 持续集成完毕 ------"
自动部署效果图: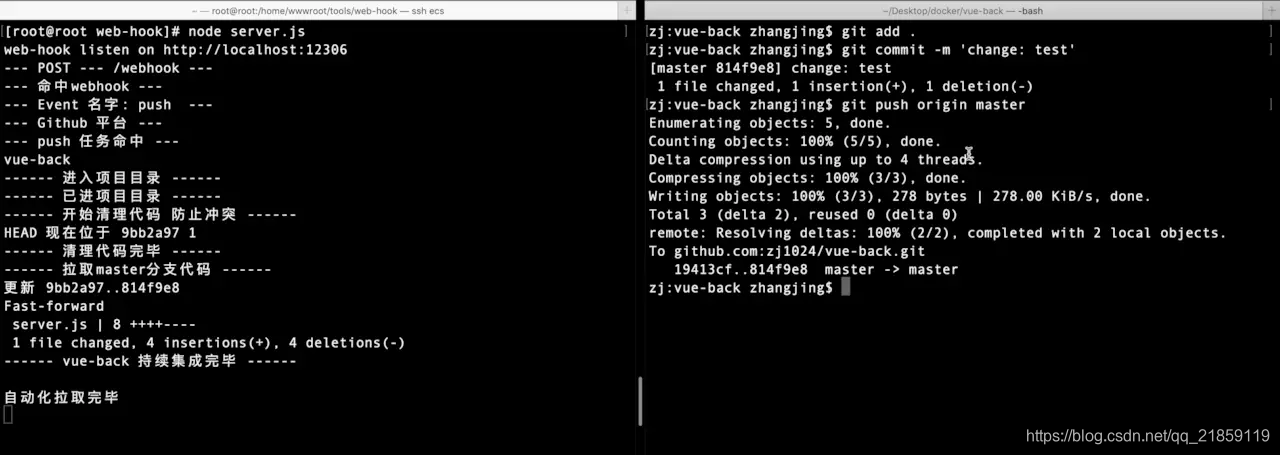
转自https://juejin.im/post/5d9fee456fb9a04e3348c5ad
如果觉得我的文章对您有用,请随意打赏。你的支持将鼓励我继续创作!
