社区微信群开通啦,扫一扫抢先加入社区官方微信群

社区微信群
这篇文章就是介绍如何在 react 中使用 redux,至于其 redux 底层工作原理,我也不懂。就像开车一样,这篇文章只会教你怎么开车,至于车是怎么构成的我不知道,也不用知道。。框架封装出来就是直接拿来用的嘛,所以用就完事了。。
简单来说,redux 就是一个仓库管理工具。
在一个项目中肯定有很多个组件,其中也有很多组件是有状态的,也就是说某些组件里保存了数据;在很多情况下,我们需要在一个组件中取得另外一个组件的数据,同时这两个组件还不是父子级关系的,这个时候我们总不能通过父子组件传值一个个传过去吧,这样做实在是太蠢了。
对此,redux 应运而生,我们可以将需要共享的数据放在仓库中,当另外一个组件有需要的时候只需要从仓库中拿就行了。也就是说,有了 redux 之后,没有中间商赚差价,数据直接从仓库传输到需要的组件中。
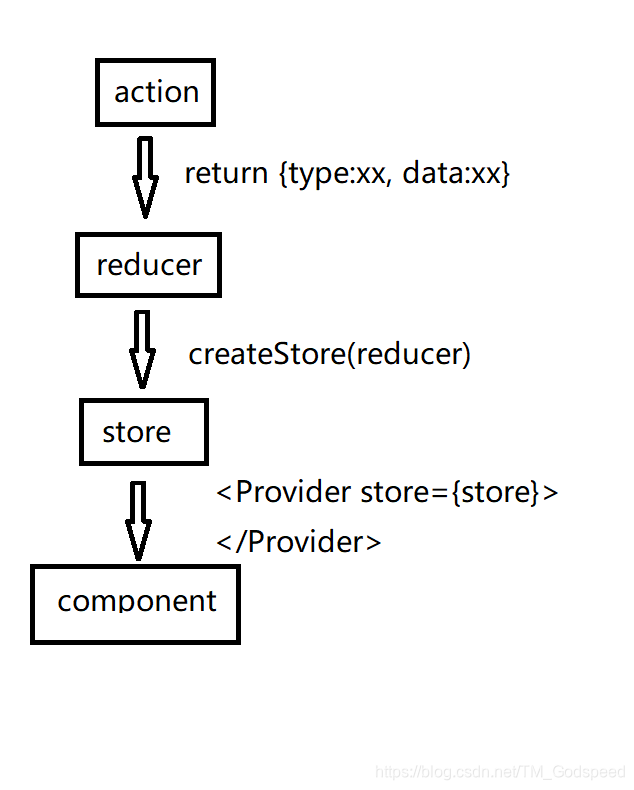
好了,废话不多说,下面开始进入正题吧。首先要看一下 redux 的工作流程
-- index.js
|
-- app.js
|
-- redux
|	|
|	-- index.js
这个地方就不用解释了吧,我相信点进来看的读者要么是不小心点错了要么是已经有一定 react 基础的了,所以点错的同学请离开。。
import React from 'react'
import ReactDOM from 'react-dom'
import {Provider} from 'react-redux'
import {
    createStore
    , applyMiddleware	// 使用中间件
    , compose
} from 'redux'
// 使用中间件使 redux 可以执行异步操作
import thunk from 'redux-thunk'

import App from './App'

import {reducer} from './redux'

// 如果有 redux 辅助工具则执行, 否则什么都不做
const devToolsExtension = window.devToolsExtension
						?window.devToolsExtension()
						:()=>{}

const store = createStore(
    reducer
	, compose(
    	applyMiddleware(thunk)
        , devToolsExtension
    )
)

ReactDOM.render(
    <Provider store={store}>
          <App/>
    </Provider>
    , document.getElementById('root')
)
import React, {Component} from 'react'
import {
    connect
} from 'react-redux'
import {
    add
    , minus
    , minusAsync
} from './redux'

class App extends Component {
    render(){
        return (
        	<div className-'App'>
            	<h1> hello redux </h1>

                {/*将store的状态显示出来*/}
                <h2>{this.props.state}</h2>

                {/* 创建按钮 执行事件 */}
                <input
                    type='button'
                    defaultValue='增加'
                    onClick={()=>{
                        this.props.add()
                    }}
                 />
                <hr/>
                <input
                    type='button'
                    defaultValue='减少'
                    onClick={()=>{
                        this.props.minus()
                    }}
                 />
                <hr/>
                <input
                    type='button'
                    defaultValue='异步减少'
                    onClick={()=>{
                        this.props.minusAsync()
                    }}
                 />
            </div>
        )
    }
}

// 把 state 映射到 props 中, 这样组件就可以通过 this.props 获得新的状态
const matStateToProps = state => {
    return {
        state    // store.getState()
    }
}
// 将指令传到组件的 this.props 中
const mapDispatchToProps = state => {
    add
    , minus
    , minusAsync
}
App = connect(mapStateToProps, mapDispatchToProps)(App)

export default App
这里解释一下 connect 是用来干什么的:
简单来说,这个跟给人送礼是一样的,礼物是你想给别人的,但是别人不要,那这礼物依然不是那个人的;
同理,在这个地方,数据的确是可以从仓库中接受到,但是如果组件不接受,那么数据也是不能传递到组件中的,接受的组件通过 this.props 来获取仓库中的数据(state)和指令(action),各位不太明白的一定要打印一下这个 this.props 啊。
// reducer	用于进行数据操作,返回一个state(对象、数组、基本数据类型)
function reducer(state=0, action){
    switch(action.type){
        case 'add':
            return state+1
        case 'minus':
            return state-1
        default:
            return state
    }
}

// 以下的函数都是 action
export function add(){
    return {
        type: 'add'
    }
}
export function minus(){
    return {
        type: 'minus'
    }
}
export function minusAsync(){
    return dispatch=>{
        setTimeout(()=>{
            dispatch(minus())
        }, 2000)
    }
}
看本段落之前请确保你已经明白了 react-redux 是怎么使用的
当你已经掌握怎么使用 react-redux 的时候你可能会觉得每次组件接受数据的那段代码写好多东西啊,为了接受仓库的数据还要额外写两个函数。而现在,有了装饰器之后,妈妈再也不用担心我写太多模块代码啦!
yarn eject 或者 npm run ejectgit add .git commit -m 'up'// 原来的babel
"babel": {
"presets": [
"react-app"
]
}
// 修改后的babel
"babel": {
"presets": [
"react-app"
],
"plugins": [
[
"@babel/plugin-proposal-decorators",
{
"legacy": true
}
]
]
}
import xxx
...

/********************** 看我 **********************************/
@connect(
	state=>({state})
    , {add, minus, minusAsync}
)
/*************************************************************/

class App extends Component{
    ...
    this.props.state // 通过该语句来获得redux的数据
}

export default App
好了,相信能看到这里的同学都是很棒的,祝早日升职加薪,走上人生巅峰~
拜了个拜 ┏(^0^)┛
如果觉得我的文章对您有用,请随意打赏。你的支持将鼓励我继续创作!
