社区微信群开通啦,扫一扫抢先加入社区官方微信群

社区微信群
首先来看Vue的构造函数,
源码:
function Vue(options) {
  if (process.env.NODE_ENV !== 'production' &&
    !(this instanceof Vue)
  ) {
    warn('Vue is a constructor and should be called with the `new` keyword')
  }
  this._init(options)
}
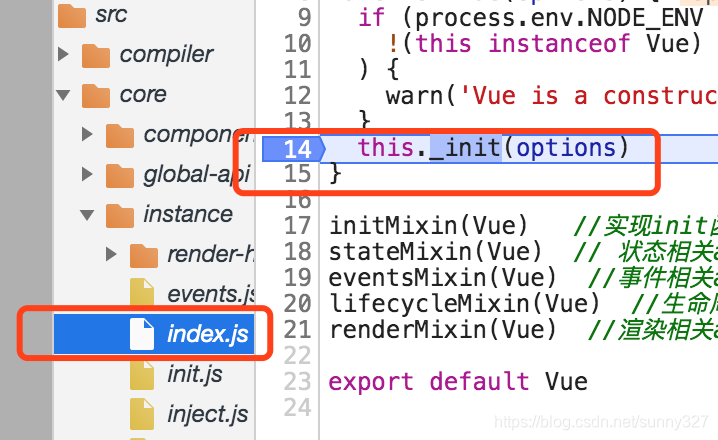
可以看到这里会进入到_init()这个方法中。即Vue.prototype._init,所在文件为src/core/instance/init.js
可以在这个文件中看到,_init()方法定义了很多的初始化方法, _init()源码:
export function initMixin(Vue: Class<Component>) {
Vue.prototype._init = function (options?: Object) {
const vm: Component = this
// a uid
vm._uid = uid++
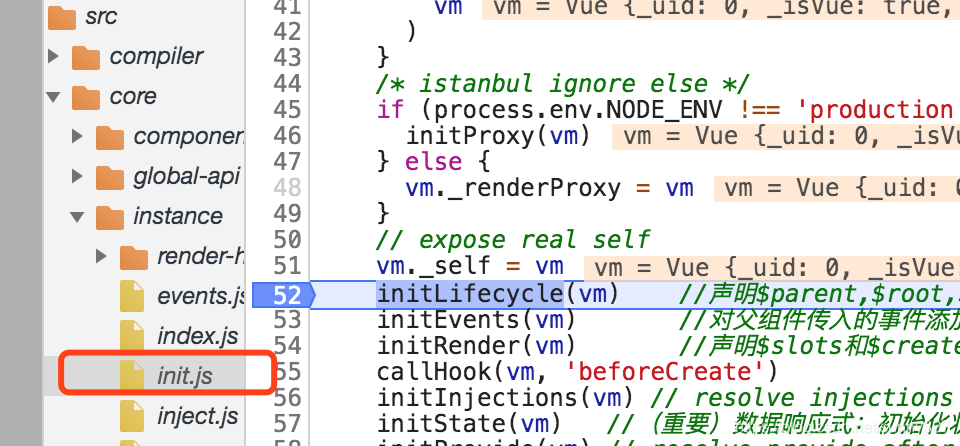
....中间代码忽略,从45行看起
/* istanbul ignore else */
if (process.env.NODE_ENV !== 'production') {
initProxy(vm)
} else {
vm._renderProxy = vm
}
// expose real self
vm._self = vm
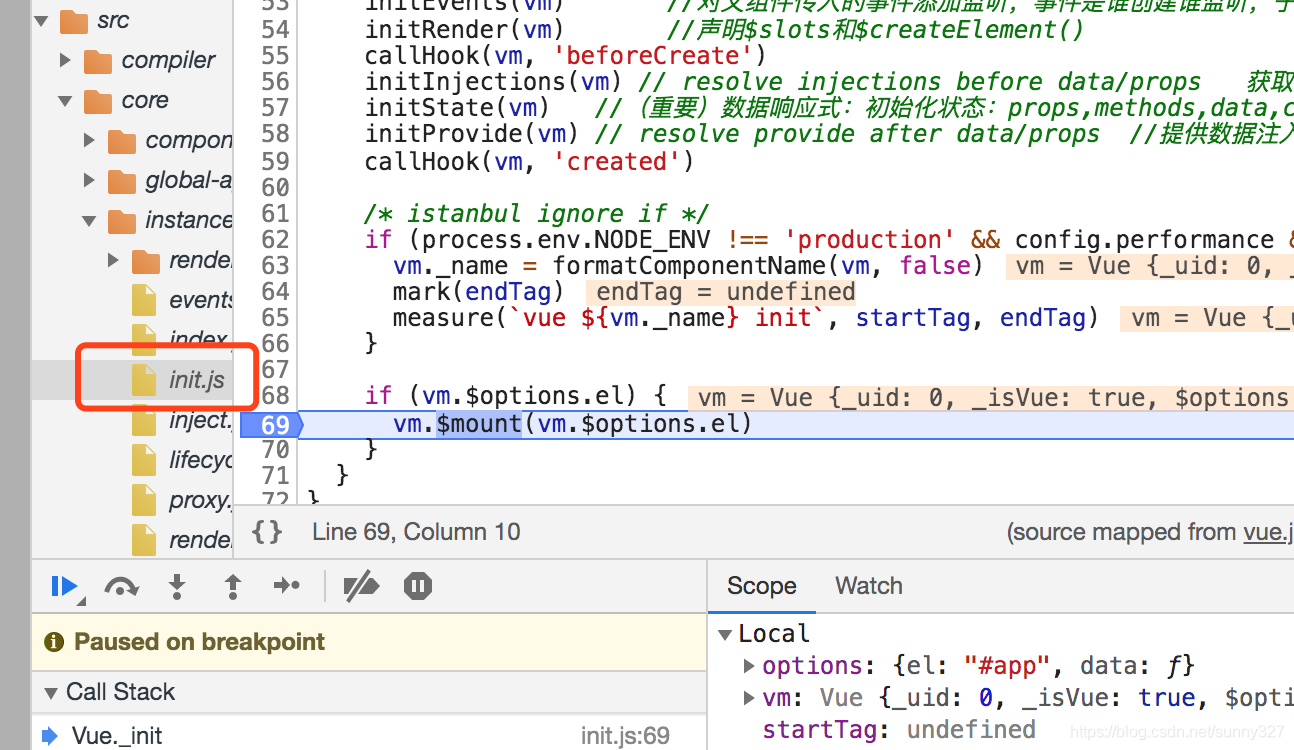
initLifecycle(vm) //声明$parent,$root,$parent,$refs
initEvents(vm) //对父组件传入的事件添加监听,事件是谁创建谁监听,子组件创建事件子组件监听
initRender(vm) //声明$slots和$createElement()
callHook(vm, 'beforeCreate')
initInjections(vm) // resolve injections before data/props 获取注入数据
initState(vm) //(重要)数据响应式:初始化状态:props,methods,data,computed,watch
initProvide(vm) // resolve provide after data/props //提供数据注入
callHook(vm, 'created')
/* istanbul ignore if */
if (process.env.NODE_ENV !== 'production' && config.performance && mark) {
vm._name = formatComponentName(vm, false)
mark(endTag)
measure(`vue ${vm._name} init`, startTag, endTag)
}
if (vm.$options.el) {
vm.$mount(vm.$options.el)
}
}
}
2.1 我们来描述一下这些初始化方法:
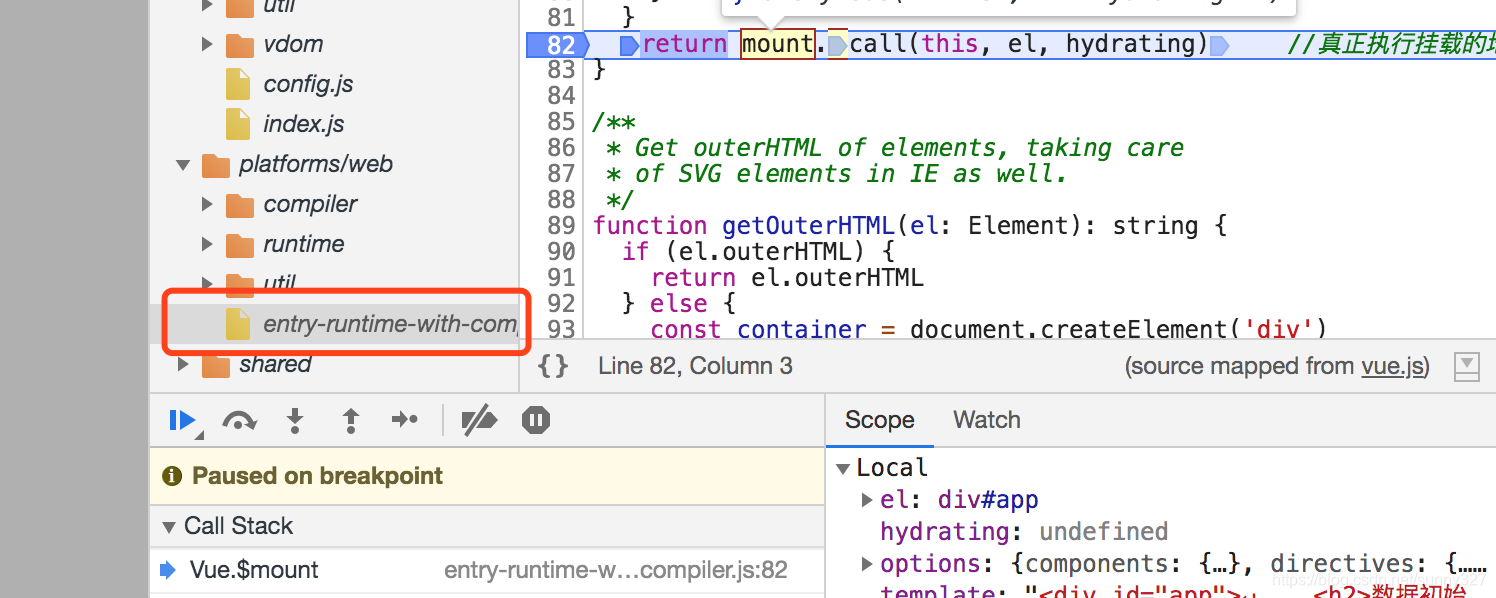
执行挂载:在这个文件中获取VDom并转换为真实DOM。
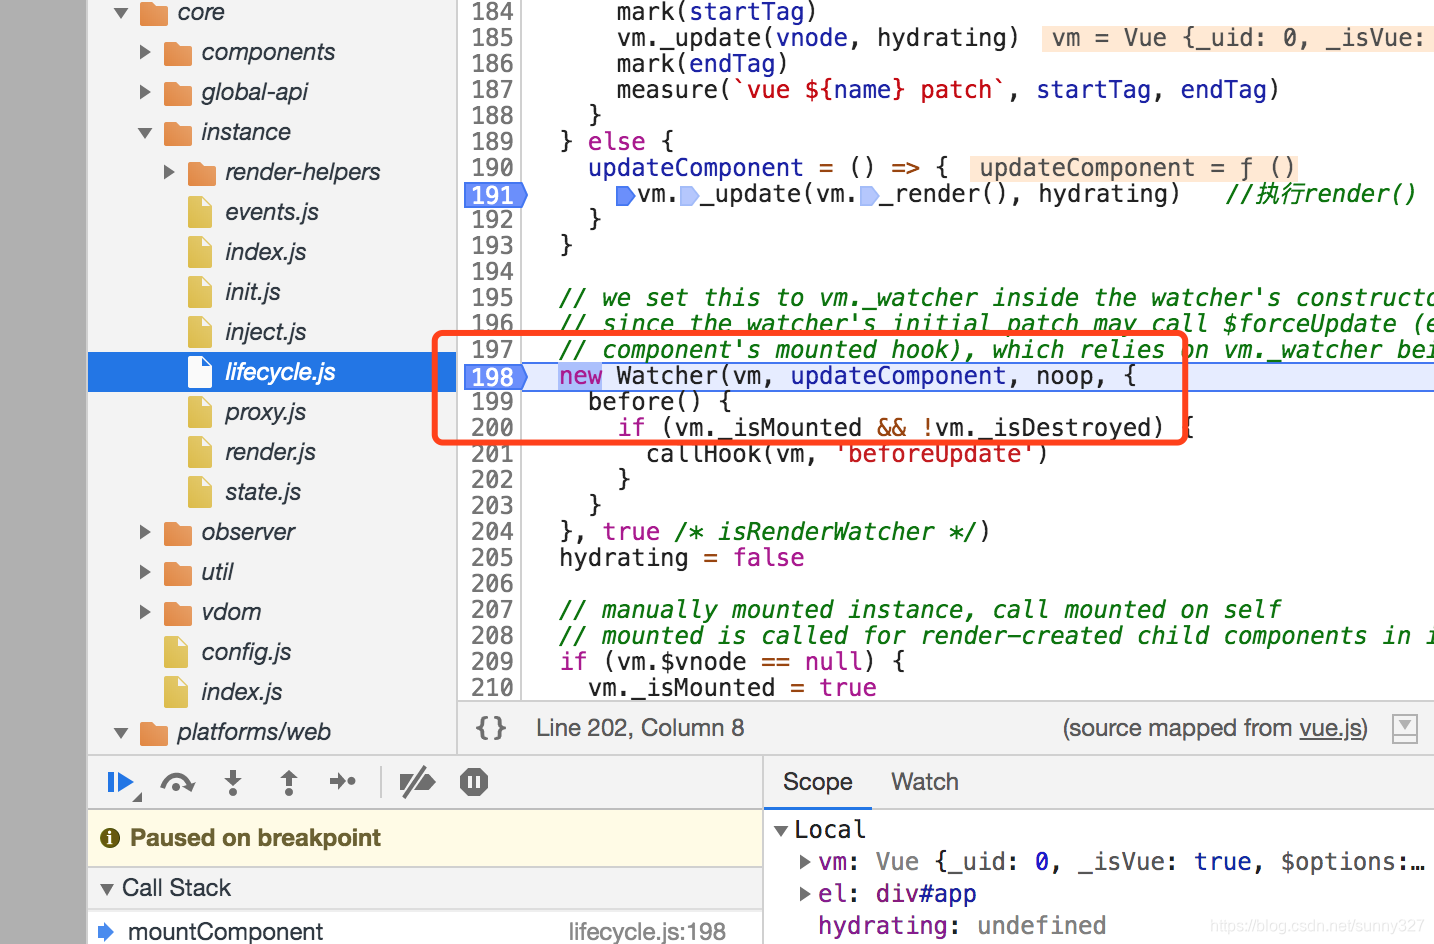
首先在lifecircle.js文件中,定义了Vue.prototype._update 方法,这个方法会获取Vdom,接着执行mountComponent,然后执行vm._update(vnode, hydrating),源码如下:
let updateComponent
  /* istanbul ignore if */
  if (process.env.NODE_ENV !== 'production' && config.performance && mark) {
    updateComponent = () => {
      const name = vm._name
      const id = vm._uid
      const startTag = `vue-perf-start:${id}`
      const endTag = `vue-perf-end:${id}`

      mark(startTag)
      const vnode = vm._render()
      mark(endTag)
      measure(`vue ${name} render`, startTag, endTag)

      mark(startTag)
      vm._update(vnode, hydrating)  //把虚拟Dom转化为真实dom
      mark(endTag)
      measure(`vue ${name} patch`, startTag, endTag)
    }
  } else {
    updateComponent = () => {
      vm._update(vm._render(), hydrating)   //执行render() 获取vdom并渲染dom
    }
  }
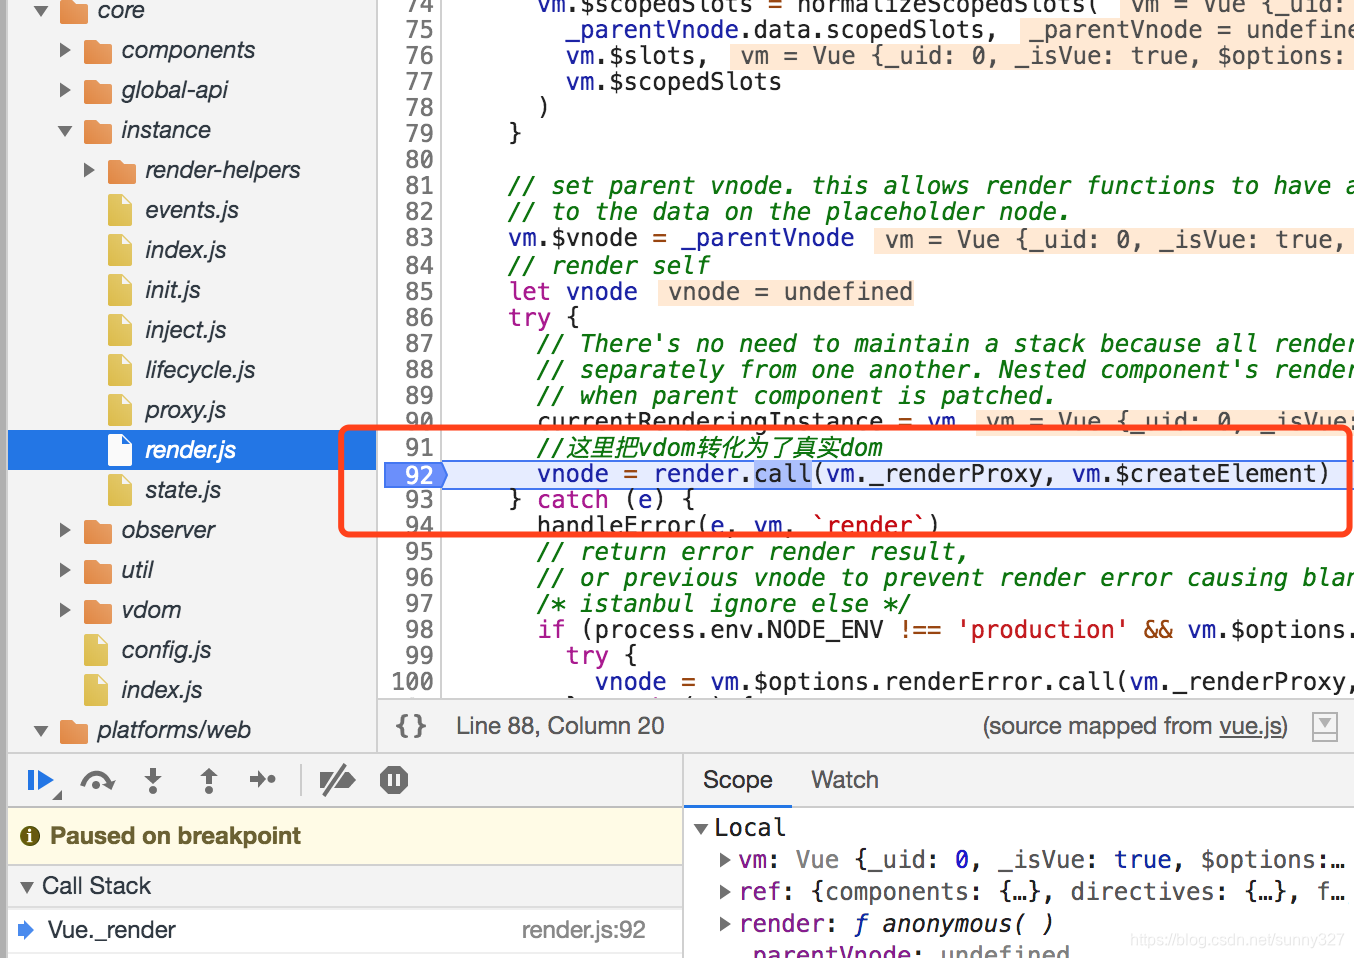
Vue.prototype._render = function (): VNode {
    const vm: Component = this
    const { render, _parentVnode } = vm.$options

    if (_parentVnode) {
      vm.$scopedSlots = normalizeScopedSlots(
        _parentVnode.data.scopedSlots,
        vm.$slots,
        vm.$scopedSlots
      )
    }

    // set parent vnode. this allows render functions to have access
    // to the data on the placeholder node.
    vm.$vnode = _parentVnode
    // render self
    let vnode
    try {
      // There's no need to maintain a stack because all render fns are ui4op[poiuy]
      // separately from one another. Nested component's render fns are called
      // when parent component is patched.
      currentRenderingInstance = vm
      //这里把vdom转化为了真实dom
      vnode = render.call(vm._renderProxy, vm.$createElement)
    }
通过这句vnode = render.call(vm._renderProxy, vm.$createElement)把vdom替换成了真实dom。
new Vue() (vue构造函数) => _init() (初始化options中的各种属性,data,methods,props,computed,watch)=> $mount (调用mountComponent())===> mountComponent() (创建updateComponent()) ===> updateComponent() (执行_render()和_update()) ===> _render() (获取虚拟dom) ===> update() (把获取的虚拟dom转化为真实dom)
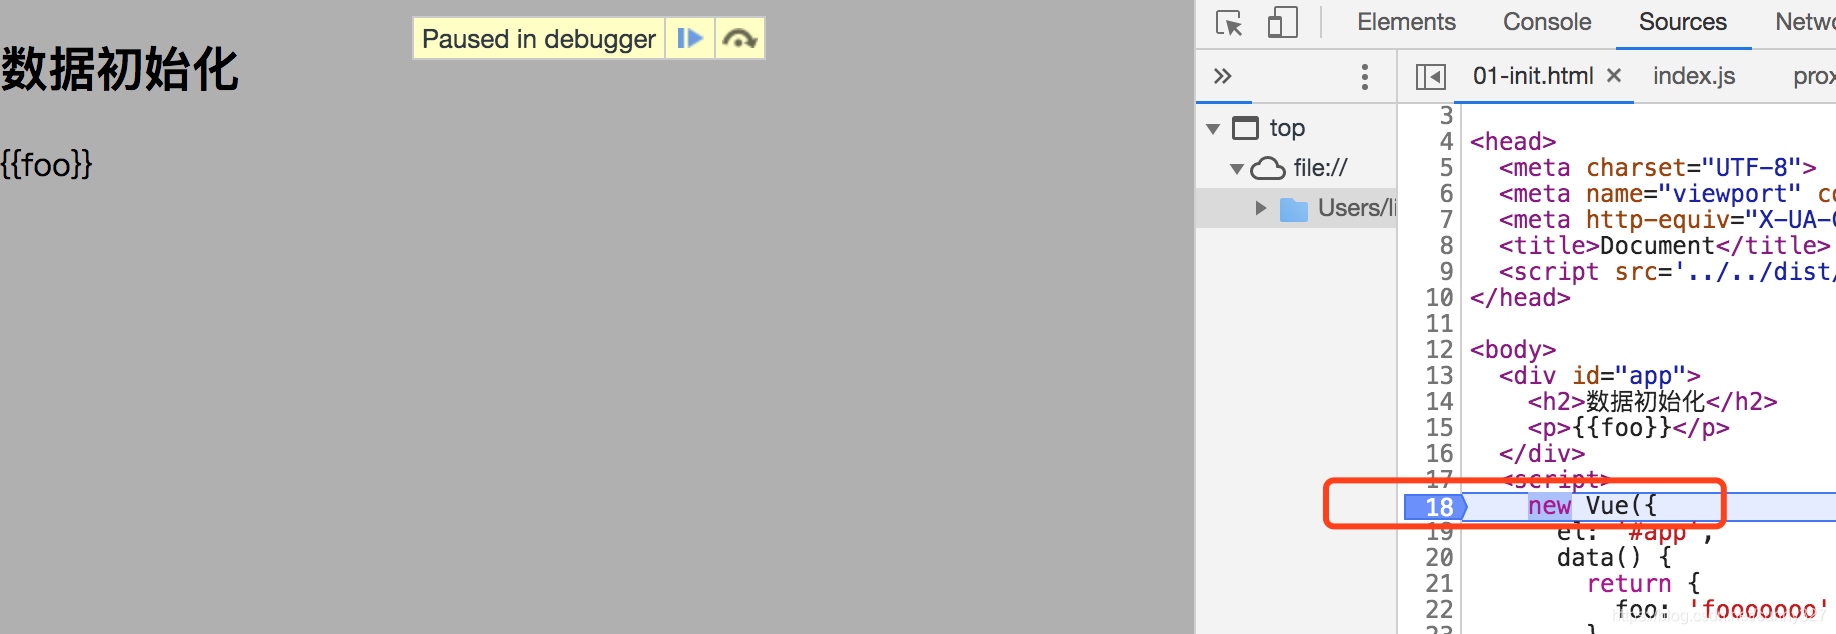
这里有一个例子来说明:
<!DOCTYPE html>
<html lang="en">

<head>
  <meta charset="UTF-8">
  <meta name="viewport" content="width=device-width, initial-scale=1.0">
  <meta http-equiv="X-UA-Compatible" content="ie=edge">
  <title>Document</title>
  <script src='../../dist/vue.js'></script>
</head>

<body>
  <div id="app">
    <h2>数据初始化</h2>
    <p>{{foo}}</p>
  </div>
  <script>
    new Vue({
      el: '#app',
      data() {
        return {
          foo: 'fooooooo'
        }
      },
    })
  </script>

</body>

</html>
在浏览器中打开这个文件,断点设置在new Vue({})这里,F11进入到这个构造函数内部。

如果觉得我的文章对您有用,请随意打赏。你的支持将鼓励我继续创作!
