社区微信群开通啦,扫一扫抢先加入社区官方微信群

社区微信群
分享一个朋友的人工智能教程(请以“右键”->"在新标签页中打开连接”的方式访问)。比较通俗易懂,风趣幽默,感兴趣的朋友可以去看看。
在springboot中,使用的最多的就是starter。starter可以理解为一个可拔插式的插件,例如,你想使用jdbc插件,那么可以使用spring-boot-starter-jdbc;如果想使用mongodb,可以使用spring-boot-starter-data-mongodb。 自定义starter
注意artifactId的命名规则,Spring官方Starter通常命名为spring-boot-starter-{name}如 spring-boot-starter-web, Spring官方建议非官方Starter命名应遵循{name}-spring-boot-starter的格式, 如mybatis-spring-boot-starter。这里创建的项目的artifactId为helloworld-spring-boot-starter
注意:这里的packaging为jar,starter需要使用到Spring boot的自动配置功能,所以需要引入自动配置相关的依赖
<groupId>com.mengday</groupId>
<artifactId>helloworld-spring-boot-starter</artifactId>
<version>1.0-SNAPSHOT</version>
<packaging>jar</packaging>

<dependencies>
	<dependency>
      <groupId>org.springframework.boot</groupId>
      <artifactId>spring-boot-autoconfigure</artifactId>
      <version>2.0.0.RELEASE</version>
    </dependency>
    <dependency>
      <groupId>org.springframework.boot</groupId>
      <artifactId>spring-boot-configuration-processor</artifactId>
      <version>2.0.0.RELEASE</version>
      <optional>true</optional>
    </dependency>
</dependencies>
在使用Spring官方的Starter时通常可以在application.properties中来配置参数覆盖掉默认的值,例如在使用redis时一般就会有对应的RedisProperties
@ConfigurationProperties(prefix = "spring.redis")
public class RedisProperties {
    private int database = 0;
    private String url;
    private String host = "localhost";
    private String password;
    private int port = 6379;
}
我们来模仿来定义自己的Properties类
@ConfigurationProperties(prefix = "spring.person")
public class PersonProperties {
    // 姓名
    private String name;
    // 年龄
    private int age;
    // 性别
    private String sex = "M";

    // Getter & Setter
}
每个starter都有自己的功能,例如在spring-boot-starter-jdbc中最重要的类时JdbcTemplate,每个starter中的核心业务类明白都不同,也没什么规律(像spring-boot-starter-data-xxx的命名是比较有规律的),这里使用PersonService来定义helloworld-spring-boot-starter的功能,这里通过一个sayHello来模拟一个功能。
public class PersonService {

    private PersonProperties properties;

    public PersonService() {
    }

    public PersonService(PersonProperties properties) {
        this.properties = properties;
    }

    public void sayHello(){
        System.out.println("大家好,我叫: " + properties.getName() + ", 今年" + properties.getAge() + "岁"
            + ", 性别: " + properties.getSex());
    }
}
一般每个starter都至少会有一个自动配置类,一般命名规则使用XxxAutoConfiguration, 例如RedisAutoConfiguration
@Configuration
@ConditionalOnClass({ JedisConnection.class, RedisOperations.class, Jedis.class })
@EnableConfigurationProperties(RedisProperties.class)
public class RedisAutoConfiguration {

	@Configuration
	@ConditionalOnClass(GenericObjectPool.class)
	protected static class RedisConnectionConfiguration {
		private final RedisProperties properties;

		@Bean
		@ConditionalOnMissingBean(RedisConnectionFactory.class)
		public JedisConnectionFactory redisConnectionFactory()
				throws UnknownHostException {
			return applyProperties(createJedisConnectionFactory());
		}
	}

	@Configuration
	protected static class RedisConfiguration {
		@Bean
		@ConditionalOnMissingBean(name = "redisTemplate")
		public RedisTemplate<Object, Object> redisTemplate(RedisConnectionFactory redisConnectionFactory)
						throws UnknownHostException {
			RedisTemplate<Object, Object> template = new RedisTemplate<Object, Object>();
			template.setConnectionFactory(redisConnectionFactory);
			return template;
		}

}
这里我们定义自己的自动配置PersonServiceAutoConfiguration,并将核心功能类PersonService放入到Spring Context容器中
@Configuration
@EnableConfigurationProperties(PersonProperties.class)
@ConditionalOnClass(PersonService.class)
@ConditionalOnProperty(prefix = "spring.person", value = "enabled", matchIfMissing = true)
public class PersonServiceAutoConfiguration {

    @Autowired
    private PersonProperties properties;

    @Bean
    @ConditionalOnMissingBean(PersonService.class)  // 当容器中没有指定Bean的情况下,自动配置PersonService类
    public PersonService personService(){
        PersonService personService = new PersonService(properties);
        return personService;
    }
}
@ConditionalOnClass:当类路径classpath下有指定的类的情况下进行自动配置
@ConditionalOnMissingBean:当容器(Spring Context)中没有指定Bean的情况下进行自动配置
@ConditionalOnProperty(prefix = “example.service”, value = “enabled”, matchIfMissing = true),当配置文件中example.service.enabled=true时进行自动配置,如果没有设置此值就默认使用matchIfMissing对应的值
@ConditionalOnMissingBean,当Spring Context中不存在该Bean时。
@ConditionalOnBean:当容器(Spring Context)中有指定的Bean的条件下
@ConditionalOnMissingClass:当类路径下没有指定的类的条件下
@ConditionalOnExpression:基于SpEL表达式作为判断条件
@ConditionalOnJava:基于JVM版本作为判断条件
@ConditionalOnJndi:在JNDI存在的条件下查找指定的位置
@ConditionalOnNotWebApplication:当前项目不是Web项目的条件下
@ConditionalOnWebApplication:当前项目是Web项目的条件下
@ConditionalOnResource:类路径下是否有指定的资源
@ConditionalOnSingleCandidate:当指定的Bean在容器中只有一个,或者在有多个Bean的情况下,用来指定首选的Bean
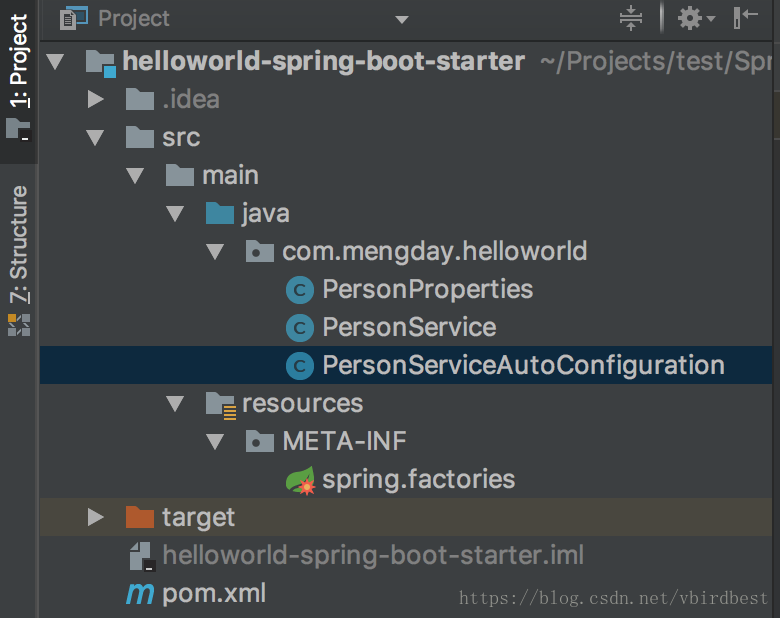
注意:META-INF是自己手动创建的目录,spring.factories也是手动创建的文件,在该文件中配置自己的自动配置类
org.springframework.boot.autoconfigure.EnableAutoConfiguration=com.mengday.helloworld.PersonServiceAutoConfiguration
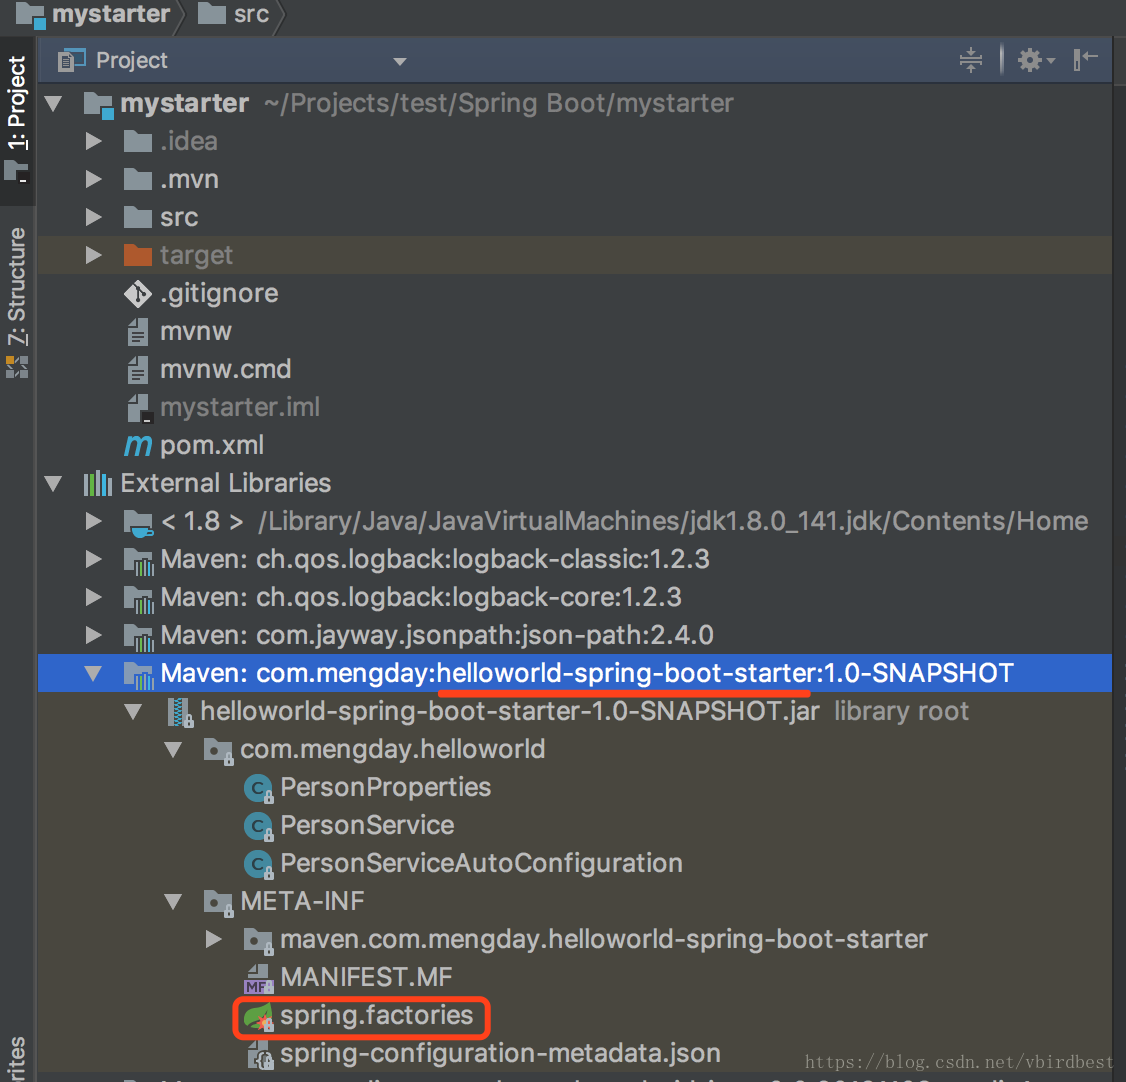
<dependency>
	<groupId>com.mengday</groupId>
	<artifactId>helloworld-spring-boot-starter</artifactId>
	<version>1.0-SNAPSHOT</version>
</dependency>
spring.person.name=mengday
spring.person.age=28
import com.mengday.helloworld.PersonService;
import org.junit.Test;
import org.junit.runner.RunWith;
import org.springframework.beans.factory.annotation.Autowired;
import org.springframework.boot.test.context.SpringBootTest;
import org.springframework.test.context.junit4.SpringRunner;

@RunWith(SpringRunner.class)
@SpringBootTest
public class MystarterApplicationTests {

	@Autowired
	private PersonService personService;

	@Test
	public void testHelloWorld() {
		personService.sayHello();
	}
}
从使用者的角度来看,自己并没有将PersonService放入到Spring容器中,就直接来使用了,进行注入进来了。
总结下Starter的工作原理
@ConfigurationProperties: 注解主要用来把properties配置文件转化为对应的XxxProperties来使用的,并不会把该类放入到IOC容器中,如果想放入到容器中可以在XxxProperties上使用@Component来标注,也可以使用@EnableConfigurationProperties(XxxProperties.class)统一配置到Application上来,这种方式可以在Application上来统一开启指定的属性,这样也没必要在每个XxxProperties上使用@Component
@EnableConfigurationProperties(XxxProperties.class) 注解的作用是@ConfigurationProperties注解生效。如果只配置@ConfigurationProperties注解,在IOC容器中是获取不到properties配置文件转化的bean的
local.host=127.0.0.1
local.port=8080

dev.host=192.168.0.1
dev.port=8888
@ConfigurationProperties(prefix="local")
public class LocalProperties {

    private String host;
    private String port;
}

@ConfigurationProperties(prefix="dev")
public class DevProperties {

    private String host;
    private String port;
}
@SpringBootApplication
@EnableConfigurationProperties({LocalProperties.class, DevProperties.class})
public class MystarterApplication {

	public static void main(String[] args) {
		ConfigurableApplicationContext applicationContext = SpringApplication.run(MystarterApplication.class, args);
		System.out.println(applicationContext.getBean(LocalProperties.class));
		System.out.println(applicationContext.getBean(DevProperties.class));
		applicationContext.close();
	}
}
如果在每个Properties上都使用@Component来标注,那么在XxxApplication上也不需要使用@EnableConfigurationProperties({XxxProperties.class})来标注了,同样也可以在spring上下文容器中也能获取到XxxProperties对应的bean
分享一个朋友的人工智能教程(请以“右键”->"在新标签页中打开连接”的方式访问)。比较通俗易懂,风趣幽默,感兴趣的朋友可以去看看。
如果觉得我的文章对您有用,请随意打赏。你的支持将鼓励我继续创作!