社区微信群开通啦,扫一扫抢先加入社区官方微信群

社区微信群
Spring Boot中除了对常用的关系型数据库提供了优秀的自动化支持之外,对于很多NoSQL数据库一样提供了自动化配置的支持,包括:Redis, MongoDB, Elasticsearch, Solr和Cassandra。
Redis是一个开源的使用ANSI C语言编写、支持网络、可基于内存亦可持久化的日志型、Key-Value数据库,这里将对SpringBoot整合Redis做一个简单的讨论。
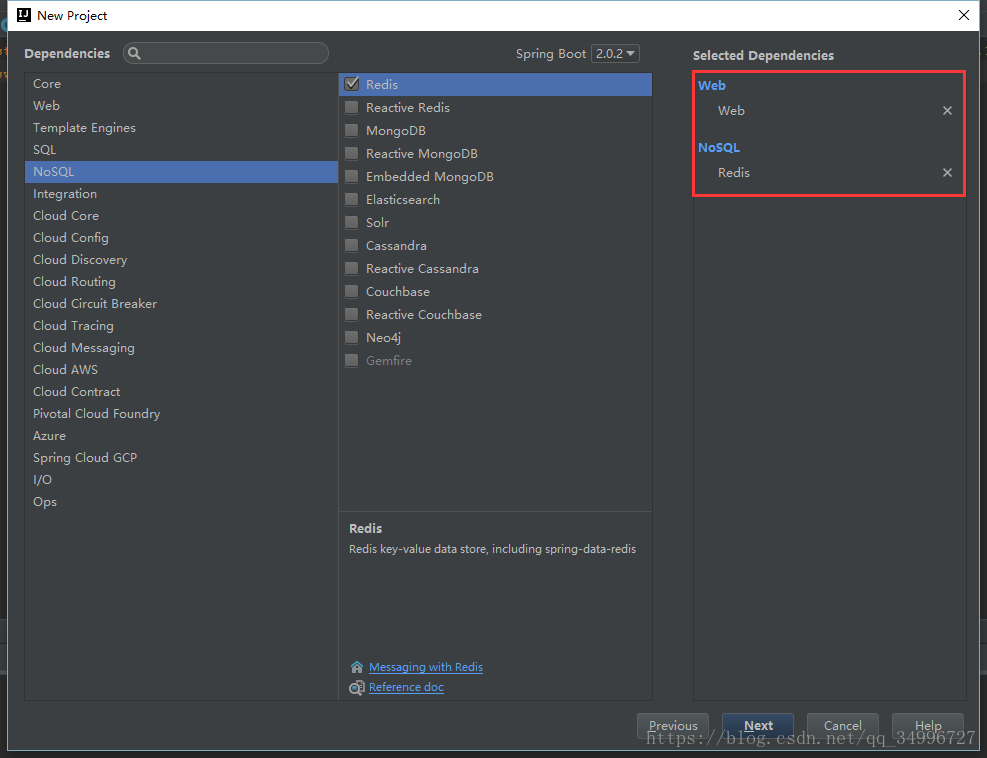
由于之前写过创建spring项目,这里就不多做介绍了,注意创建的时候选择NoSql的里面的Redis。
创建成功之后pom.xml内容:
<?xml version="1.0" encoding="UTF-8"?>
<project xmlns="http://maven.apache.org/POM/4.0.0" xmlns:xsi="http://www.w3.org/2001/XMLSchema-instance"
	xsi:schemaLocation="http://maven.apache.org/POM/4.0.0 http://maven.apache.org/xsd/maven-4.0.0.xsd">
	<modelVersion>4.0.0</modelVersion>

	<groupId>com.example</groupId>
	<artifactId>demo</artifactId>
	<version>0.0.1-SNAPSHOT</version>
	<packaging>jar</packaging>

	<name>demo</name>
	<description>Demo project for Spring Boot</description>

	<parent>
		<groupId>org.springframework.boot</groupId>
		<artifactId>spring-boot-starter-parent</artifactId>
		<version>2.0.2.RELEASE</version>
		<relativePath/> <!-- lookup parent from repository -->
	</parent>

	<properties>
		<project.build.sourceEncoding>UTF-8</project.build.sourceEncoding>
		<project.reporting.outputEncoding>UTF-8</project.reporting.outputEncoding>
		<java.version>1.8</java.version>
	</properties>

	<dependencies>
		<dependency>
			<groupId>org.springframework.boot</groupId>
			<artifactId>spring-boot-starter-data-redis</artifactId>
		</dependency>
		<dependency>
			<groupId>org.springframework.boot</groupId>
			<artifactId>spring-boot-starter-web</artifactId>
		</dependency>

		<dependency>
			<groupId>org.springframework.boot</groupId>
			<artifactId>spring-boot-starter-test</artifactId>
			<scope>test</scope>
		</dependency>
	</dependencies>

	<build>
		<plugins>
			<plugin>
				<groupId>org.springframework.boot</groupId>
				<artifactId>spring-boot-maven-plugin</artifactId>
			</plugin>
		</plugins>
	</build>

</project>
# REDIS (RedisProperties)
# Redis数据库索引(默认为0)
spring.redis.database=0
# Redis服务器地址
spring.redis.host=localhost
# Redis服务器连接端口
spring.redis.port=8090
# Redis服务器连接密码(默认为空)
spring.redis.password=password
# 连接池最大连接数(使用负值表示没有限制)
spring.redis.pool.max-active=8
# 连接池最大阻塞等待时间(使用负值表示没有限制)
spring.redis.pool.max-wait=-1
# 连接池中的最大空闲连接
spring.redis.pool.max-idle=8
# 连接池中的最小空闲连接
spring.redis.pool.min-idle=0
# 连接超时时间(毫秒)
spring.redis.timeout=0package com.example.redis;
import org.junit.Test;
import org.junit.runner.RunWith;
import org.springframework.beans.factory.annotation.Autowired;
import org.springframework.boot.test.context.SpringBootTest;
import org.springframework.data.redis.core.RedisTemplate;
import org.springframework.test.context.junit4.SpringRunner;
import org.springframework.data.redis.core.ValueOperations;
@RunWith(SpringRunner.class)
@SpringBootTest
public class RedisDemoApplicationTests {
@Test
public void contextLoads() {
}
@Autowired RedisTemplate<String,String> redisTemplate;
@Test
public void test(){
ValueOperations<String, String> opsForValue = redisTemplate.opsForValue();
opsForValue.set("redisKey","cluster test");
System.out.println(opsForValue.get("redisKey"));
}
}
Ok单机版完成了,下面我们就来整合Redis集群。
在上面的项目中添加这几个依赖,有些是在工具中使用到的,不是必须的。
		<dependency>
			<groupId>redis.clients</groupId>
			<artifactId>jedis</artifactId>
			<version>2.9.0</version>
		</dependency>
		<dependency>
			<groupId>com.alibaba</groupId>
			<artifactId>fastjson</artifactId>
			<version>1.2.47</version>
		</dependency>
		<dependency>
			<groupId>org.apache.commons</groupId>
			<artifactId>commons-pool2</artifactId>
			<version>2.4.2</version>
</dependency>密码、ip等做出隐藏,请自行补充。
spring:
  redis:
    password: *******
    clusterNodes: 10.102.*.*:6279,10.102.*.*:6379,10.102.*.*:6279,10.102.*.*:6479,10.102.*.*:6479,10.102.*.*:6379
    expireSeconds: 120
    commandTimeout: 10000  #redis操作的超时时间
    pool:
      maxActive: 5000 #最大连接数
      maxIdle: 30 #最大空闲连接数
      minIdle: 5 #最小空闲连接数
maxWait: 3000 #获取连接最大等待时间 ms #default -1package com.example.redis.redis;
import org.springframework.boot.context.properties.ConfigurationProperties;
import org.springframework.stereotype.Component;
@Component
@ConfigurationProperties(prefix = "spring.redis")
public class RedisProperties {
private int expireSeconds;
private String clusterNodes;
private String password;
private int commandTimeout;
public int getExpireSeconds() {
return expireSeconds;
}
public void setExpireSeconds(int expireSeconds) {
this.expireSeconds = expireSeconds;
}
public String getClusterNodes() {
return clusterNodes;
}
public void setClusterNodes(String clusterNodes) {
this.clusterNodes = clusterNodes;
}
public String getPassword() {
return password;
}
public void setPassword(String password) {
this.password = password;
}
public int getCommandTimeout() {
return commandTimeout;
}
public void setCommandTimeout(int commandTimeout) {
this.commandTimeout = commandTimeout;
}
}package com.example.redis.redis;
import org.apache.commons.pool2.impl.GenericObjectPoolConfig;
import org.springframework.beans.factory.annotation.Autowired;
import org.springframework.context.annotation.Bean;
import org.springframework.context.annotation.Configuration;
import redis.clients.jedis.HostAndPort;
import redis.clients.jedis.JedisCluster;
import java.util.HashSet;
import java.util.Set;
@Configuration
public class JedisClusterConfig {
@Autowired
private RedisProperties redisProperties;
/**
* 注意:
* 这里返回的JedisCluster是单例的,并且可以直接注入到其他类中去使用
* @return
*/
@Bean
public JedisCluster getJedisCluster() {
String[] serverArray = redisProperties.getClusterNodes().split(",");//获取服务器数组(这里要相信自己的输入,所以没有考虑空指针问题)
Set<HostAndPort> nodes = new HashSet<>();
for (String ipPort : serverArray) {
String[] ipPortPair = ipPort.split(":");
nodes.add(new HostAndPort(ipPortPair[0].trim(), Integer.valueOf(ipPortPair[1].trim())));
}
return new JedisCluster(nodes,redisProperties.getCommandTimeout(),1000,1,redisProperties.getPassword() ,new GenericObjectPoolConfig());//需要密码连接的创建对象方式
}
}package com.example.redis.redis;
import com.alibaba.fastjson.JSON;
import org.springframework.beans.factory.annotation.Autowired;
import org.springframework.stereotype.Component;
import redis.clients.jedis.JedisCluster;
@Component
public class RedisUtil {
@Autowired
private JedisCluster jedisCluster;
/**
* 设置缓存
* @param key 缓存key
* @param value 缓存value
*/
public void set(String key, String value) {
jedisCluster.set(key, value);
}
/**
* 设置缓存对象
* @param key 缓存key
* @param obj 缓存value
*/
public <T> void setObject(String key, T obj , int expireTime) {
jedisCluster.setex(key, expireTime, JSON.toJSONString(obj));
}
/**
* 获取指定key的缓存
* @param key---JSON.parseObject(value, User.class);
*/
public String getObject(String key) {
return jedisCluster.get(key);
}
/**
* 判断当前key值 是否存在
*
* @param key
*/
public boolean hasKey(String key) {
return jedisCluster.exists(key);
}
/**
* 设置缓存,并且自己指定过期时间
* @param key
* @param value
* @param expireTime 过期时间
*/
public void setWithExpireTime( String key, String value, int expireTime) {
jedisCluster.setex(key, expireTime, value);
}
/**
* 获取指定key的缓存
* @param key
*/
public String get(String key) {
String value = jedisCluster.get(key);
return value;
}
/**
* 删除指定key的缓存
* @param key
*/
public void delete(String key) {
jedisCluster.del(key);
}
}package com.example.redis.controller;
import com.example.redis.redis.RedisUtil;
import org.springframework.beans.factory.annotation.Autowired;
import org.springframework.web.bind.annotation.RequestMapping;
import org.springframework.web.bind.annotation.RestController;
@RestController
public class RedisController {
@Autowired
private RedisUtil redisUtil;
@RequestMapping("/redis")
public String findRedis() {
redisUtil.set("key100", "666");
return redisUtil.get("key100");
}
}本来Redis集群的测试需要模仿部分节点宕机(手动关闭部分节点),这里就不做讨论了,大家可以自行测试。
关于SpringBoot整合Redis就告一段落了,是不是很简单,发现自己很厉害,感觉自己棒棒的,没错,你就是传说中的萌哒哒。至于在项目中使用还需要去写一些工具类方便调用,如果是在SpringCloud中还需要写一些公用的跨服调用接口,这些这里就不讨论了。
如果觉得我的文章对您有用,请随意打赏。你的支持将鼓励我继续创作!