社区微信群开通啦,扫一扫抢先加入社区官方微信群

社区微信群
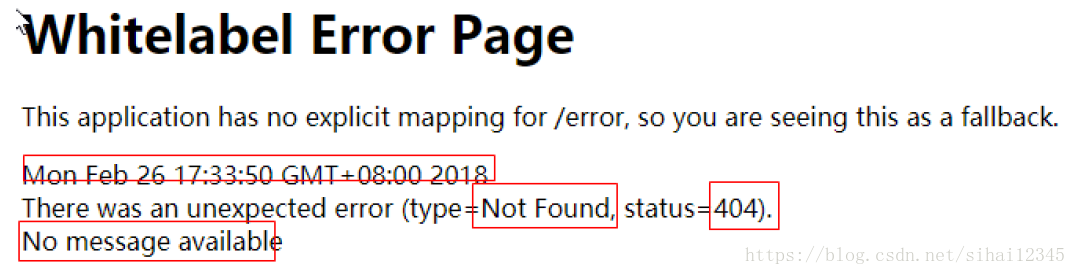
1.1、错误页面
如果没有进行处理出现错误,默认这样处理页面。
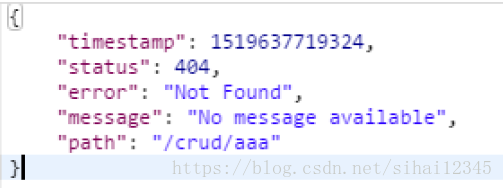
1.2、其他客户端,默认响应一个json数据
这个类是默认处理/error请求的。下面看看源代码
其中有这样一段代码来处理错误请求:
@Controller
@RequestMapping("${server.error.path:${error.path:/error}}")
public class BasicErrorController extends AbstractErrorController {
@RequestMapping(produces = "text/html")//产生html类型的数据;浏览器发送的请求来到这个方法处理
public ModelAndView errorHtml(HttpServletRequest request,
HttpServletResponse response) {
HttpStatus status = getStatus(request);
Map<String, Object> model = Collections.unmodifiableMap(getErrorAttributes(
request, isIncludeStackTrace(request, MediaType.TEXT_HTML)));
response.setStatus(status.value());
//去哪个页面作为错误页面;包含页面地址和页面内容
ModelAndView modelAndView = resolveErrorView(request, response, status, model);
}
@RequestMapping
@ResponseBody //产生json数据,其他客户端来到这个方法处理;
public ResponseEntity<Map<String, Object>> error(HttpServletRequest request) {
Map<String, Object> body = getErrorAttributes(request,
isIncludeStackTrace(request, MediaType.ALL));
HttpStatus status = getStatus(request);
return new ResponseEntity<Map<String, Object>>(body, status);
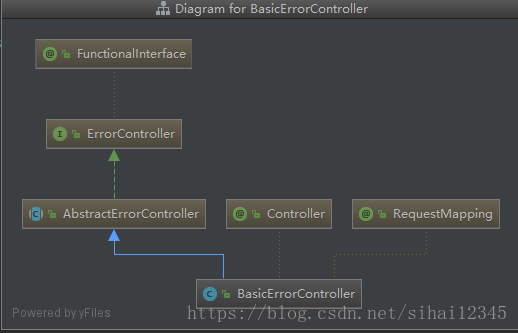
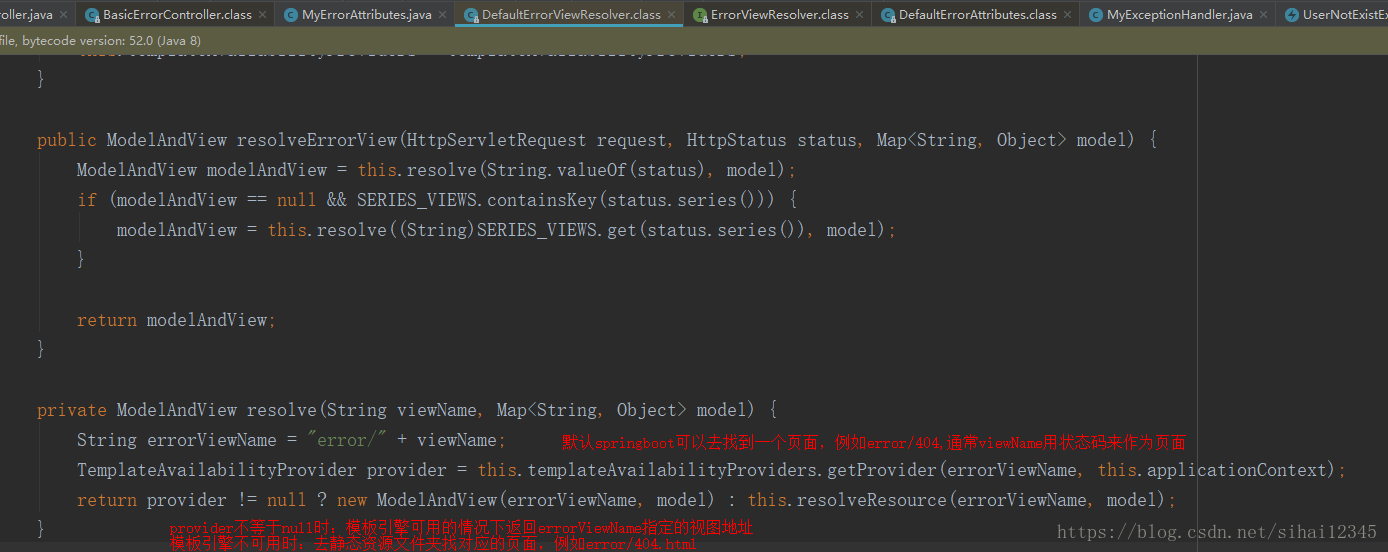
}其类图如下:
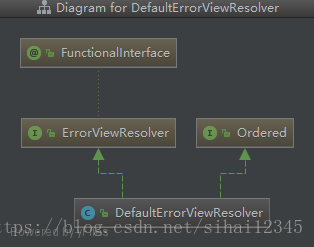
下面我们还要看下一个关键类
先看一下类图
我们看看其中关键代码,就知道springboot如何处理异常:
处理步骤:
一但系统出现4xx或者5xx之类的错误;ErrorPageCustomizer就会生效(定制错误的响应规则);就会来到/error请求;就会被BasicErrorController(2.1中讲解的)处理。
1)有模板引擎的情况下;error/状态码
将错误页面命名为 错误状态码.html 放在模板引擎文件夹里面的error文件夹下,发生此状态码的错误就会来到 对应的页面。
我们可以使用4xx和5xx作为错误页面的文件名来匹配这种类型的所有错误
页面能获取的信息:
timestamp:时间戳
status:状态码
error:错误提示
exception:异常对象
message:异常消息
errors:JSR303数据校验的错误都在这里
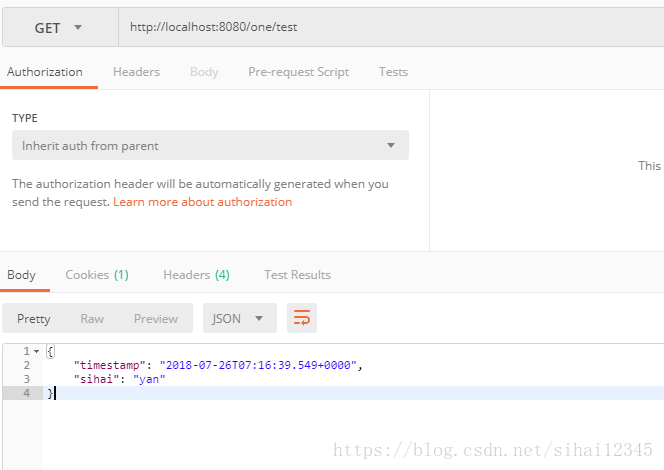
例如:
2)没有模板引擎(模板引擎找不到这个错误页面),静态资源文件夹下找(也就是static文件夹)
3)以上都没有错误页面,就是默认来到SpringBoot默认的错误提示页面
/**
 * @author 欧阳思海
 * @date 2018/7/25 9:57
 */
@Controller
@RequestMapping("/one")
public class ExceptionControllerTest_2 {


    @RequestMapping(value = "/test", method = RequestMethod.GET)
    public void testException(){
        throw new UserNotExistException();
    }


    @ExceptionHandler(UserNotExistException.class)
    public Map<String,Object> exceptionHandler(Exception e) {
        Map<String,Object> map = new HashMap<>();
        map.put("code","notexist");
        map.put("message",e.getMessage());
        return map;
    }

}
说明:
postman输入或者浏览器:http://localhost:8080/one/test
我们需要写一个MyExceptionHandler类,用@ControllerAdvice标注和@ExceptionHandler(UserNotExistException.class)标记具体使用哪个类
/**
 * @author 欧阳思海
 * @date 2018/7/26 10:58
 */
@ControllerAdvice
public class MyExceptionHandler {

    @ResponseBody
    @ExceptionHandler(UserNotExistException.class)
    public Map<String,Object> handleException(Exception e){
        Map<String,Object> map = new HashMap<>();
        map.put("code","notexist");
        map.put("message",e.getMessage());
        return map;
    }
}
说明:
@ControllerAdvice约定了几种可行的返回值,如果是直接返回model类的话,需要使用@ResponseBody进行json转换
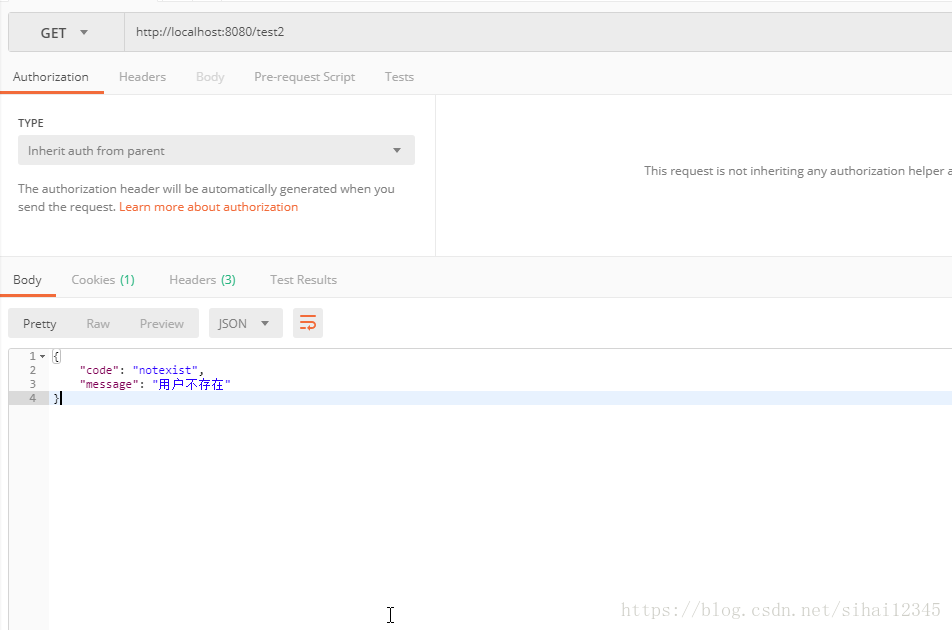
 @RequestMapping(value = "/test2", method = RequestMethod.GET)
    public void testException(){
        throw new UserNotExistException();
}在浏览器输入:http://localhost:8080/test2
如果觉得我的文章对您有用,请随意打赏。你的支持将鼓励我继续创作!