社区微信群开通啦,扫一扫抢先加入社区官方微信群

社区微信群
在上一篇博客中我们讲到了使用基于xml的声明式AspectJ,相对于代理类的AOP实现相比,基于xml的声明式AspectJ要便捷得多,但是他也是存在着一些缺点,那就是spring配置大量的代码,为了解决这个问题,AspectJ框架为AOP的实现提供了一套注解,用以取代Spring配置文件中为实现AOP功能所配置的臃肿代码
下面就通过一个事例来演示基于注解的声明式AspectJ
1、在chapter03项目的src目录下创建com.itheima.aspectj.annotation包。并将上一篇博客的切面类MyAspect复制编辑到该包下(上一篇博客点这里)
package com.itheima.aspectj.annotation;
import org.aspectj.lang.JoinPoint;
import org.aspectj.lang.ProceedingJoinPoint;
import org.aspectj.lang.annotation.After;
import org.aspectj.lang.annotation.AfterReturning;
import org.aspectj.lang.annotation.AfterThrowing;
import org.aspectj.lang.annotation.Around;
import org.aspectj.lang.annotation.Aspect;
import org.aspectj.lang.annotation.Before;
import org.aspectj.lang.annotation.Pointcut;
import org.springframework.stereotype.Component;

//切面类
@Aspect
@Component
public class MyAspect {
	//定义切入点表达式
	@Pointcut("execution(* com.itheima.jdk.*.*(..))")
	//使用一个返回值为void,方法体为空的方法来命名切入点
	private void myPointCut() {}
	//前置通知
	@Before("myPointCut()")
	private void myBefore(JoinPoint joinPoint) {
		System.out.println("前置通知:模拟执行权限检查,,,");
		System.out.println("目标类是:"+joinPoint.getTarget());
		System.out.println(",被植入增强的目标方法是:"+joinPoint.getSignature().getName());
	}
	//后置通知
	@AfterReturning("myPointCut()")
	private void myAfterReturning(JoinPoint joinPoint) {
		System.out.println("后置通知:模拟记录日志,,,");
		System.out.println(",被植入增强的目标方法是:"+joinPoint.getSignature().getName());
	}
	//环绕通知
	@Around("myPointCut()")
	private Object myAround(ProceedingJoinPoint proceedingJoinPoint)throws Throwable {
		System.out.println("环绕开始:模拟开启事务,,,");
		Object obj = proceedingJoinPoint.proceed();
		System.out.println("环绕结束:模拟关闭事务,,,");
		return obj;
	}
	//异常通知
	@AfterThrowing(value="myPointCut()",throwing="e")
	private void myAfterThrowing(JoinPoint joinPoint,Throwable e) {
		System.out.println("异常通知:不好了,出错了,,,"+e.getMessage());
	}
	//最终通知
	@After("myPointCut()")
	private void myAfter() {
		System.out.println("最终通知:模拟结束后释放资源,,,");
	}

}
对比之下就会发现代码基本没变但是多了几个注解,这也是基于注解实现Aop的特点
2、在目标类com.itheima.jdk.UserDaoImpl中,添加@Repository("userDao")
package com.itheima.jdk;

import org.springframework.stereotype.Repository;

@Repository("userDao")
public class UserDaoImpl implements UserDao {

	public void addUser() {
		System.out.println("添加用户");

	}

	public void deleteUser() {
		System.out.println("删除用户");

	}
	public void name() {
		System.out.println("改名字了");

	}

}
3、在com.itheima.aspectj.annotation包中创建配置文件applicationContext.xml,并对该文件进行编辑,代码如下所示:
<?xml version="1.0" encoding="UTF-8"?>
<beans xmlns="http://www.springframework.org/schema/beans"
    xmlns:xsi="http://www.w3.org/2001/XMLSchema-instance"
    xmlns:aop="http://www.springframework.org/schema/aop"
    xmlns:context="http://www.springframework.org/schema/context"
    xsi:schemaLocation="http://www.springframework.org/schema/beans
    http://www.springframework.org/schema/beans/spring-beans-4.3.xsd
    http://www.springframework.org/schema/aop
    http://www.springframework.org/schema/aop/spring-aop-4.3.xsd
    http://www.springframework.org/schema/context
    http://www.springframework.org/schema/context/spring-context-4.3.xsd">
   <!-- 指定需要扫描的包,使注解生效 -->
   <context:component-scan base-package="com.itheima" />
   <!-- 启动基于注解的声明式AspectJ支持 -->
   <aop:aspectj-autoproxy />
</beans>
和基于xml相比,基于注解的配置文件确实没有那么臃肿
4、在com.itheima.aspectj.annotation包中,创建测试类TestAnnotation,该类与上一篇中的测试类基本相同,只是文件路径不同
package com.itheima.aspectj.annotation;
import org.springframework.context.ApplicationContext;
import org.springframework.context.support.ClassPathXmlApplicationContext;

import com.itheima.jdk.UserDao;

public class TestAnnotation {

	public static void main(String[] args) {
		String xmlPath = "com/itheima/aspectj/annotation/applicationContext.xml";
		ApplicationContext applicationContext = new ClassPathXmlApplicationContext(xmlPath);
		//从spring容器中获得内容
		UserDao userDao = (UserDao) applicationContext.getBean("userDao");
		//执行方法
		userDao.addUser();

	}

}
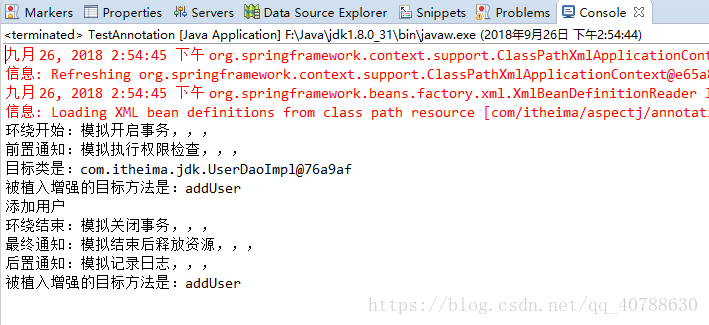
运行程序结果如下:
通过结果我们可以看出目标方法确实被增强了
如果觉得我的文章对您有用,请随意打赏。你的支持将鼓励我继续创作!