社区微信群开通啦,扫一扫抢先加入社区官方微信群

社区微信群
上篇粗略的查看了一下 desktop 的基本使用, 本篇探索一下插件的使用
环境变量的配置请查看上篇,本篇不再赘述
继上一篇文章过去了几天, 这个桌面引擎有了一点点的更改: 现在完全用 swift 了,不用 oc 了,无论是 example 还是 plugin 模板都是如此
所以, 为了省事,我重新 clone 了一个仓库, 然后准备用 swift 来创建插件
$ git clone https://github.com/google/flutter-desktop-embedding.git flutter-desktop-embedding-2
然后分别打开工程和插件 $ code flutter-desktop-embedding-2/example/ and $ code flutter-desktop-embedding-2/plugins/example_plugin
这个 example_plugin 是给的模板, 最好是复制一份出来
cd flutter-desktop-embedding-2/plugins
cp -r example_plugin math_desktop
code math_desktop
查看一下目录结构
tree math_desktop

math_desktop
├── LICENSE
├── lib
│   └── example_plugin.dart
├── linux
│   ├── Makefile
│   ├── example_plugin.cc
│   └── example_plugin.h
├── macos
│   ├── Classes
│   │   └── ExamplePlugin.swift
│   └── example_plugin.podspec
├── pubspec.yaml
└── windows
    ├── ExamplePlugin.vcxproj
    ├── ExamplePlugin.vcxproj.filters
    ├── example_plugin.cpp
    ├── example_plugin.h
    └── scripts
        └── cache_flutter.bat
基本是约定式的,和移动版的很类似
pubspec.yaml 在根目录,lib 放 dart 文件,然后根据 Platform 的不同使用不同的文件
修改 example 文件,添加依赖
dependencies:
  flutter:
    sdk: flutter

  cupertino_icons: ^0.1.0
  math_desktop: # add it
    path: ../plugins/math_desktop
然后在 example 目录下执行flutter pub get, 这个是flutter packages get的另一种写法, 比较简单点
接着进入 macos 目录下,执行$ pod install
等待完成后 执行 $ open Runner.xcworkspace, 这样正常情况下会用 xcode 打开这个工程
接着出现的就和 iOS 的插件差不多一样了
是这个 SHI 样的: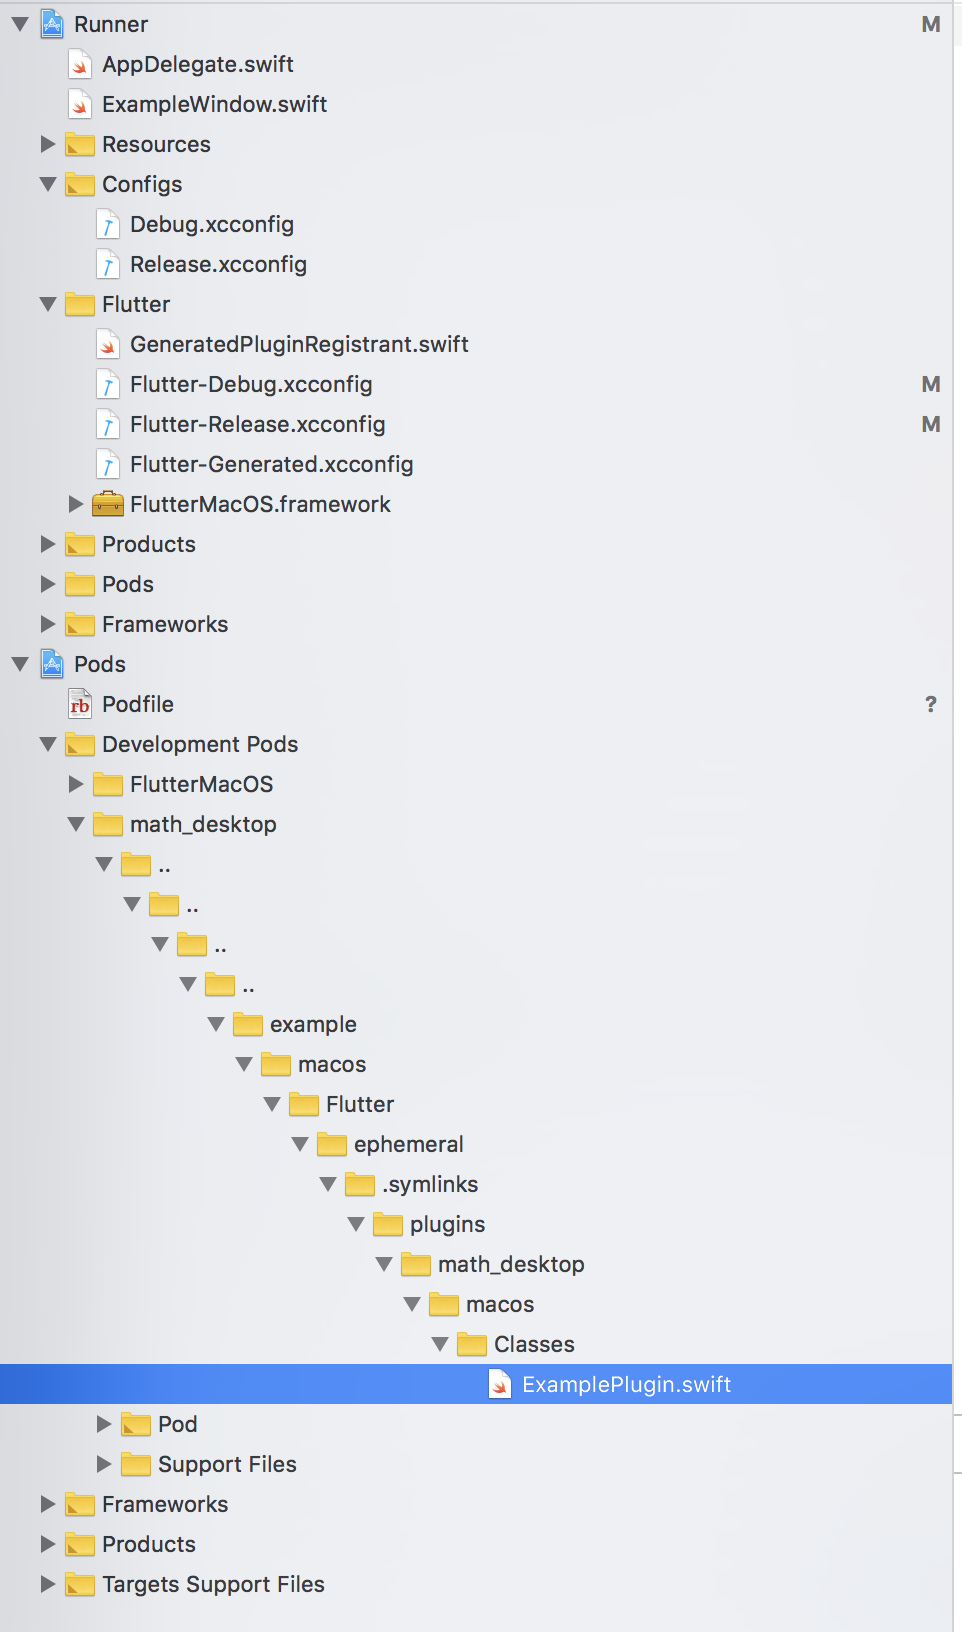
需要简化目录结构的可以搜索我写的 appcode 索引那个文章, 有简化方式,我这里不管它了
插件目录下的 lib 文件夹
添加一个方法
  static Future<int> add(int a, int b) async {
    return _channel.invokeMethod('add', [a, b]);
  }
很显然,中间那段是我自己加的,没什么实际意义, 就为了演示而已
 public func handle(_ call: FlutterMethodCall, result: @escaping FlutterResult) {
    if (call.method == "getPlatformVersion") {
      result("macOS " + ProcessInfo.processInfo.operatingSystemVersionString)
    } else if(call.method == "add"){
        let args = call.arguments as! [Any]
        let a = args[0] as! Int
        let b = args[1] as! Int
        result(a + b)
    } else {
      result(FlutterMethodNotImplemented);
    }
  }
在 example 中调用这个方法
FutureBuilder<int>(
    future: ExamplePlugin.add(_counter, 5),
    builder: (context, snapshot) {
        if (snapshot.hasData) {
            return Text(snapshot.data.toString());
        } else {
            return Text('计算中');
        }
    },
)
目前完整的 example 部分的代码如下:
// Copyright 2018 Google LLC
//
// Licensed under the Apache License, Version 2.0 (the "License");
// you may not use this file except in compliance with the License.
// You may obtain a copy of the License at
//
//      http://www.apache.org/licenses/LICENSE-2.0
//
// Unless required by applicable law or agreed to in writing, software
// distributed under the License is distributed on an "AS IS" BASIS,
// WITHOUT WARRANTIES OR CONDITIONS OF ANY KIND, either express or implied.
// See the License for the specific language governing permissions and
// limitations under the License.

import 'package:flutter/foundation.dart'
    show debugDefaultTargetPlatformOverride;
import 'package:flutter/material.dart';
import 'package:math_desktop/example_plugin.dart';

void main() {
  // See https://github.com/flutter/flutter/wiki/Desktop-shells#target-platform-override
  debugDefaultTargetPlatformOverride = TargetPlatform.fuchsia;

  runApp(new MyApp());
}

class MyApp extends StatelessWidget {
  @override
  Widget build(BuildContext context) {
    return MaterialApp(
      title: 'Flutter Demo',
      theme: ThemeData(
        primarySwatch: Colors.blue,
        // See https://github.com/flutter/flutter/wiki/Desktop-shells#fonts
        fontFamily: 'Roboto',
      ),
      home: MyHomePage(title: 'Flutter Demo Home Page'),
    );
  }
}

class MyHomePage extends StatefulWidget {
  MyHomePage({Key key, this.title}) : super(key: key);

  final String title;

  @override
  _MyHomePageState createState() => _MyHomePageState();
}

class _MyHomePageState extends State<MyHomePage> {
  int _counter = 0;

  void _incrementCounter() {
    setState(() {
      _counter++;
    });
  }

  @override
  Widget build(BuildContext context) {
    return Scaffold(
      appBar: AppBar(
        title: Text(widget.title),
      ),
      body: Center(
        child: Column(
          mainAxisAlignment: MainAxisAlignment.center,
          children: <Widget>[
            Text(
              'You have pushed the button this many times:',
            ),
            Text(
              '$_counter',
              style: Theme.of(context).textTheme.display1,
            ),
            FutureBuilder<int>(
              future: ExamplePlugin.add(_counter, 5),
              builder: (context, snapshot) {
                if (snapshot.hasData) {
                  return Text(snapshot.data.toString());
                } else {
                  return Text('计算中');
                }
              },
            ),
          ],
        ),
      ),
      floatingActionButton: FloatingActionButton(
        onPressed: _incrementCounter,
        tooltip: 'Increment',
        child: Icon(Icons.add),
      ),
    );
  }
}
这里会发现这种错误
[ERROR:flutter/lib/ui/ui_dart_state.cc(148)] Unhandled Exception: MissingPluginException(No implementation found for method add on channel example_plugin)
首先我在 MathDesktop 类的注册方法中加入了 NSLog 的日志, 发现并没有输出, 所以应该是插件没有注册的原因
public static func register(with registrar: FlutterPluginRegistrar) {
  let channel = FlutterMethodChannel(name: "example_plugin", binaryMessenger: registrar.messenger)
  let instance = MathDesktop()
  registrar.addMethodCallDelegate(instance, channel: channel)
  NSLog("初始插件 : example_plugin")
}
据我观察并测试后, 原因是: 虽然迁移到了 swift, 但是相应的脚本或者说 flutter 的工具链没有迁移, 所以还是用的 oc 文件来注入, 但 oc 文件未被纳入到 flutter 项目中, 所以暂时还没法通过 flutter packages get 来自动引入原生的 plugin
所以需要手动修改example/macos/Flutter/GeneratedPluginRegistrant.swift文件,来注册插件
import Foundation
import FlutterMacOS
import math_desktop

func RegisterGeneratedPlugins(registry: FlutterPluginRegistry) {
    MathDesktop.register(with: registry.registrar(forPlugin: "math_desktop"))
}
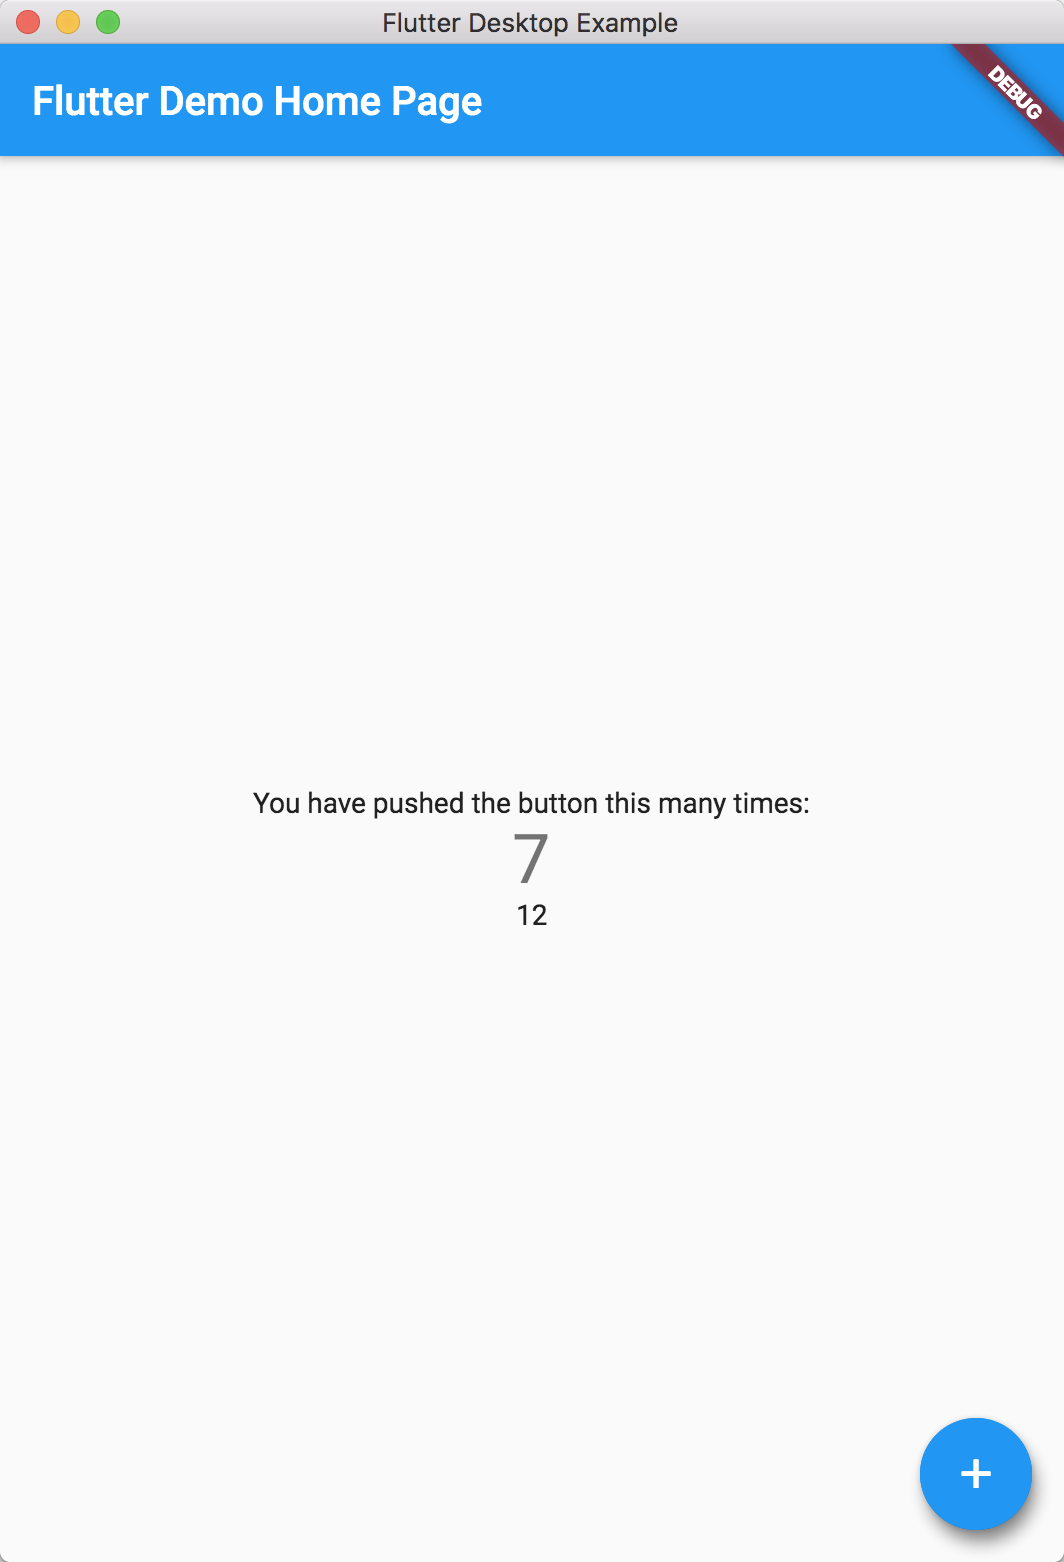
这样再次运行,就不会再报错了
可以得到正确的效果
通过插件的编写, 简单总结一下:
仓库地址: https://git.kikt.top/kikt/flutter-desktop-mac-example-2 目前私有库,后续修改完成后放在 github 上
插件的简单使用就到这里
以上
如果觉得我的文章对您有用,请随意打赏。你的支持将鼓励我继续创作!
