社区微信群开通啦,扫一扫抢先加入社区官方微信群

社区微信群
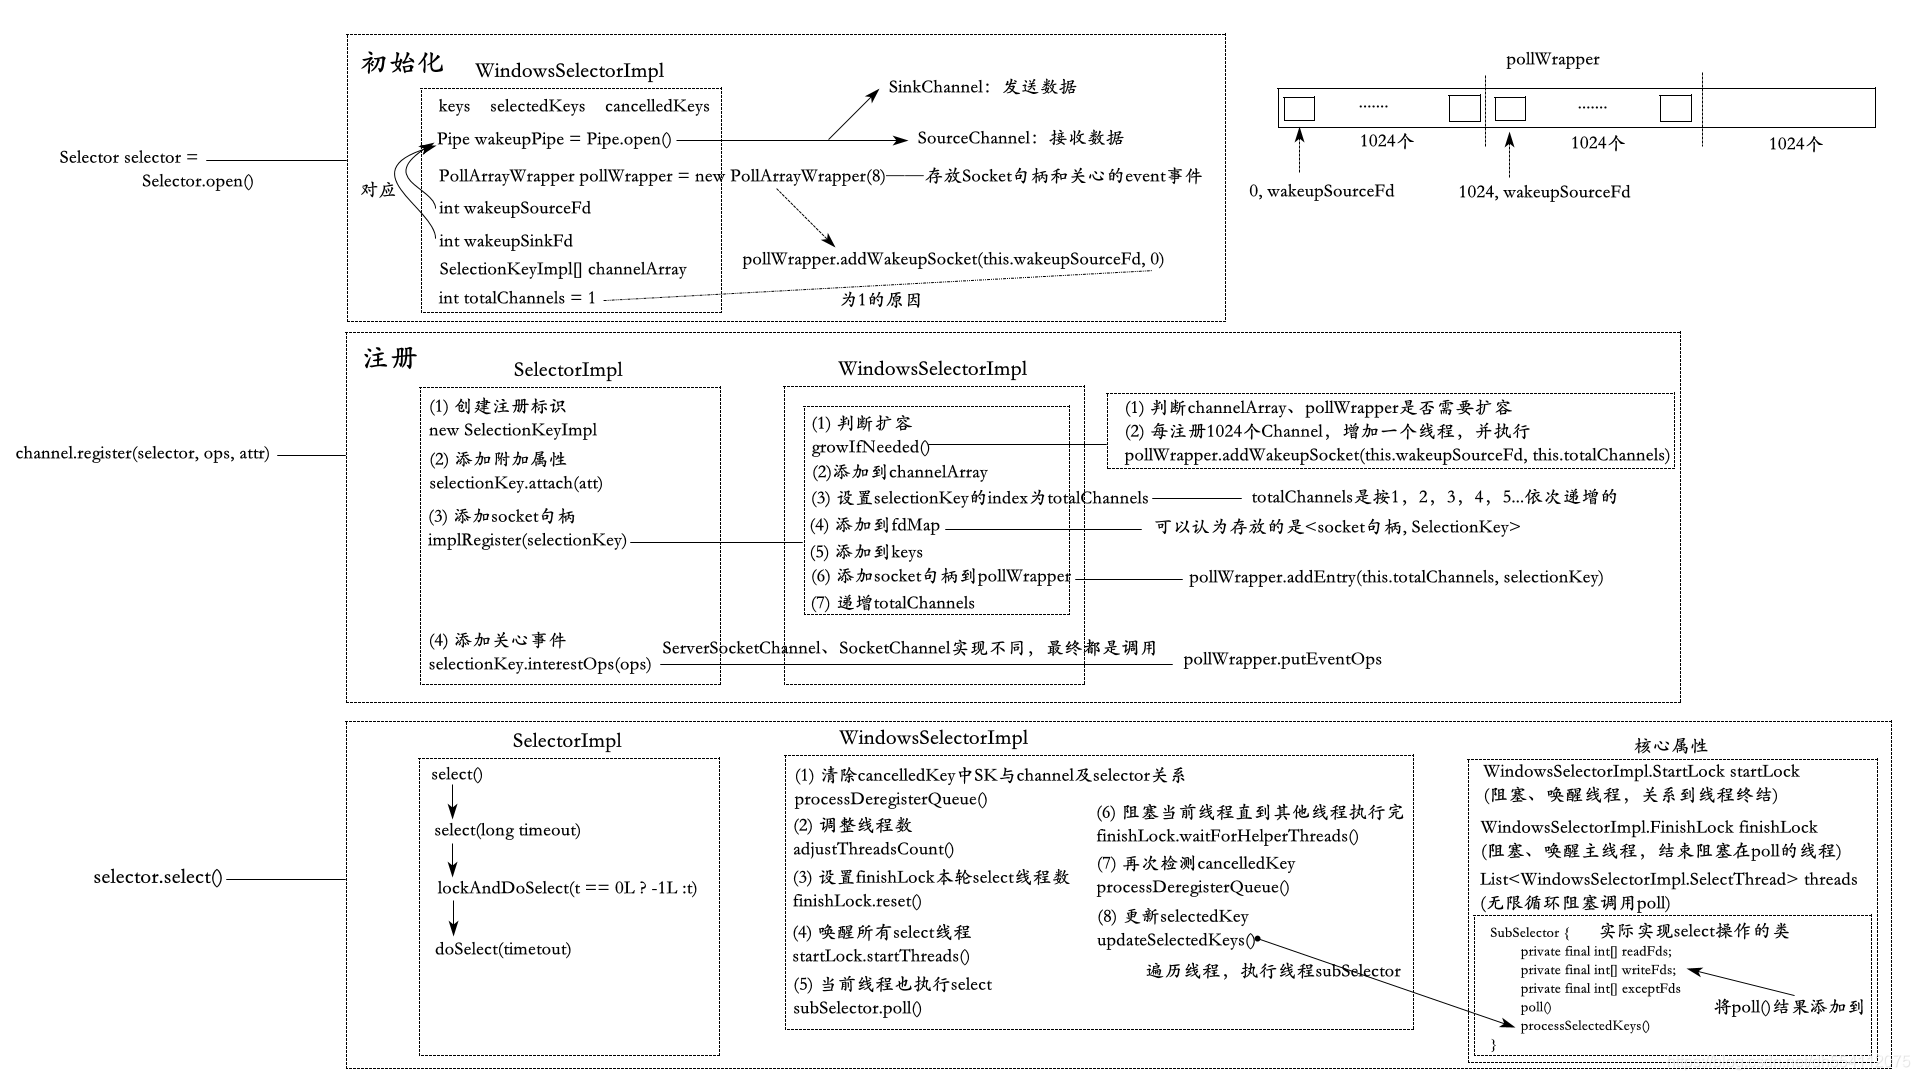
Pipe使用两组Channel,SinkChannel用于发送数据,SourceChannel用于接收数据。
public class PipeDemo {
    public static void main(String[] args) throws Exception {
        String msg = "Hello world!";
        Pipe pipe = Pipe.open();
        // 用于发送数据的SinkChannel
        Pipe.SinkChannel sinkChannel = pipe.sink();
        sinkChannel.write(ByteBuffer.wrap((msg).getBytes())); // 发送数据
        // 用于接收数据的SourceChannel
        Pipe.SourceChannel sourceChannel = pipe.source();
        ByteBuffer byteBuffer = ByteBuffer.allocate(msg.length());
        sourceChannel.read(byteBuffer);                       // 读取数据
        System.out.println(new String(byteBuffer.array()));   // 打印数据
    }
}
// 输出结果:Hello world!
由于Pipe在下面会使用到,所以这里先介绍一下。
(1)首先,我们会通过Selector.open()创建Selector
Selector selector = Selector.open();
(2)SelectorProvider.provider()最终会创建new WindowsSelectorProvider()对象
openSelector()最终会创建new WindowsSelectorImpl(this)对象
——这两步跟JDK操作系统版本有关,这里是Windows。
public static Selector open() throws IOException {
    return SelectorProvider.provider().openSelector();
}

public class WindowsSelectorProvider extends SelectorProviderImpl {
    public AbstractSelector openSelector() throws IOException {
        return new WindowsSelectorImpl(this);
    }
}
这里我们已经认识到通过Selector.open()创建的其实是一个WindowsSelectorImpl对象,下面深入其构造函数进行分析。
WindowsSelectorImpl(SelectorProvider selectorProvider) throws IOException {
	super(selectorProvider);
	// 省略,下面讲解
}
(1)先来看看super()中的方法
在此之前,先来看看Selector的关系图
SelectorImpl会为我们初始化publicKets和publicSelectedKeys
public abstract class SelectorImpl extends AbstractSelector {
	/** 已选择集合,select()添加到该键集并返回 */
	protected Set<SelectionKey> selectedKeys = new HashSet();
	/** 键集,register()时添加到该键级 */
	protected HashSet<SelectionKey> keys = new HashSet();
    protected SelectorImpl(SelectorProvider selectorProvider) {
        super(selectorProvider);
        // 省略
    }
}
AbstractSelector会初始化provider,这里是WindowsSelectorProvider
public abstract class AbstractSelector extends Selector {
	private final SelectorProvider provider;
	/** 已取消键集,已被取消但其通道尚未注销的键的集合 */
	private final Set<SelectionKey> cancelledKeys = new HashSet<SelectionKey>();
    protected AbstractSelector(SelectorProvider provider) {
        this.provider = provider;
    }
}
这里不需要清晰的明白上面各变量的具体含义,只需记得有下面这三种即可:
(2)看完了父类的构造方法,接下来看WindowsSelectorImpl的构造函数和局部变量。
在介绍构造函数之前,先来介绍两个布局变量,上面介绍了Pipe的使用。并了解了Pipe使用两组Channel,SinkChannel用于发送数据,SourceChannel用于接收数据。这里介绍Pipe是如何创建的。
private final Pipe wakeupPipe = Pipe.open();
其核心在PipeImpl内部类LoopbackConnector的run()方法中
private class LoopbackConnector implements Runnable {
	private LoopbackConnector() {
	}

	public void run() {
		ServerSocketChannel serverSocketChannel = null;
		SocketChannel socketChannel1 = null;
		SocketChannel socketChannel2 = null;

		try {
			ByteBuffer byteBuffer1 = ByteBuffer.allocate(16);
			ByteBuffer byteBuffer2 = ByteBuffer.allocate(16);
			inetAddressetAddress inetAddress = InetAddress.getByName("127.0.0.1");
			assert inetAddress.isLoopbackAddress();
			InetSocketAddress inetSocketAddress = null;
			while(true) {
				// ServerSocketChannel绑定端口0
				if (serverSocketChannel == null || !serverSocketChannel.isOpen()) {
					serverSocketChannel = ServerSocketChannel.open();
					serverSocketChannel.socket().bind(new InetSocketAddress(inetAddress, 0));
					inetSocketAddress = new InetSocketAddress(inetAddress, serverSocketChannel.socket().getLocalPort());
				}
				// 创建socketChnnel1,用于发送数据
				socketChannel1 = SocketChannel.open();
				// 生成随机字节写到byteBuffer1
				PipeImpl.RANDOM_NUMBER_GENERATOR.nextBytes(byteBuffer1.array());
				do {
					socketChannel1.write(byteBuffer1); // 将byteBuffer1数据写到socketChannel1
				} while(byteBuffer1.hasRemaining());
				byteBuffer1.rewind();
				// serverSocketChannel调用accept()接收一个SocketChannel,用于读取数据
				socketChannel2 = serverSocketChannel.accept();
				do {
					socketChannel2.read(byteBuffer2); // socketChannel2将数据写道byteBuffer2
				} while(byteBuffer2.hasRemaining());
				byteBuffer2.rewind();
				// 判断是否能正常地读写数据
				if (byteBuffer2.equals(byteBuffer1)) {
					PipeImpl.this.source = new SourceChannelImpl(Initializer.this.sp, socketChannel1);
					PipeImpl.this.sink = new SinkChannelImpl(Initializer.this.sp, socketChannel2);
					break;
				}
				// 不能正确读写数据则关闭SocketChannel资源
				socketChannel2.close();
				socketChannel1.close();
			}
		} catch (IOException e) {
			// 关闭SocketChannel
		} finally {
			// 关闭ServerSocketChannel
		}
	}
}

如果发送的数据与接收的数据内容相同,则将发送的SocketChannel作为source(SourceChannelImpl),使用接收的SocketChannel作为sink(SinkChannelImpl)。
如果看源码,SourceChannelImpl继承了SourceChannel,而SourceChannel实现了ReadableByteChannel, ScatteringByteChannel两个接口,而这两个接口只提供了只读的方法,因此SourceChannel只能接受数据。
public static abstract class SourceChannel
    extends AbstractSelectableChannel
    implements ReadableByteChannel, ScatteringByteChannel
SinkChannelImpl继承了SinkChannel,同样只能写数据。
public static abstract class SinkChannel
    extends AbstractSelectableChannel
    implements WritableByteChannel, GatheringByteChannel
wakeuppipe是我们介绍的第一个WindowsSelectorImpl局部变量,第二个局部变量是pollWrapper,用于存储socket句柄fd以及事件events。
private PollArrayWrapper pollWrapper = new PollArrayWrapper(8);
这里先看一下构造函数,具体的方法使用到再看。
class PollArrayWrapper {
	// 存储和获取操作
	private AllocatedNativeObject pollArray;
    PollArrayWrapper(int var1) {
        int var2 = var1 * SIZE_POLLFD;
		// 初始化时调用unsafe.allocateMemory()申请一块内存
        this.pollArray = new AllocatedNativeObject(var2, true);
		// 用pollArrayAddress记录内存地址
        this.pollArrayAddress = this.pollArray.address();
        this.size = var1;
    }
}
现在我们回过来看WindowsSelectorImpl的构造函数
WindowsSelectorImpl(SelectorProvider selectorProvider) throws IOException {
	super(selectorProvider);
	// 这里的wakeupPipe就是上面介绍的局部变量PipeImpl
	// 获取保存SourceChannel的socket句柄
	this.wakeupSourceFd = ((SelChImpl)this.wakeupPipe.source()).getFDVal();
	// 获取SinkChannel
	SinkChannelImpl sinkChannelImpl = (SinkChannelImpl)this.wakeupPipe.sink();
	sinkChannelImpl.sc.socket().setTcpNoDelay(true);
	// 获取保存SinkChannel的socket句柄
	this.wakeupSinkFd = sinkChannelImpl.getFDVal();
	this.pollWrapper.addWakeupSocket(this.wakeupSourceFd, 0);
}
addWakeupSocket:当事件触发,会通知对应的socket
class PollArrayWrapper {
    void addWakeupSocket(int var1, int var2) { // (SourceChannel的socket句柄, 0)
    	// 添加描述符
        this.putDescriptor(var2, var1); // (0, SourceChannel的socket句柄)
        // 添加事件, Net.POLLIN表示有数据可读
        this.putEventOps(var2, Net.POLLIN); // (0, Net.POLLIN)
    }
    void putDescriptor(int var1, int var2) {
        this.pollArray.putInt(SIZE_POLLFD * var1 + 0, var2); // (0, socket句柄)
    }
    void putEventOps(int var1, int var2) {
        this.pollArray.putShort(SIZE_POLLFD * var1 + 4, (short)var2); // (4, socket句柄)
    }
}
通过上面代码我们也可以看出socket句柄占用4个字节,事件占用两个字节。
——到这里我们已经清晰地了解创建一个Selector的具体流程。包括常用的三个键集keys、selectedKeys、cancelledKeys,以及Pipe管道和PollArrayWrapper。下面将介绍Selector的常用方法。
(1)register()
SelectorImpl
protected final SelectionKey register(AbstractSelectableChannel ch, int ops, Object att) {
    if (!(var1 instanceof SelChImpl)) {
        throw new IllegalSelectorException();
    } else {
    	// 创建一个注册标识
        SelectionKeyImpl selectionKey = new SelectionKeyImpl((SelChImpl)ch, this);
        // 为selectionKey附加额外属性
        selectionKey.attach(att);
        synchronized(this.publicKeys) {
        	// 添加socket句柄
            this.implRegister(selectionKey);
        }
        // 添加事件
        selectionKey.interestOps(ops);
        return selectionKey;
    }
}
WindowsSelectorImpl
用到的局部变量
/** 用于存储注册标识 */
private SelectionKeyImpl[] channelArray = new SelectionKeyImpl[8];
/** 用于存储Socket句柄和events */
private PollArrayWrapper pollWrapper = new PollArrayWrapper(8);
/** 可以认为存储的是<socket句柄,SelectionKey> */
private final WindowsSelectorImpl.FdMap fdMap = new WindowsSelectorImpl.FdMap();
/** 已注册的Channel总数,从1开始 */
private int totalChannels = 1;
添加socket句柄
protected void implRegister(SelectionKeyImpl selectionKey) {
    synchronized(this.closeLock) {
        if (this.pollWrapper == null) {
            throw new ClosedSelectorException();
        } else {
        	// 功能(1)判断是否需要扩容,如果需要则对channelArray、pollWrapper进行扩容
        	// 功能(2)每增加1024个Channel则增加一个线程
            this.growIfNeeded();
            // 添加selectionKey到channelArray
            this.channelArray[this.totalChannels] = selectionKey;
            // 设置selectionKey的index属性,添加事件时会用到
            selectionKey.setIndex(this.totalChannels);
            this.fdMap.put(selectionKey);
            // 添加到已注册键集
            this.keys.add(selectionKey);
            // 添加socket句柄到pollWrapper
            this.pollWrapper.addEntry(this.totalChannels, selectionKey);
            // 将已注册的channel总数 + 1
            ++this.totalChannels;
        }
    }
}
void addEntry(int var1, SelectionKeyImpl var2) { // (1, selectionKey) // 下一次为(2, sk)
	this.putDescriptor(var1, var2.channel.getFDVal()); // (1, socket句柄) // 下一次为(2, s)
}

void putDescriptor(int var1, int var2) { // (1, socket句柄) // 下一次为(2, s)
	this.pollArray.putInt(SIZE_POLLFD * var1 + 0, var2); //(8, socket句柄)//下一次为(16, s)
}
selectionKey.interestOps(ops)——添加事件
public SelectionKey interestOps(int ops) {
	this.ensureValid();
	return this.nioInterestOps(ops);
}

public SelectionKey nioInterestOps(int ops) {
	if ((ops & ~this.channel().validOps()) != 0) {
		throw new IllegalArgumentException();
	} else {
		// 添加事件到pollWrapper
		this.channel.translateAndSetInterestOps(ops, this);
		this.interestOps = ops;
		return this;
	}
}
// translateAndSetInterestOps在不同的类实现不同这里主要看ServerSocketChannel和SocketChannel
// SocketChannel
public void translateAndSetInterestOps(int ops, SelectionKeyImpl selectionKey) {
	int finalOps = 0;
	if ((ops & 1) != 0) { // 1 :读(read)
		finalOps |= Net.POLLIN;
	}
	if ((ops & 4) != 0) { // 2 : 写(write)
		finalOps |= Net.POLLOUT;
	}
	if ((ops & 8) != 0) { // 8 : 连接(connect)
		finalOps |= Net.POLLCONN;
	}
	selectionKey.selector.putEventOps(selectionKey, finalOps);
}
// ServerSocketChannel
public void translateAndSetInterestOps(int ops, SelectionKeyImpl selectionKey) {
	int finalOps = 0;
	if ((ops & 16) != 0) { // 16 :接收(accept)
		finalOps |= Net.POLLIN;
	}
	selectionKey.selector.putEventOps(selectionKey, finalOps);
}

public void putEventOps(SelectionKeyImpl selectionKey, int ops) {
	synchronized(this.closeLock) {
		if (this.pollWrapper == null) {
			throw new ClosedSelectorException();
		} else {
			int index = selectionKey.getIndex();
			if (index == -1) { // index是大于0的
				throw new CancelledKeyException();
			} else {
				this.pollWrapper.putEventOps(index, ops); // 添加事件(具体看上面)
			}
		}
	}
}
(2)select()
// Selector
public int select() throws IOException {
	return this.select(0L);
}
// SelectorImpl
public int select(long timeout) throws IOException {
	if (timeout < 0L) {
		throw new IllegalArgumentException("Negative timeout");
	} else {
		return this.lockAndDoSelect(timeout == 0L ? -1L : timeout);
	}
}
// SelectorImpl
private int lockAndDoSelect(long timeout) throws IOException {
	// 这里省略了没有意义的
	return this.doSelect(timeout);
}
下面是核心方法,这里只对关键代码进行分析
// WindowsSelectorImpl
protected int doSelect(long timeout) throws IOException {
	if (this.channelArray == null) {
		throw new ClosedSelectorException();
	} else {
		this.timeout = timeout;
		// 检查cancelledKeys,清除里面的selectionKey与channel、selector的联系
		this.processDeregisterQueue();
		if (this.interruptTriggered) {
			this.resetWakeupSocket();
			return 0;
		} else {
			// 调整线程数量,少了就添加,多了就移除
			// 移除是通过修改线程内的volatile boolean zombie标识
			this.adjustThreadsCount();
			// 调整
如果觉得我的文章对您有用,请随意打赏。你的支持将鼓励我继续创作!
