社区微信群开通啦,扫一扫抢先加入社区官方微信群

社区微信群
场景说明
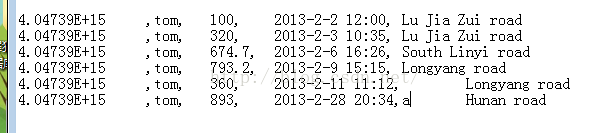
个人使用信用卡消费,银行定期发送银行卡消费账单,本例将模拟银行处理个人信用卡消费对账单对账,银行需要定期地把个人消费的记录导出成csv文件,然后交给对账系统处理。
主要流程:
(从credit-card-bill-201303.csv)读取数据---->处理数据----->写数据到 outputFile文件
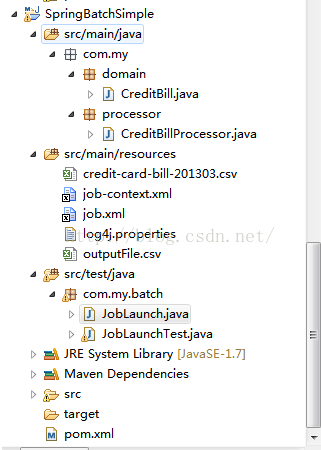
项目结构
项目结构说明:
package com.my.domain;
/**
 * 信用卡消费记录领域对象
 * 该类主要用于在ItemReader读取文件数据之后转换成领域对象CreditBill,
 * 以便于ItemProcessoe和ItemWriter操作使用
 * @author wbw
 *
 */
public class CreditBill {
    /**
     * 银行账户
     */
	private String accountID;
	/**
	 * 账户名
	 */
	private String name;
	/**
	 * 消费金额
	 */
	private double amount;
	/**
	 * 消费日期
	 */
	private String date;
	/**
	 * 消费场所
	 */
	private String address;
	/**
	 * @return the 银行账户
	 */
	public String getAccountID() {
		return accountID;
	}
	/**
	 * @param 银行账户 the accountID to set
	 */
	public void setAccountID(String accountID) {
		this.accountID = accountID;
	}
	/**
	 * @return the 账户名
	 */
	public String getName() {
		return name;
	}
	/**
	 * @param 账户名 the name to set
	 */
	public void setName(String name) {
		this.name = name;
	}
	/**
	 * @return the 消费金额
	 */
	public double getAmount() {
		return amount;
	}
	/**
	 * @param 消费金额 the amount to set
	 */
	public void setAmount(double amount) {
		this.amount = amount;
	}
	/**
	 * @return the 消费日期
	 */
	public String getDate() {
		return date;
	}
	/**
	 * @param 消费日期 the date to set
	 */
	public void setDate(String date) {
		this.date = date;
	}
	/**
	 * @return the 消费场所
	 */
	public String getAddress() {
		return address;
	}
	/**
	 * @param 消费场所 the address to set
	 */
	public void setAddress(String address) {
		this.address = address;
	}


}
<?xml version="1.0" encoding="UTF-8"?>
<beans xmlns="http://www.springframework.org/schema/beans"
	xmlns:xsi="http://www.w3.org/2001/XMLSchema-instance"
	xmlns:p="http://www.springframework.org/schema/p"
	xmlns:tx="http://www.springframework.org/schema/tx"
	xmlns:aop="http://www.springframework.org/schema/aop"
	xmlns:context="http://www.springframework.org/schema/context"
	xsi:schemaLocation="http://www.springframework.org/schema/beans
	http://www.springframework.org/schema/beans/spring-beans-3.0.xsd
	http://www.springframework.org/schema/tx
	http://www.springframework.org/schema/tx/spring-tx-3.0.xsd
	http://www.springframework.org/schema/aop
	http://www.springframework.org/schema/aop/spring-aop-3.0.xsd
	http://www.springframework.org/schema/context
	http://www.springframework.org/schema/context/spring-context-2.5.xsd"
	default-autowire="byName">
	<!--定义作业仓库SpringBatch提供了两种作业仓库来记录job执行期产生的信息:一种是内存,另一种是数据库    -->
	<bean id="jobRepository"
		class="org.springframework.batch.core.repository.support.MapJobRepositoryFactoryBean">
	</bean>
	<!--定义作业调度器,用来启动Job -->
	<bean id="jobLauncher"
		class="org.springframework.batch.core.launch.support.SimpleJobLauncher">
		<property name="jobRepository" ref="jobRepository"/>
	</bean>
	<!--事务管理器,用于springbatch框架在对数据操作过程中体统事务能力-->
	<bean id="transactionManager"
		class="org.springframework.batch.support.transaction.ResourcelessTransactionManager"/>
</beans><?xml version="1.0" encoding="UTF-8"?>
<bean:beans xmlns="http://www.springframework.org/schema/batch"
xmlns:bean="http://www.springframework.org/schema/beans"
xmlns:xsi="http://www.w3.org/2001/XMLSchema-instance"
xmlns:p="http://www.springframework.org/schema/p"
xmlns:tx="http://www.springframework.org/schema/tx"
xmlns:aop="http://www.springframework.org/schema/aop"
xmlns:context="http://www.springframework.org/schema/context"
xsi:schemaLocation="http://www.springframework.org/schema/beans
http://www.springframework.org/schema/beans/spring-beans-3.0.xsd
http://www.springframework.org/schema/tx
http://www.springframework.org/schema/tx/spring-tx-3.0.xsd
http://www.springframework.org/schema/aop
http://www.springframework.org/schema/aop/spring-aop-3.0.xsd
http://www.springframework.org/schema/context
http://www.springframework.org/schema/context/spring-context-2.5.xsd
http://www.springframework.org/schema/batch
http://www.springframework.org/schema/batch/spring-batch-2.2.xsd">
<!--引入job-context.xml配置文件-->
<bean:import resource="classpath:job-context.xml"/>
<!--定义billJob billStep 包含读数据 处理数据 写数据-->
<job id="billJob">
<step id="billStep">
<tasklet transaction-manager="transactionManager">
<!--commit-interval="2" 表示任务提交间隔的大小 此处表示每处理2条数据 进行一次写入操作-->
<chunk reader="csvItemReader" writer="csvItemWriter"
processor="creditBillProcessor" commit-interval="2">
</chunk>
</tasklet>
</step>
</job>
<!-- 读取信用卡账单文件,CSV格式 -->
<bean:bean id="csvItemReader"
class="org.springframework.batch.item.file.FlatFileItemReader"
scope="step">
<!--设置读取的文件资源-->
<bean:property name="resource"
value="classpath:credit-card-bill-201303.csv"/>
<!--将文本中的每行记录转换为领域对象-->
<bean:property name="lineMapper">
<bean:bean class="org.springframework.batch.item.file.mapping.DefaultLineMapper">
<!--引用lineTokenizer-->
<bean:property name="lineTokenizer" ref="lineTokenizer"/>
<!--fieldSetMapper根据lineTokenizer中定义的names属性映射到领域对象中去-->
<bean:property name="fieldSetMapper">
<bean:bean class="org.springframework.batch.item.file.mapping.BeanWrapperFieldSetMapper">
<bean:property name="prototypeBeanName" value="creditBill">
</bean:property>
</bean:bean>
</bean:property>
</bean:bean>
</bean:property>
</bean:bean>
<!-- lineTokenizer 定义文本中每行的分隔符号 以及每行映射成FieldSet对象后的name列表 -->
<bean:bean id="lineTokenizer"
class="org.springframework.batch.item.file.transform.DelimitedLineTokenizer">
<bean:property name="delimiter" value=","/>
<bean:property name="names">
<bean:list>
<bean:value>accountID</bean:value>
<bean:value>name</bean:value>
<bean:value>amount</bean:value>
<bean:value>date</bean:value>
<bean:value>address</bean:value>
</bean:list>
</bean:property>
</bean:bean>
<!-- 写信用卡账单文件,CSV格式 -->
<bean:bean id="csvItemWriter"
class="org.springframework.batch.item.file.FlatFileItemWriter"
scope="step">
<bean:property name="resource" value="file:outputFile.csv"/>
<bean:property name="lineAggregator">
<bean:bean
class="org.springframework.batch.item.file.transform.DelimitedLineAggregator">
<bean:property name="delimiter" value=","></bean:property>
<bean:property name="fieldExtractor">
<bean:bean
class="org.springframework.batch.item.file.transform.BeanWrapperFieldExtractor">
<bean:property name="names" value="accountID,name,amount,date,address">
</bean:property>
</bean:bean>
</bean:property>
</bean:bean>
</bean:property>
</bean:bean>
<!--领域对象 并标注为原型-->
<bean:bean id="creditBill" scope="prototype"
class="com.my.domain.CreditBill">
</bean:bean>
<!--负责业务数据的处理-->
<bean:bean id="creditBillProcessor" scope="step"
class="com.my.processor.CreditBillProcessor">
</bean:bean>
</bean:beans>/**
*
*/
package com.my.processor;
import org.springframework.batch.item.ItemProcessor;
import com.my.domain.CreditBill;
/**
* 处理数据器
* @author wbw
*
*/
public class CreditBillProcessor implements ItemProcessor<CreditBill, CreditBill> {
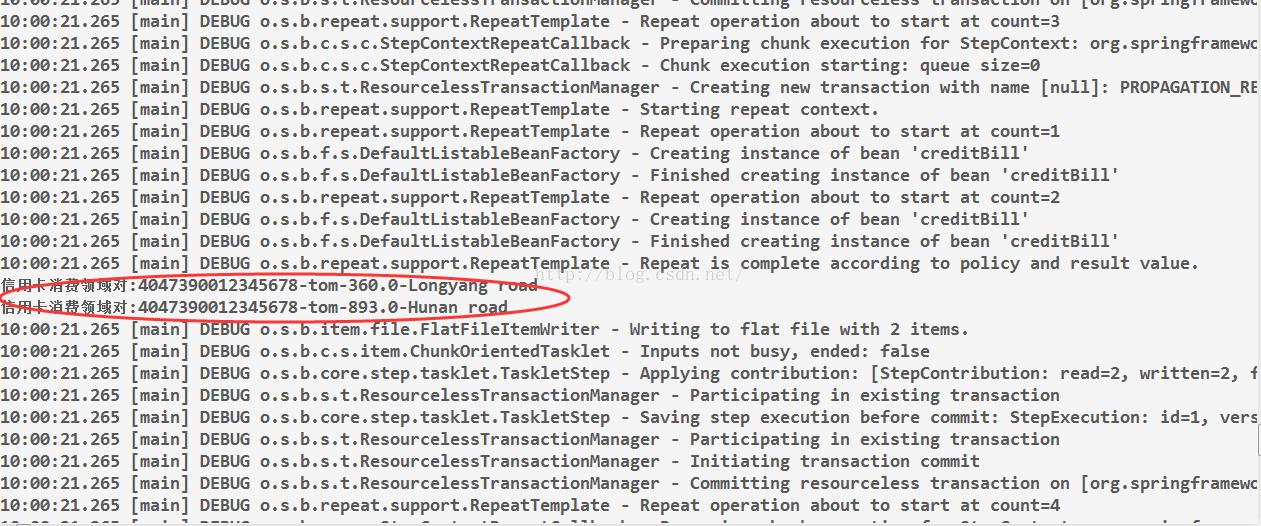
public CreditBill process(CreditBill bill) throws Exception {
System.out.println("信用卡消费领域对象:"+bill.getAccountID()+"-"+bill.getName()+"-"+bill.getAmount()+"-"+bill.getAddress());
return bill;
}
}
/**
 *
 */
package com.my.batch;

import org.springframework.batch.core.Job;
import org.springframework.batch.core.JobExecution;
import org.springframework.batch.core.JobParameters;
import org.springframework.batch.core.launch.JobLauncher;
import org.springframework.context.ApplicationContext;
import org.springframework.context.support.ClassPathXmlApplicationContext;

/**
 * 测试
 * @author wbw
 *
 */
public class JobLaunch {

	/**
	 * @param args
	 */
	@SuppressWarnings("resource")
	public static void main(String[] args) {
		//初始化应用上下文
		ApplicationContext context = new ClassPathXmlApplicationContext("job.xml");
		//获取作业调度,根据Bean的名称从Spring的上下文获取
		JobLauncher launcher = (JobLauncher) context.getBean("jobLauncher");
		//获取任务对象
		Job job = (Job) context.getBean("billJob");
		try {
			JobExecution result = launcher.run(job, new JobParameters());
			System.out.println(result.toString());
		} catch (Exception e) {
			e.printStackTrace();
		}
	}
}
package com.my.batch;


import org.junit.After;
import org.junit.Before;
import org.junit.Test;
import org.junit.runner.RunWith;
import org.springframework.batch.core.Job;
import org.springframework.batch.core.JobExecution;
import org.springframework.batch.core.JobParameters;
import org.springframework.batch.core.launch.JobLauncher;
import org.springframework.beans.factory.annotation.Autowired;
import org.springframework.beans.factory.annotation.Qualifier;

@RunWith(SpringJUnit4ClassRunner.class)
@ContextConfiguration(locations={"job.xml"})
public class JobLaunchTest {
	@Autowired
	private JobLauncher jobLauncher;

	@Autowired@Qualifier("billJob")
	private Job job;

	@Before
	public void setUp() throws Exception {
	}

	@After
	public void tearDown() throws Exception {
	}

	@Test
	public void billJob() throws Exception {
		JobExecution result = jobLauncher.run(job, new JobParameters());
		System.out.println(result.toString());
	}
}

如果觉得我的文章对您有用,请随意打赏。你的支持将鼓励我继续创作!