社区微信群开通啦,扫一扫抢先加入社区官方微信群

社区微信群
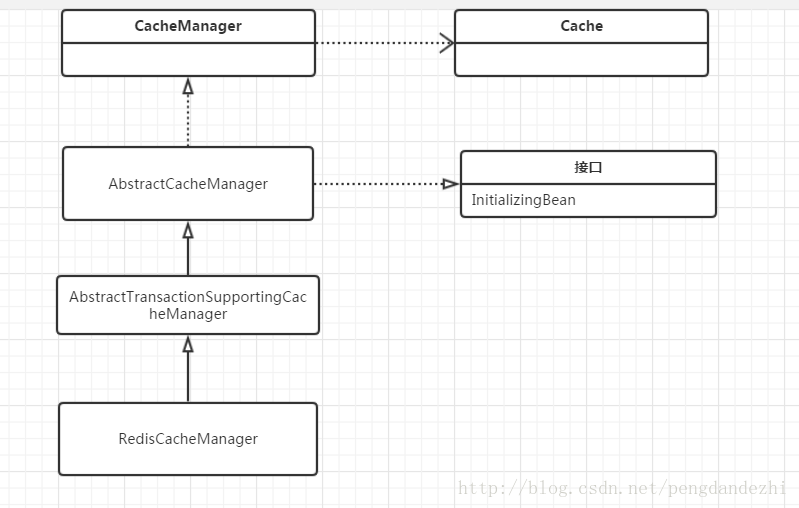
首先一个抽象的缓存管理类AbstractCacheManager,对CacheManager进行了基本功能的实现,这个类还实现了InitializingBean接口,这个我们知道在spring中实现这个接口就可以在类初始化完成之后,执行接口的afterPropertiesSet方法,AbstractCacheManager在这个方法中执行了initializeCaches方法,也就是初始化缓存。其代码如下:
        //首先加载缓存。loadCaches是一个模板方法,具体怎么加载子类决定。
        Collection<? extends Cache> caches = loadCaches();

        synchronized (this.cacheMap) {
            //每次初始化都创建一个新的缓存名称Set。代码最后一行,把这个set集合变成只读
            this.cacheNames = Collections.emptySet();
            //清空缓存Map  ConcurrentHashMap
            this.cacheMap.clear();
            //初始化 cacheNames
            //1. 循环遍历子类加载的caches
            Set<String> cacheNames = new LinkedHashSet<String>(caches.size());
            for (Cache cache : caches) {
                String name = cache.getName();
                //加入到缓存map集合中,在加入前要进行对缓存进行装配 decorateCache(cache)
                //decorateCache 这个方法本身就是返回cache。但是子类
                //AbstractTransactionSupportingCacheManager 重写它。这个类从名字可以看出
                //是支持事务。它有一个属性transactionAware默认为false. 如果配置了支持事务,
                //就会把当前cache装配成支持事物的cache 所以后面会有支持事务的配置,配置的就是
                //transactionAware 这个属性为true
                //TransactionAwareCacheDecorator
                this.cacheMap.put(name, decorateCache(cache));
                //2. 把cache的name加入到name集合中
                cacheNames.add(name);
            }
            //set变成只读
            this.cacheNames = Collections.unmodifiableSet(cacheNames);
        }
    }
初始化缓存之后,也实现了基本的获取缓存方法:
public Cache getCache(String name) {
        //根据缓存name直接从自己的cache map中获取
        Cache cache = this.cacheMap.get(name);
        if (cache != null) {
            return cache;
        }
        else {
            //如果没有,那么就同步创建
            synchronized (this.cacheMap) {
                //这里再一次获取,避免在同步前,有线程已经添加进去了。
                cache = this.cacheMap.get(name);
                if (cache == null) {
                    //如果还没有,就调用getMissingCache方法获取。
                    //这个方法可以看作一个模板方法,只不过自己实现了返回null
                    //也就是说默认不创建。子类可以通过重写这个方法进行创建。
                    cache = getMissingCache(name);
                    if (cache != null) {
                        //对创建的cache进行装配
                        cache = decorateCache(cache);
                        //放入缓存 map中
                        this.cacheMap.put(name, cache);
                        //更新缓存名称集合。 上面我们知道缓存名称集合被修改成只读,
                        //所以更新方法里面是创建一个新的,然后size进行加1,再把前面的
                        //添加进去,然后加入新建的这个,再修改成只读
                        updateCacheNames(name);
                    }
                }
                return cache;
            }
        }
    }
当然你也可以直接调用lookupCache方法,该方法就是直接获取。没有后续的步骤
//final类型。子类不可重写
protected final Cache lookupCache(String name) {
        return this.cacheMap.get(name);
    }
通过上面对缓存的一个基本加载获取有了认知之后,就看看redis具体怎么对其自己想要的功能进行扩展,首先我们应该知道,redis是一个键值对的缓存框架,当然值由多种类型。在spring-data-redis中,我们操作redis又是通过RedisOperations(RedisTemplate间接的实现了它)对其进行操作,并且在读取和写入的时候,都会对键值进行序列化。所以,如果要扩展,RedisOperations比不可少,redis支持事务,那么我们就可以利用上面的AbstractTransactionSupportingCacheManager属性transactionAware进行配置。其它诸如:过期时间,缓存是否为null等等进行扩展,具体看看源码RedisCacheManager:
    //RedisCacheManager的基本属性
    @SuppressWarnings("rawtypes") //
    //配置redisTemplate 通过构造函数
    private final RedisOperations redisOperations;
    //是否使用前缀
    private boolean usePrefix = false;
    //默认前缀 为":"。使用前缀可以对缓存进行分组,避免缓存的冲突
    private RedisCachePrefix cachePrefix = new DefaultRedisCachePrefix();
    //远程加载缓存
    private boolean loadRemoteCachesOnStartup = false;
    //是否动态生成缓存。默认为true。这个就是上面如果缓存不存在,则创建
    //是通过这个属性进行配置。配置为false则不会去创建缓存
    private boolean dynamic = true;

    // 过期时间 0为永不过期
    private long defaultExpiration = 0;
    //可以配置指定key的过期时间 可以通过定制化配置过期时间
    private Map<String, Long> expires = null;
    //配置缓存名称集合
    private Set<String> configuredCacheNames;
    //缓存是否可以为null
    private final boolean cacheNullValues;
了解这些属性的含义,对后续的配置就更加容易理解。在spring的可扩展性非常高,一部分就是spring大量运用模板模式,所以看子类扩展,重点就看其扩展的模板方法。先看一下上面提到的第一个模板方法loadCaches:
@Override
    protected Collection<? extends Cache> loadCaches() {
    //首先我们必须配置了redisOperations。因为没有redisTemplate我们就无法操作redis
        Assert.notNull(this.redisOperations, "A redis template is required in order to interact with data store");
        //首先看是否需要远程加载缓存
        //如果配置是,那么久执行  loadAndInitRemoteCaches()方法进行加载
        //这个远程加载比较容易。就是用redisTemplate去加载后缀~keys的key.
        //后缀为~keys是因为在创建的时候加上了这个后缀。具体可以查看redis的静态内部类
        //RedisCacheMetadata 的构造方法。
        Set<Cache> caches = new LinkedHashSet<Cache>(
                loadRemoteCachesOnStartup ? loadAndInitRemoteCaches() : new ArrayList<Cache>());
        //加载我们配置的缓存名称集合 上面属性有介绍
        Set<String> cachesToLoad = new LinkedHashSet<String>(this.configuredCacheNames);
        //加载当前已经缓存名称集合 volatile类型。所以对于当前线程是可见的
        cachesToLoad.addAll(this.getCacheNames());

        if (!CollectionUtils.isEmpty(cachesToLoad)) {
            //如果不为空则循环创建缓存 并加入缓存集合中
            //这个缓存为redisCache.创建就是根据我们配置的如过期时间,是否允许为null,序列化(默认为
            //jdk序列化)等属性创建一个redisCache
            for (String cacheName : cachesToLoad) {
                caches.add(createCache(cacheName));
            }
        }

        return caches;
    }
到这里基本redis cache的一个基本加载创建原理里有比较深的认识。其中另外的模板方法getMissingCache就比较容易理解了:
protected Cache getMissingCache(String name) {
        根据我们配置的dynamic属性决定是否创建新的缓存
        return this.dynamic ? createCache(name) : null;
    }
看看支持事务的重写方法:
@Override
    protected Cache decorateCache(Cache cache) {

        if (isCacheAlreadyDecorated(cache)) {
            return cache;
        }

        return super.decorateCache(cache);
    }

    protected boolean isCacheAlreadyDecorated(Cache cache) {
        return isTransactionAware() && cache instanceof TransactionAwareCacheDecorator;
    }
如果配置了transactionAware,则把cache装饰成支持事务的cache
另外一个重点就是看一下createCache方法:
@SuppressWarnings("unchecked")
    protected RedisCache createCache(String cacheName) {
        long expiration = computeExpiration(cacheName);
        return new RedisCache(cacheName, (usePrefix ? cachePrefix.prefix(cacheName) : null), redisOperations, expiration,
                cacheNullValues);
    }
我们发现它就是new了一个RedisCache缓存,然后返回。并没有保存到redis服务端去。事实上应该要保存到服务端才符合原理。Spring通过拦截器CacheInterceptor来实现缓存拦截,然后调用CacheAspectSupport中的execute方法,在execute中调用内部类的一个apply方法,这个方法中调用了doPut方法,然后调用创建的缓存的RedisCache的put方法保存到服务端。这里提供一个调用链介绍,具体源码可以自己跟着链去看看
<?xml version="1.0" encoding="UTF-8"?>
<beans xmlns="http://www.springframework.org/schema/beans"
    xmlns:xsi="http://www.w3.org/2001/XMLSchema-instance" xmlns:context="http://www.springframework.org/schema/context"
    xmlns:mvc="http://www.springframework.org/schema/mvc" xmlns:cache="http://www.springframework.org/schema/cache"
    xsi:schemaLocation="
        http://www.springframework.org/schema/mvc
        http://www.springframework.org/schema/mvc/spring-mvc-4.0.xsd
        http://www.springframework.org/schema/beans
        http://www.springframework.org/schema/beans/spring-beans-4.0.xsd
        http://www.springframework.org/schema/cache
        http://www.springframework.org/schema/cache/spring-cache.xsd
        http://www.springframework.org/schema/context
        http://www.springframework.org/schema/context/spring-context-4.0.xsd"
    default-lazy-init="false">

<!-- 不使用就需要注解掉,如果配置了启用注解注释,就必须要配置cacheManager 否则就会启动报错。因为配置了这个缓存拦截器就会去注入cacheManager -->
    <cache:annotation-driven />
    <bean id="propertyConfigurer"
        class="org.springframework.beans.factory.config.PropertyPlaceholderConfigurer">
        <property name="locations">
            <list>
                <value>classpath:dbconfig.properties</value>
                <value>classpath:redis.properties</value>
            </list>
        </property>
    </bean>

    <!-- 连接池配置. -->
    <bean id="jedisPoolConfig" class="redis.clients.jedis.JedisPoolConfig">
        <!-- 连接池中最大连接数。高版本:maxTotal,低版本:maxActive -->
        <property name="maxTotal" value="8" />
        <!-- 连接池中最大空闲的连接数. -->
        <property name="maxIdle" value="8" />
        <!-- 连接池中最少空闲的连接数. -->
        <property name="minIdle" value="${redis.minIdle}" />
        <!-- 当连接池资源耗尽时,调用者最大阻塞的时间,超时将跑出异常。单位,毫秒数;默认为-1.表示永不超时。高版本:maxWaitMillis,低版本:maxWait -->
        <property name="maxWaitMillis" value="${redis.maxWaitMillis}" />
        <!-- 连接空闲的最小时间,达到此值后空闲连接将可能会被移除。负值(-1)表示不移除. -->
        <property name="minEvictableIdleTimeMillis" value="${redis.minEvictableIdleTimeMillis}" />
        <!-- 对于“空闲链接”检测线程而言,每次检测的链接资源的个数。默认为3 -->
        <property name="numTestsPerEvictionRun" value="${redis.numTestsPerEvictionRun}" />
        <!-- “空闲链接”检测线程,检测的周期,毫秒数。如果为负值,表示不运行“检测线程”。默认为-1. -->
        <property name="timeBetweenEvictionRunsMillis" value="${redis.timeBetweenEvictionRunsMillis}" />
        <!-- testOnBorrow:向调用者输出“链接”资源时,是否检测是有有效,如果无效则从连接池中移除,并尝试获取继续获取。默认为false。建议保持默认值. -->
        <!-- testOnReturn:向连接池“归还”链接时,是否检测“链接”对象的有效性。默认为false。建议保持默认值. -->
        <!-- testWhileIdle:向调用者输出“链接”对象时,是否检测它的空闲超时;默认为false。如果“链接”空闲超时,将会被移除。建议保持默认值. -->
        <!-- whenExhaustedAction:当“连接池”中active数量达到阀值时,即“链接”资源耗尽时,连接池需要采取的手段, 默认为1(0:抛出异常。1:阻塞,直到有可用链接资源。2:强制创建新的链接资源) -->
    </bean>
    <!-- Spring提供的Redis连接工厂 -->
     <bean id="jedisConnectionFactory"
        class="org.springframework.data.redis.connection.jedis.JedisConnectionFactory"
        destroy-method="destroy">
    <!--    连接池配置. -->
        <property name="poolConfig" ref="jedisPoolConfig" />
        <!-- Redis服务主机. -->
        <property name="hostName" value="${redis.hostName}" />
        <!-- Redis服务端口号. -->
        <property name="port" value="${redis.port}" />
        <!-- Redis服务连接密码. -->
    <!--    <property name="password" value="${redis.password}" /> -->
        <!-- 连超时设置. -->
        <property name="timeout" value="${redis.timeout}" />
        <!-- 是否使用连接池. -->
        <property name="usePool" value="${redis.usePool}" />
    </bean>
    <!-- Spring提供的访问Redis类. -->
    <bean id="jedisTemplate" class="org.springframework.data.redis.core.RedisTemplate">
        <property name="connectionFactory" ref="jedisConnectionFactory" />
        <!-- 开启事务 -->
        <property name="enableTransactionSupport" value="true"></property>
        <property name="keySerializer">
            <bean
                class="org.springframework.data.redis.serializer.StringRedisSerializer" />
        </property>

        <property name="valueSerializer">
             <bean class="org.springframework.data.redis.serializer.JdkSerializationRedisSerializer" />
            <!-- <bean class="com.pdz.util.ApiRedisSerializa"/>
             <bean class="com.alibaba.fastjson.support.spring.GenericFastJsonRedisSerializer"/>
            <bean
                class="org.springframework.data.redis.serializer.StringRedisSerializer" /> -->
        </property>

        <property name="hashKeySerializer">
            <bean
                class="org.springframework.data.redis.serializer.StringRedisSerializer" />
        </property>

        <!-- <property name="hashValueSerializer">
        <bean class="org.springframework.data.redis.serializer.StringRedisSerializer"
            /> </property> -->
        <property name="hashValueSerializer">
            <bean class="com.pdz.util.ApiRedisSerializa" />
        </property>

    </bean>

    <bean id="stringRedisTemplate" class="org.springframework.data.redis.core.StringRedisTemplate">
        <property name="connectionFactory" ref="jedisConnectionFactory" />
        <!-- 开启事务 -->
        <property name="enableTransactionSupport" value="true"></property>
    </bean>
<!-- <bean id="cacheManager" 这里面可以配置上面分析的各种字段属性-- >
class="org.springframework.data.redis.cache.RedisCacheManager">
        <!--配置 redisTemplate-->
        <constructor-arg index = "0" type="RedisOperations">
            <ref bean="jedisTemplate" />
        </constructor-arg>
        <!-- 过期时间 -->
        <property name="defaultExpiration" value="300000"/>
        <!--    支持事务 -->
        <property name="transactionAware" value = "true"/>
    </bean>
具体使用采用注解可以参照这篇文章:http://jinnianshilongnian.iteye.com/blog/2001040
如果觉得我的文章对您有用,请随意打赏。你的支持将鼓励我继续创作!