服务端
使用idea创建spring boot工程:
“File”→“New”→“Project”→“Spring Initializr”……
在pom添加依赖
<dependency>
    <groupId>org.springframework.boot</groupId>
    <artifactId>spring-boot-starter-web</artifactId>
</dependency>
<dependency>
    <groupId>org.springframework.boot</groupId>
    <artifactId>spring-boot-starter-web-services</artifactId>
</dependency>

<dependency>
    <groupId>org.springframework.boot</groupId>
    <artifactId>spring-boot-starter-test</artifactId>
    <scope>test</scope>
</dependency>

<dependency>
    <groupId>org.apache.cxf</groupId>
    <artifactId>cxf-rt-frontend-jaxws</artifactId>
    <version>3.1.6</version>
</dependency>
<dependency>
    <groupId>org.apache.cxf</groupId>
    <artifactId>cxf-rt-transports-http</artifactId>
    <version>3.1.6</version>
</dependency>- 1
- 2
- 3
- 4
- 5
- 6
- 7
- 8
- 9
- 10
- 11
- 12
- 13
- 14
- 15
- 16
- 17
- 18
- 19
- 20
- 21
- 22
- 23
- 24
- 25
在application.properties中添加配置
这个配置根据实际需求添加,如果不修改server.port,服务器会默认从8080端口启动,为避免冲突,这里设置服务端口为8090。
server.port=8090- 1
提供webservice接口
import javax.jws.WebService;

@WebService
public interface DemoService {
    public String sayHello(String user);
}- 1
- 2
- 3
- 4
- 5
- 6
实现webservice的方法
import java.util.Date;

public class DemoServiceImpl implements DemoService {
    @Override
    public String sayHello(String user) {
        return user+":hello"+"("+new Date()+")";
    }
}- 1
- 2
- 3
- 4
- 5
- 6
- 7
- 8
配置并发布
import org.apache.cxf.Bus;
import org.apache.cxf.bus.spring.SpringBus;
import org.apache.cxf.jaxws.EndpointImpl;
import org.apache.cxf.transport.servlet.CXFServlet;
import org.springframework.boot.web.servlet.ServletRegistrationBean;
import org.springframework.context.annotation.Bean;
import org.springframework.context.annotation.Configuration;

import javax.xml.ws.Endpoint;


@Configuration
public class CxfConfig {

    @Bean
    public ServletRegistrationBean dispatcherServlet() {
        return new ServletRegistrationBean(new CXFServlet(),"/demo/*");
    }
    @Bean(name = Bus.DEFAULT_BUS_ID)
    public SpringBus springBus() {
        return new SpringBus();
    }
    @Bean
    public DemoService demoService() {
        return new DemoServiceImpl();
    }
    @Bean
    public Endpoint endpoint() {
        EndpointImpl endpoint = new EndpointImpl(springBus(), demoService());
        endpoint.publish("/api");
        return endpoint;
    }
}- 1
- 2
- 3
- 4
- 5
- 6
- 7
- 8
- 9
- 10
- 11
- 12
- 13
- 14
- 15
- 16
- 17
- 18
- 19
- 20
- 21
- 22
- 23
- 24
- 25
- 26
- 27
- 28
- 29
- 30
- 31
- 32
- 33
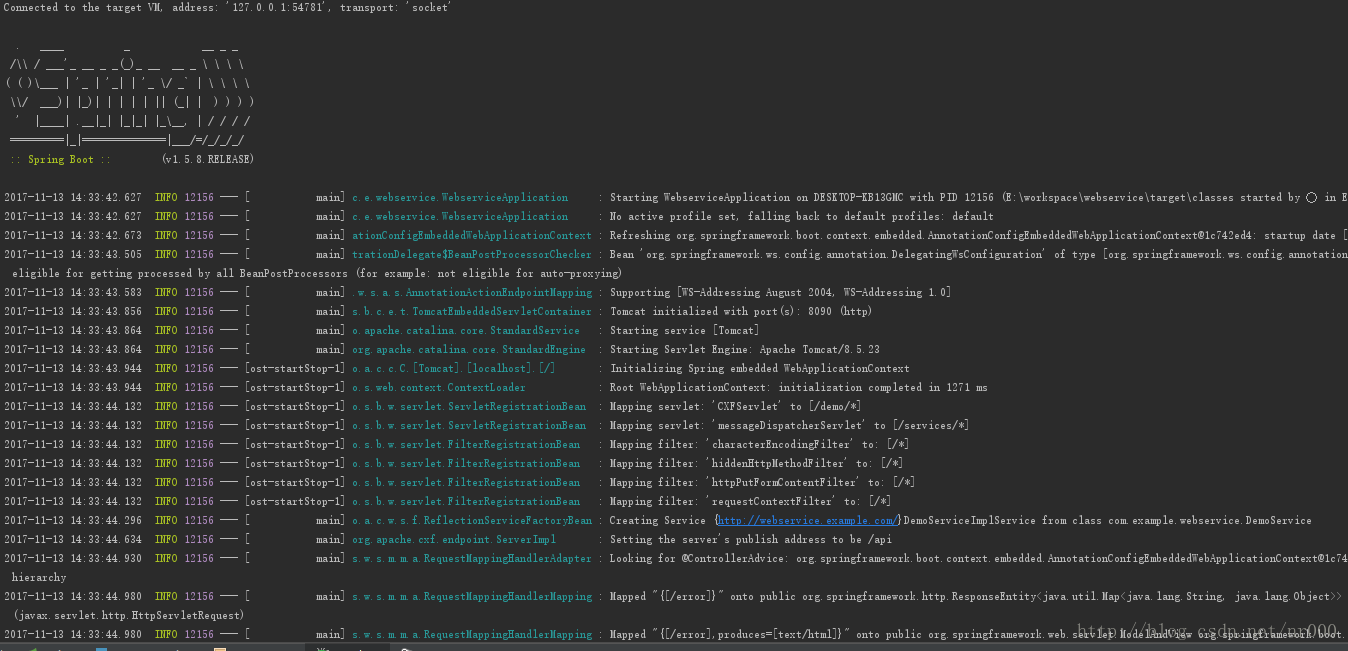
启动服务
直接启动WebserviceApplication,看到服务器正常启动
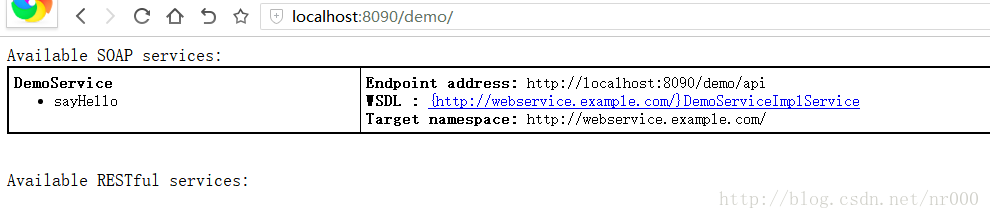
查看系统提供的webservice接口
在浏览器输入http://localhost:8090/demo/ 可以看到系统提供的webservice服务
客户端
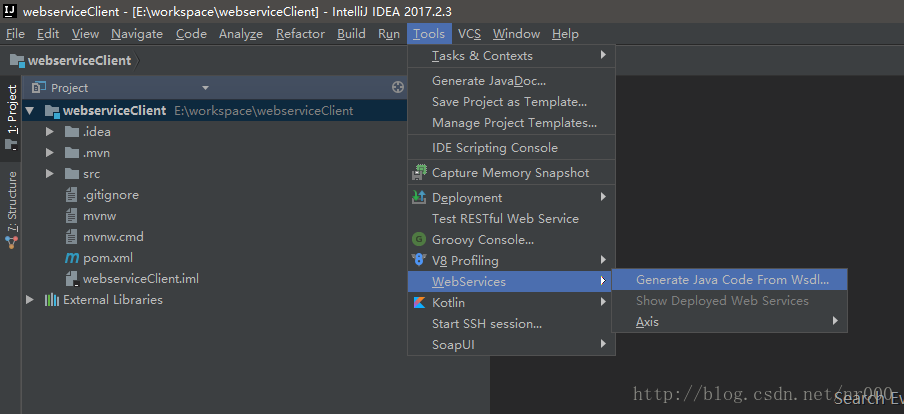
创建新项目
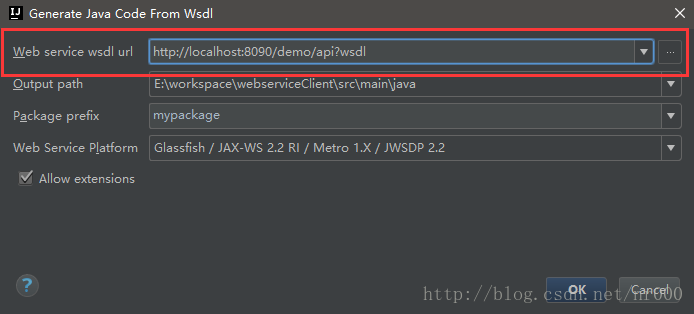
通过wsdl生成Java代码
Web service wsdl url 填入服务端WSDL地址
如果使用的是JDK1.8可能会有bug,生成时报错:由于 accessExternalSchema 属性设置的限制而不允许 ‘file’ 访问, 因此无法读取方案文档 ‘xjc.xsd’。
org.xml.sax.SAXParseException;
systemId: jar:file:/D:/apache-cxf-2.7.11/apache-cxf-2.7.11/lib/jaxb-xjc2.2.6.jar!/com/sun/tools/xjc/reader/xmlschema/bindinfo/binding.xsd;
lineNumber: 52; columnNumber: 88; schema_reference:
由于 accessExternalSchema 属性设置的限制而不允许 'file' 访问, 因此无法读取方案文档 'xjc.xsd'。- 1
- 2
- 3
- 4
解决方法:
在jdk的安装路径下,如 C:Javajdk1.8.0_65jrelib,添加一个属性文件jaxp.properties,并写上如下内容javax.xml.accessExternalSchema = all
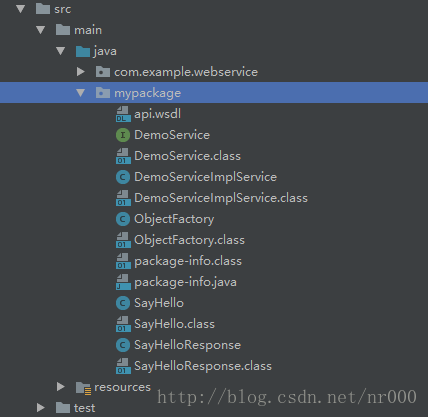
成功执行后可以看到mypackage多了很多文件
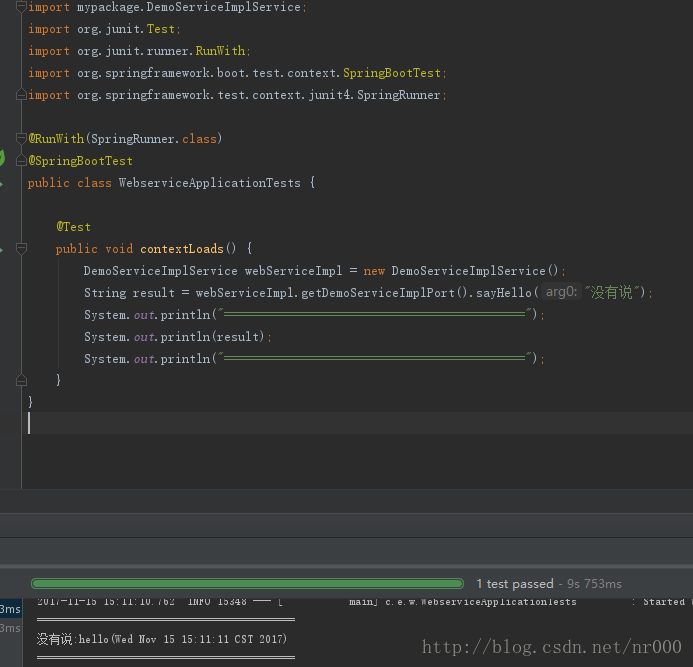
我们可以直接调用DemoServiceImplService提供的webservice接口,就像使用本地的方法一样。这里在单元测试中直接调用:
import mypackage.DemoServiceImplService;
import org.junit.Test;
import org.junit.runner.RunWith;
import org.springframework.boot.test.context.SpringBootTest;
import org.springframework.test.context.junit4.SpringRunner;

@RunWith(SpringRunner.class)
@SpringBootTest
public class WebserviceApplicationTests {

    @Test
    public void contextLoads() {
        DemoServiceImplService webServiceImpl = new DemoServiceImplService();
        String result = webServiceImpl.getDemoServiceImplPort().sayHello("没有说");
        System.out.println("===========================================");
        System.out.println(result);
        System.out.println("===========================================");
    }
}- 1
- 2
- 3
- 4
- 5
- 6
- 7
- 8
- 9
- 10
- 11
- 12
- 13
- 14
- 15
- 16
- 17
- 18
- 19
执行结果: