社区微信群开通啦,扫一扫抢先加入社区官方微信群

社区微信群
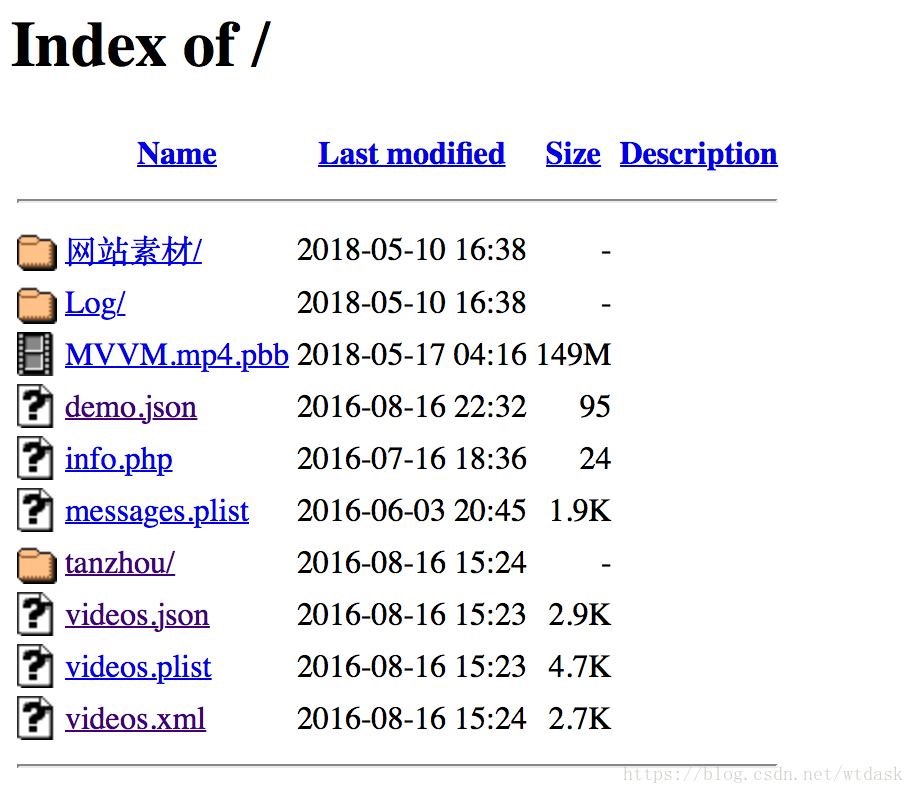
我们在前面的文章中介绍了MAC电脑搭建Apache服务器,在Sites文件夹中放置一个视频文件MVVM.mp4.pbb,通过NSURLConnection进行下载
访问http://localhost,我们可以进行查看,所有Apache服务器中的文件
- (void)touchesBegan:(NSSet<UITouch *> *)touches withEvent:(UIEvent *)event {
    NSString * urlStr = @"http://127.0.0.1/MVVM.mp4.pbb";
    urlStr =[urlStr stringByAddingPercentEscapesUsingEncoding:NSUTF8StringEncoding];
    NSURL * url =[NSURL URLWithString:urlStr];

    //request
    NSURLRequest * request = [NSURLRequest requestWithURL:url];

    //connection
    NSLog(@"开始");
    [NSURLConnection sendAsynchronousRequest:request queue:[NSOperationQueue mainQueue] completionHandler:^(NSURLResponse * _Nullable response, NSData * _Nullable data, NSError * _Nullable connectionError) {
        //将数据写入磁盘
        [data writeToFile:@"/Users/mac/Desktop/123.mp4.pbb" atomically:YES];
        NSLog(@"完成");
    }];
}
上面代码的写法有两个问题:
假如使用第三方的文件下载工具,我们大家都已经轻车熟路了,但是我们就是要用NSURLConnection来做网络文件下载,应该怎么处理这两个问题呢?
NSURLConnection - 从iOS2.0开始有,已经有十多年的年龄了
NSURLConnection的异步加载 iOS5.0才有,在5.0以前通过代理来实现网络开发(这个时间开发者异常难熬
)
- 开发简单的网络请求还是比较方便的,直接用异步方法
- 开发复杂的网络请求,比如大文件的网络下载,步骤非常繁琐
在平时开发中,我们几乎不会用到NSURLConnection,因为我们用的都是别人给你封装好的,但是我们也要去了解挖掘它,才能更好的使用三方库。
问题:
1.没有下载进度,会影响用户体验
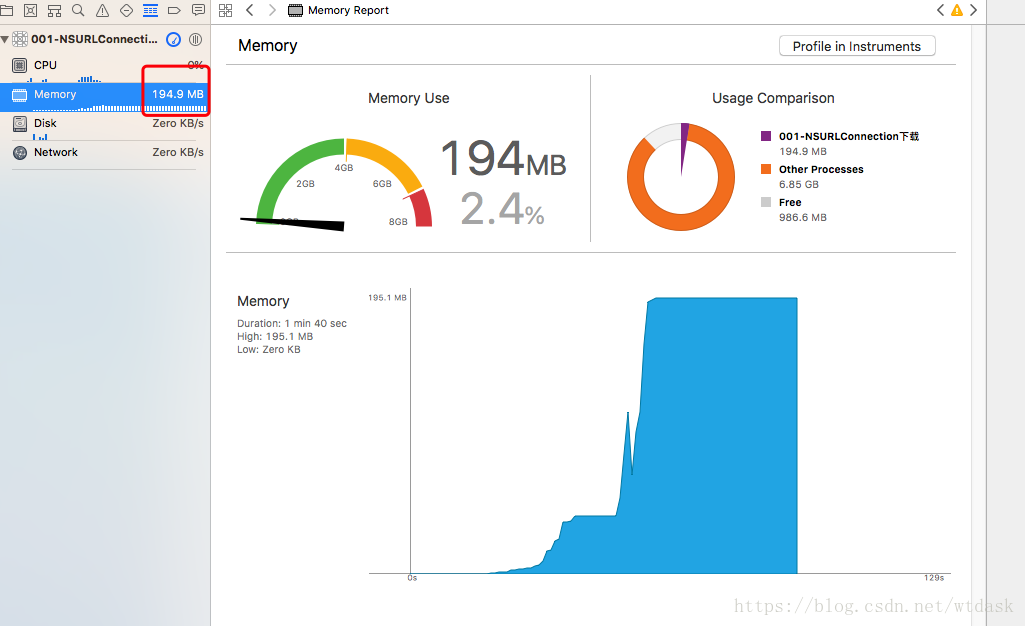
2.内存偏高,有一个最大的峰值
解决办法:
- 通过代理方式来解决
1.进度跟进
- 在响应方法中获得文件总大小
- 每次接收到数据,计算数据的总比例
#import "ViewController.h"

@interface ViewController ()<NSURLConnectionDelegate>
/** 要下载文件的总大小 **/
@property(nonatomic,assign)long long expectedContentLength;
/** 当前下载的长度 **/
@property(nonatomic,assign)long long currentLength;
@end

@implementation ViewController

- (void)viewDidLoad {
    [super viewDidLoad];
}

- (void)touchesBegan:(NSSet<UITouch *> *)touches withEvent:(UIEvent *)event {
    NSString * urlStr = @"http://127.0.0.1/MVVM.mp4.pbb";
    urlStr =[urlStr stringByAddingPercentEscapesUsingEncoding:NSUTF8StringEncoding];
    NSURL * url =[NSURL URLWithString:urlStr];

    //request
    NSURLRequest * request = [NSURLRequest requestWithURL:url];

    NSLog(@"开始");
    //NSURLConnection的构造方法
    NSURLConnection * con = [NSURLConnection connectionWithRequest:request delegate:self];
    //启动链接
    [con start];

}

#pragma mark - <NSURLConnectionDelegate>
//1.接受到服务器的响应 - 状态行&响应头 - 做一些准备工作
//expectedContentLength  需要下载文件的总大小 long long
//suggestedFilename 服务器建议保存的文件名称
-(void)connection:(NSURLConnection *)connection didReceiveResponse:(nonnull NSURLResponse *)response{
    NSLog(@"%@",response);
    //记录文件总大小
    self.expectedContentLength = response.expectedContentLength;
    self.currentLength = 0;
}

//2.接受到服务器的数据 - 此代理方法可能会执行很多次 因为拿到多个data
-(void)connection:(NSURLConnection *)connection didReceiveData:(nonnull NSData *)data{
    self.currentLength += data.length;
    //计算百分比
    //progress = long long / long long
    float progress =  (float)self.currentLength / self.expectedContentLength;
    NSLog(@"接受数据进度%f",progress);
}

//3.所有的数据加载完毕 - 所有数据都传输完毕,只是一个最后的通知
-(void)connectionDidFinishLoading:(NSURLConnection *)connection
{
    NSLog(@"完毕");
}

//4.下载失败或者错误
-(void)connection:(NSURLConnection *)connection didFailWithError:(NSError *)error{

}
@end
问题:
1.没有下载进度,会影响用户体验
2.内存偏高,有一个最大的峰值
解决第二个问题的办法,我们猜测是因为一次性写入才使内存偏高 我们有两种方法一次进行校验:
2.保存文件的思路
有两种解决方式
1.保存完成一次性写入磁盘
2.边下载边写入
#import "ViewController.h"

@interface ViewController ()<NSURLConnectionDelegate>
/** 要下载文件的总大小 **/
@property(nonatomic,assign)long long expectedContentLength;
/** 当前下载的长度 **/
@property(nonatomic,assign)long long currentLength;
/** 保存目标 **/
@property(nonatomic,copy)NSString * targetFilePath;
/** 用来每次接收到的数据,拼接  **/
@property(nonatomic,strong)NSMutableData * fileData;

@end

@implementation ViewController

- (void)viewDidLoad {
    [super viewDidLoad];

}

- (void)touchesBegan:(NSSet<UITouch *> *)touches withEvent:(UIEvent *)event {
    NSString * urlStr = @"http://127.0.0.1/MVVM.mp4.pbb";
    urlStr =[urlStr stringByAddingPercentEscapesUsingEncoding:NSUTF8StringEncoding];
    NSURL * url =[NSURL URLWithString:urlStr];

    //request
    NSURLRequest * request = [NSURLRequest requestWithURL:url];

    NSLog(@"开始");
    //NSURLConnection的构造方法
    NSURLConnection * con = [NSURLConnection connectionWithRequest:request delegate:self];
    //启动链接
    [con start];

}

#pragma mark - <NSURLConnectionDelegate>
//1.接受到服务器的响应 - 状态行&响应头 - 做一些准备工作
//expectedContentLength  需要下载文件的总大小 long long
//suggestedFilename 服务器建议保存的文件名称
-(void)connection:(NSURLConnection *)connection didReceiveResponse:(nonnull NSURLResponse *)response{
    NSLog(@"%@",response);
    //记录文件总大小
    self.expectedContentLength = response.expectedContentLength;
    self.currentLength = 0;
    //生成目标文件的路径
    self.targetFilePath = [@"/Users/mac/Desktop/" stringByAppendingPathComponent:response.suggestedFilename];
}

-(NSMutableData *)fileData{
    if (!_fileData) {
        _fileData = [[NSMutableData alloc]init];
    }
    return _fileData;
}

//2.接受到服务器的数据 - 此代理方法可能会执行很多次 因为拿到多个data
-(void)connection:(NSURLConnection *)connection didReceiveData:(nonnull NSData *)data{
    self.currentLength += data.length;
    //计算百分比
    //progress = long long / long long
    float progress =  (float)self.currentLength / self.expectedContentLength;
    NSLog(@"接受数据进度%f",progress);

    //拼接数据
    [self.fileData appendData:data];
}

//3.所有的数据加载完毕 - 所有数据都传输完毕,只是一个最后的通知
-(void)connectionDidFinishLoading:(NSURLConnection *)connection
{
    NSLog(@"完毕");
    //将数据写入磁盘
    [self.fileData writeToFile:self.targetFilePath atomically:YES];
}

//4.下载失败或者错误
-(void)connection:(NSURLConnection *)connection didFailWithError:(NSError *)error{

}
@end
使用第一种方式,文件保存完成写入磁盘,我们看见峰值升到很高,且都不会掉下来了,原因是@property(nonatomic,strong)NSMutableData * fileData; 是用strong来修饰的,且数据写入磁盘后,fileData没有被释放。因此要手动释放。self.fileData = nil;
//3.所有的数据加载完毕 - 所有数据都传输完毕,只是一个最后的通知
-(void)connectionDidFinishLoading:(NSURLConnection *)connection
{
NSLog(@"完毕");
//将数据写入磁盘
[self.fileData writeToFile:self.targetFilePath atomically:YES];
//释放fileData
self.fileData = nil;
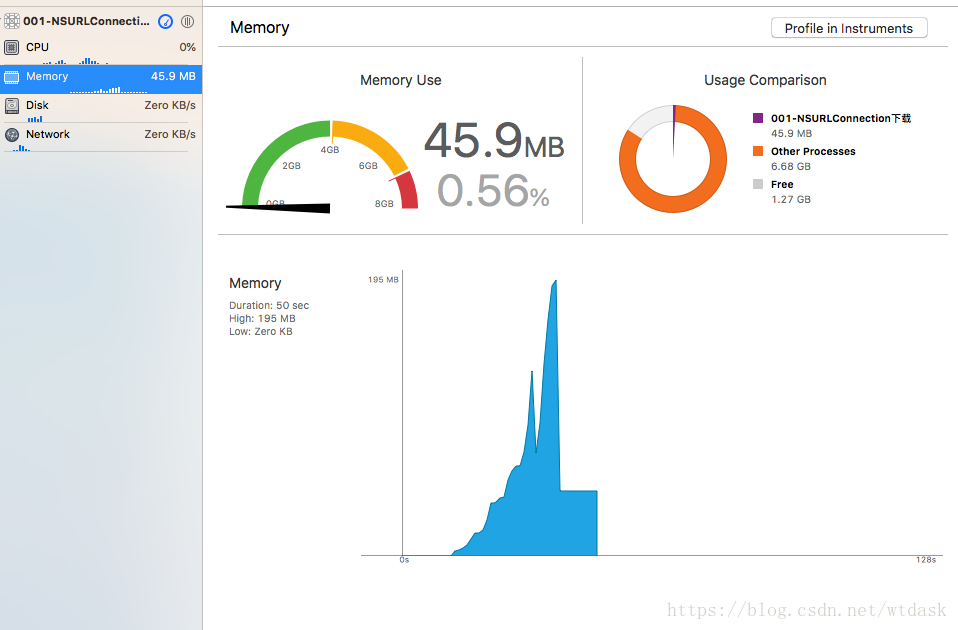
}此时再看,内存依然很大,问题没有被解决。我们可以得出结论,保存完成后一次性写入磁盘和异步方法执行的效果是一样的,仍然存在内存问题
此时我们是不是就可以推测:苹果的异步方法的实现思路就是此时我们在上面做的实现思路呢?
NSFileManager:主要功能,创建目录,检查目录是否存在,遍历目录,删除文件..针对文件操作Finder
NSFileHandle:文件“句柄”,Handle意味着是对前面单词的“File” 操作或者处理
主要功能:就是对同一个文件进行二进制的读和写
#import "ViewController.h"

@interface ViewController ()<NSURLConnectionDelegate>
/** 要下载文件的总大小 **/
@property(nonatomic,assign)long long expectedContentLength;
/** 当前下载的长度 **/
@property(nonatomic,assign)long long currentLength;
/** 保存目标 **/
@property(nonatomic,copy)NSString * targetFilePath;

@end

@implementation ViewController

- (void)viewDidLoad {
    [super viewDidLoad];

}
- (void)touchesBegan:(NSSet<UITouch *> *)touches withEvent:(UIEvent *)event {
    NSString * urlStr = @"http://127.0.0.1/开班典礼介绍2017-11-27_220225.wmv";
    urlStr =[urlStr stringByAddingPercentEscapesUsingEncoding:NSUTF8StringEncoding];
    NSURL * url =[NSURL URLWithString:urlStr];

    //request
    NSURLRequest * request = [NSURLRequest requestWithURL:url];
    NSLog(@"开始");
    //NSURLConnection的构造方法
    NSURLConnection * con = [NSURLConnection connectionWithRequest:request delegate:self];
    //启动链接
    [con start];

}

#pragma mark - <NSURLConnectionDelegate>
//1.接受到服务器的响应 - 状态行&响应头 - 做一些准备工作
//expectedContentLength  需要下载文件的总大小 long long
//suggestedFilename 服务器建议保存的文件名称
-(void)connection:(NSURLConnection *)connection didReceiveResponse:(nonnull NSURLResponse *)response{
    NSLog(@"%@",response);
    //记录文件总大小
    self.expectedContentLength = response.expectedContentLength;
    self.currentLength = 0;
    //生成目标文件的路径
    self.targetFilePath = [@"/Users/mac/Desktop/" stringByAppendingPathComponent:response.suggestedFilename];
    //删除 -- removeItemAtPath 如果文件存在,就会直接删除,如果文件不存在,就什么也不做,也不会报错
    [[NSFileManager defaultManager]removeItemAtPath:self.targetFilePath error:NULL];
}

//2.接受到服务器的数据 - 此代理方法可能会执行很多次 因为拿到多个data
-(void)connection:(NSURLConnection *)connection didReceiveData:(nonnull NSData *)data{
    self.currentLength += data.length;
    //计算百分比
    //progress = long long / long long
    float progress =  (float)self.currentLength / self.expectedContentLength;
    NSLog(@"接受数据进度%f",progress);

    //拼接数据
    [self writeToFileWithData:data];
}
-(void)writeToFileWithData:(NSData *)data{

    //注意:fp 中的 p 是指指针 文件句柄也可以理解为文件指针
    //如果文件不存在,fp 在实例化的结果是空
    NSFileHandle * fp = [NSFileHandle fileHandleForWritingAtPath:self.targetFilePath];
    //判断文件是否存在,直接将数据写入磁盘
    if (fp == nil) {
        [data writeToFile:self.targetFilePath atomically:YES];
    }else{
        //如果存在
        //1.将文件指针移到文件的末尾
        [fp seekToEndOfFile];
        //2.写入文件
        [fp writeData:data];
        //3.关闭文件 在c语音的开发中,泛是涉及到文件读写,都有打开和关闭的操作
        [fp closeFile];
    }

}
//3.所有的数据加载完毕 - 所有数据都传输完毕,只是一个最后的通知
-(void)connectionDidFinishLoading:(NSURLConnection *)connection
{
    NSLog(@"完毕");
    //将数据写入磁盘

}

//4.下载失败或者错误
-(void)connection:(NSURLConnection *)connection didFailWithError:(NSError *)error{

}
@end
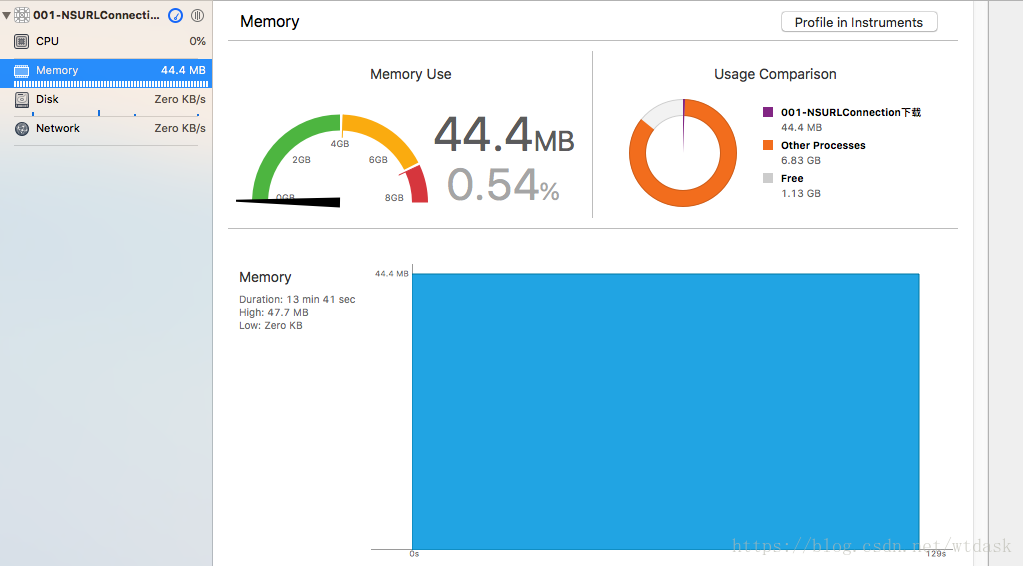
NSFileHandle 彻底解决了内存峰值的问题
但是有没有一种更加简单的方式呢?我们可以使用NSOutputStream输出流的方式来操作。
NSOutputStream 输出流
#import "ViewController.h"

@interface ViewController ()<NSURLConnectionDelegate>
/** 要下载文件的总大小 **/
@property(nonatomic,assign)long long expectedContentLength;
/** 当前下载的长度 **/
@property(nonatomic,assign)long long currentLength;
/** 保存目标 **/
@property(nonatomic,copy)NSString * targetFilePath;
/** 保存文件的输出流
 - (void)open; 写入之前打开流
 - (void)close; 完成之后关闭流
 **/
@property(nonatomic,strong)NSOutputStream * fileStream;

@end

@implementation ViewController

- (void)viewDidLoad {
    [super viewDidLoad];

}

- (void)touchesBegan:(NSSet<UITouch *> *)touches withEvent:(UIEvent *)event {
    NSString * urlStr = @"http://127.0.0.1/开班典礼介绍2017-11-27_220225.wmv";
    urlStr =[urlStr stringByAddingPercentEscapesUsingEncoding:NSUTF8StringEncoding];
    NSURL * url =[NSURL URLWithString:urlStr];

    //request
    NSURLRequest * request = [NSURLRequest requestWithURL:url];

    NSLog(@"开始");
    //NSURLConnection的构造方法
    NSURLConnection * con = [NSURLConnection connectionWithRequest:request delegate:self];
    //启动链接
    [con start];

}

#pragma mark - <NSURLConnectionDelegate>
//1.接受到服务器的响应 - 状态行&响应头 - 做一些准备工作
//expectedContentLength  需要下载文件的总大小 long long
//suggestedFilename 服务器建议保存的文件名称
-(void)connection:(NSURLConnection *)connection didReceiveResponse:(nonnull NSURLResponse *)response{
    NSLog(@"%@",response);
    //记录文件总大小
    self.expectedContentLength = response.expectedContentLength;
    self.currentLength = 0;
    //生成目标文件的路径
    self.targetFilePath = [@"/Users/mac/Desktop/" stringByAppendingPathComponent:response.suggestedFilename];
    //删除(用户第二次点击下载) -- removeItemAtPath 如果文件存在,就会直接删除,如果文件不存在,就什么也不做,也不会报错
    [[NSFileManager defaultManager]removeItemAtPath:self.targetFilePath error:NULL];

    //输出流创建 - 以追加的方式开发文件流
    self.fileStream = [[NSOutputStream alloc]initToFileAtPath:self.targetFilePath append:YES];
    [self.fileStream open];
}

//2.接受到服务器的数据 - 此代理方法可能会执行很多次 因为拿到多个data
-(void)connection:(NSURLConnection *)connection didReceiveData:(nonnull NSData *)data{
    self.currentLength += data.length;
    //计算百分比
    //progress = long long / long long
    float progress =  (float)self.currentLength / self.expectedContentLength;
    NSLog(@"接受数据进度%f",progress);

    //将数据追加到文件流中
    [self.fileStream write:data.bytes maxLength:data.length];
}

//3.所有的数据加载完毕 - 所有数据都传输完毕,只是一个最后的通知
-(void)connectionDidFinishLoading:(NSURLConnection *)connection
{
    NSLog(@"完毕");
    //关闭文件流
    [self.fileStream close];
}

//4.下载失败或者错误
-(void)connection:(NSURLConnection *)connection didFailWithError:(NSError *)error{

}
@end
我们看,使用文件输出流的方式是不是比使用文件句柄的方式更加简洁呢?
以上执行的下载文件的代码执行是在哪个线程中呢?答案是在主线程中,因为我们在所有的代码中没有涉及到任何多线程的东西。我们肯定要把这些操作放到子线程中,防止阻塞主线程。我们使用setDelegateQueue就可以了
- (void)touchesBegan:(NSSet<UITouch *> *)touches withEvent:(UIEvent *)event {
    NSString * urlStr = @"http://127.0.0.1/开班典礼介绍2017-11-27_220225.wmv";
    urlStr =[urlStr stringByAddingPercentEscapesUsingEncoding:NSUTF8StringEncoding];
    NSURL * url =[NSURL URLWithString:urlStr];

    //request
    NSURLRequest * request = [NSURLRequest requestWithURL:url];

    NSLog(@"开始");
    //NSURLConnection的构造方法
    NSURLConnection * con = [NSURLConnection connectionWithRequest:request delegate:self];
    //设置代理工作的操作队列
    [con setDelegateQueue:[[NSOperationQueue alloc]init]];
    //启动链接
    [con start];
}

//2.接受到服务器的数据 - 此代理方法可能会执行很多次 因为拿到多个data
-(void)connection:(NSURLConnection *)connection didReceiveData:(nonnull NSData *)data{
    self.currentLength += data.length;
    //计算百分比
    //progress = long long / long long
    float progress =  (float)self.currentLength / self.expectedContentLength;
    NSLog(@"接受数据进度%f %@",progress,[NSThread currentThread]);

    //将数据追加到文件流中
    [self.fileStream write:data.bytes maxLength:data.length];
}
接下来,我们在Main.storyboard中添加两个控件,并把progressView添加关联到代码,在主线程中更新progressView的显示?我们这么做合理嘛?一切看上去很合理,但是注意!!这是一个很大的坑!!
//2.接受到服务器的数据 - 此代理方法可能会执行很多次 因为拿到多个data
-(void)connection:(NSURLConnection *)connection didReceiveData:(nonnull NSData *)data{
    self.currentLength += data.length;
    //计算百分比
    //progress = long long / long long
    float progress =  (float)self.currentLength / self.expectedContentLength;
    NSLog(@"接受数据进度%f %@",progress,[NSThread currentThread]);
    //在主线程更新UI
    dispatch_async(dispatch_get_main_queue(), ^{
         self.progressView.progress = progress; //直接影响UI
    });

    //将数据追加到文件流中
    [self.fileStream write:data.bytes maxLength:data.length];
}
运行代码,点击下载,拖动TextFilder,我们就会发现,操作UI的时候,文件是不会下载的,放开拖动后,文件下载才会重新被执行。它仍然阻塞主线程!很奇怪,我们明明把文件下载放到了子线程中,为什么还能阻塞主线程呢?
新的问题:默认Connection是在主线程工作,指定了代理的工作队列之后,整个下载仍然是在主线程,UI事件能够卡主下载
NSURLConnection * con = [NSURLConnection connectionWithRequest:request delegate:self];这个代码为了为了保证连接的正常,调用的这个线程的Run loop 必须在默认的Runloop模式下!!这是官方给出的说明。
我们知道NSURLConnection 在iOS8.0以后将会被弃用,它有很多的不足。这就是它的不足之处!!我们开发者为什么不用NSURLConnection,这就是原因。
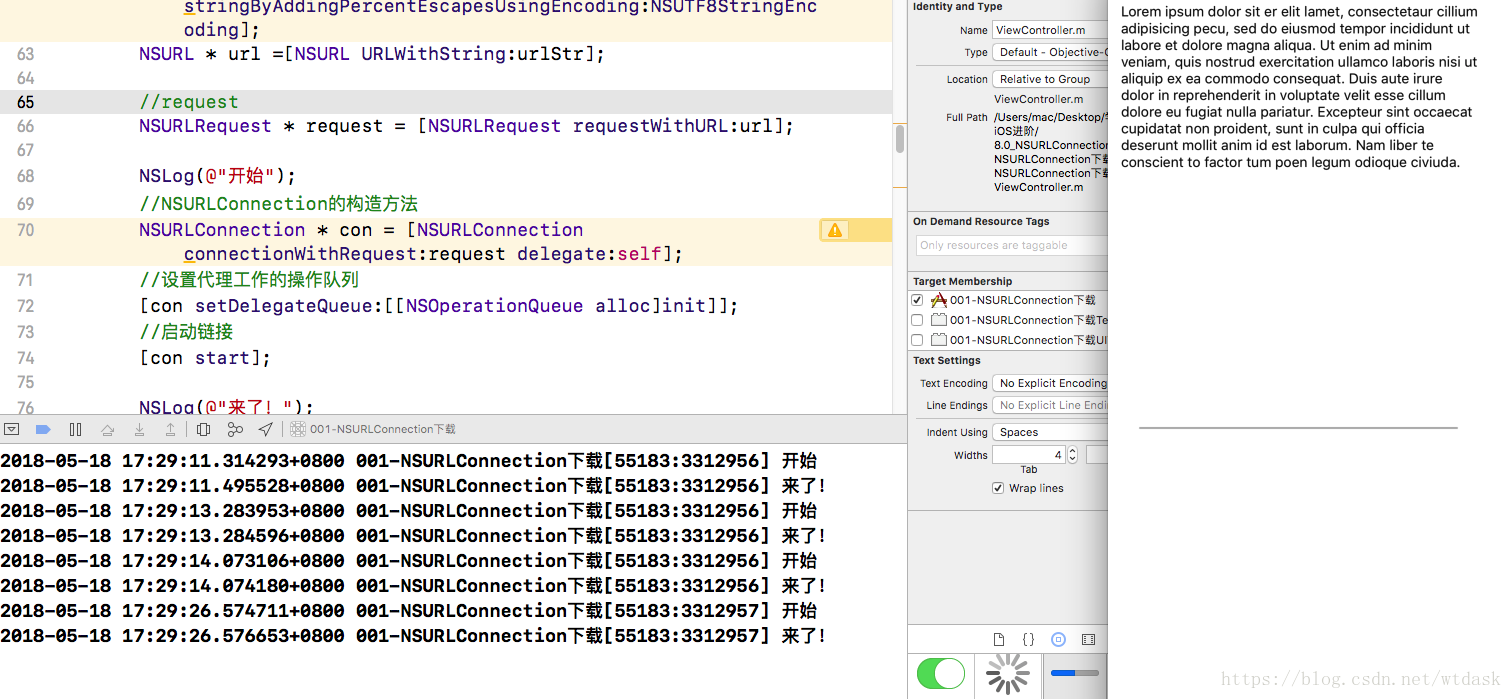
根据上面我们抛出的问题,那我们想,能不能把文件下载的所有操作放到子线程中,能不能解决问题呢?
- (void)touchesBegan:(NSSet<UITouch *> *)touches withEvent:(UIEvent *)event {
    dispatch_async(dispatch_get_global_queue(0, 0), ^{
        NSString * urlStr = @"http://127.0.0.1/开班典礼介绍2017-11-27_220225.wmv";
        urlStr =[urlStr stringByAddingPercentEscapesUsingEncoding:NSUTF8StringEncoding];
        NSURL * url =[NSURL URLWithString:urlStr];

        //request
        NSURLRequest * request = [NSURLRequest requestWithURL:url];

        NSLog(@"开始");
        //NSURLConnection的构造方法
        NSURLConnection * con = [NSURLConnection connectionWithRequest:request delegate:self];
        //设置代理工作的操作队列
        [con setDelegateQueue:[[NSOperationQueue alloc]init]];
        //启动链接
        [con start];

        NSLog(@"来了!");
    });

}
答案是不能!! 文件下载的代理方法直接就不走了!!
原因是RunLoop是负责监听事件:触摸,时钟,网络等的,在主线程中创建NSURLConnection,RunLoop 可以被启动。在子线程中RunLoop是默认不启动的,此时的网络事件是不监听的!!
执行完NSLog(@"来了!");之后,子线程就被回收了![con start];是没有意义的。
所以,我们要启动运行循环
//启动链接
 [con start];

//5.启动运行循环
[[NSRunLoop currentRunLoop] run];
NSLog(@"来了!");
注意,一般我们启动RunLoop的时候不要使用run,使用run来启动一旦启动,就没办法被回收了。此时我们仅仅用来演示用。
此时,我们算是解决了这个问题。但是这个子线程是没办法被回收的,所以不能用run,可以需要手动的方式来使runloop启动起来。当然这种方式比较令人不爽。。。
我们定义一个标记属性
/** 标记  **/
@property(nonatomic,assign,getter=isFinished)BOOL * finished;
self.finished = NO;
//5.启动运行循环
while (!self.isFinished) {
//启动一次Runlloop循环,监听事件
[[NSRunLoop currentRunLoop] runMode:NSDefaultRunLoopMode beforeDate:[NSDate dateWithTimeIntervalSinceNow:0.1]];
}//3.所有的数据加载完毕 - 所有数据都传输完毕,只是一个最后的通知
-(void)connectionDidFinishLoading:(NSURLConnection *)connection
{
NSLog(@"完毕");
//关闭文件流
[self.fileStream close];
//设置结束标记
self.finished = YES;
}
当然,这种方式对系统消耗很大,我们更优的解决方式是使用CFRunloop
全部代码如下
#import "ViewController.h"

@interface ViewController ()<NSURLConnectionDelegate>
@property (weak, nonatomic) IBOutlet UIProgressView *progressView;

/** 要下载文件的总大小 **/
@property(nonatomic,assign)long long expectedContentLength;
/** 当前下载的长度 **/
@property(nonatomic,assign)long long currentLength;

/** 下载线程的运行循环  **/
@property(nonatomic,assign)CFRunLoopRef downloadRunloop;

/** 保存目标 **/
@property(nonatomic,copy)NSString * targetFilePath;

@property(nonatomic,strong)NSOutputStream * fileStream;

@end

@implementation ViewController

- (void)viewDidLoad {
    [super viewDidLoad];

}


/**
 问题:
 1.没有下载进度,会影响用户体验
 2.内存偏高,有一个最大的峰值

 解决办法:
  - 通过代理方式来解决
  1.进度跟进
   - 在响应方法中获得文件总大小
   - 每次接收到数据,计算数据的总比例
  2.保存文件的思路
   - 因为一次性写入才使内存偏高
   有两种解决方式
   1.保存完成写入磁盘
   2.边下载边写入
    1.NSFileHandle 彻底解决了内存峰值的问题
    2.NSOutputStream 输出流

 新的问题:默认Connection是在主线程工作,指定了代理的工作队列之后,整个下载仍然是在主线程,UI事件能够卡主下载
 */
- (void)touchesBegan:(NSSet<UITouch *> *)touches withEvent:(UIEvent *)event {
    dispatch_async(dispatch_get_global_queue(0, 0), ^{
        NSString * urlStr = @"http://127.0.0.1/开班典礼介绍2017-11-27_220225.wmv";
        urlStr =[urlStr stringByAddingPercentEscapesUsingEncoding:NSUTF8StringEncoding];
        NSURL * url =[NSURL URLWithString:urlStr];

        //request
        NSURLRequest * request = [NSURLRequest requestWithURL:url];

        NSLog(@"开始");
        //NSURLConnection的构造方法
        NSURLConnection * con = [NSURLConnection connectionWithRequest:request delegate:self];
        //设置代理工作的操作队列
        [con setDelegateQueue:[[NSOperationQueue alloc]init]];
        //启动链接
        [con start];

        //5.启动运行循环
        //coreFoundation框架 CFRunloop
        /*
         CFRunloopStop() 停止指定的runloop
         CFRunLoopGetCurrent() 拿到当前的runloop
         CFRunLoopRun() 直接启动当前的运行循环
         */
        //1.拿到当前线程的运行循环
        self.downloadRunloop = CFRunLoopGetCurrent();
        //2.启动运行循环
        CFRunLoopRun();
        NSLog(@"来了!");
    });

}

#pragma mark - <NSURLConnectionDelegate>
//1.接受到服务器的响应 - 状态行&响应头 - 做一些准备工作
//expectedContentLength  需要下载文件的总大小 long long
//suggestedFilename 服务器建议保存的文件名称
-(void)connection:(NSURLConnection *)connection didReceiveResponse:(nonnull NSURLResponse *)response{
    NSLog(@"%@",response);
    //记录文件总大小
    self.expectedContentLength = response.expectedContentLength;
    self.currentLength = 0;
    //生成目标文件的路径
    self.targetFilePath = [@"/Users/mac/Desktop/" stringByAppendingPathComponent:response.suggestedFilename];
    //删除(用户第二次点击下载) -- removeItemAtPath 如果文件存在,就会直接删除,如果文件不存在,就什么也不做,也不会报错
    [[NSFileManager defaultManager]removeItemAtPath:self.targetFilePath error:NULL];

    //输出流创建 - 以追加的方式开发文件流
    self.fileStream = [[NSOutputStream alloc]initToFileAtPath:self.targetFilePath append:YES];
    [self.fileStream open];
}

//2.接受到服务器的数据 - 此代理方法可能会执行很多次 因为拿到多个data
-(void)connection:(NSURLConnection *)connection didReceiveData:(nonnull NSData *)data{
    self.currentLength += data.length;
    //计算百分比
    //progress = long long / long long
    float progress =  (float)self.currentLength / self.expectedContentLength;
    NSLog(@"接受数据进度%f %@",progress,[NSThread currentThread]);
    //在主线程更新UI
    dispatch_async(dispatch_get_main_queue(), ^{
         self.progressView.progress = progress; //直接影响UI
    });

    //将数据追加到文件流中
    [self.fileStream write:data.bytes maxLength:data.length];
}

//3.所有的数据加载完毕 - 所有数据都传输完毕,只是一个最后的通知
-(void)connectionDidFinishLoading:(NSURLConnection *)connection
{
    NSLog(@"完毕 %@",[NSThread currentThread]);
    //关闭文件流
    [self.fileStream close];

    //停止下载线程所在的运行循环
    CFRunLoopStop(self.downloadRunloop);
}

//4.下载失败或者错误
-(void)connection:(NSURLConnection *)connection didFailWithError:(NSError *)error{

}
@end
如果觉得我的文章对您有用,请随意打赏。你的支持将鼓励我继续创作!