社区微信群开通啦,扫一扫抢先加入社区官方微信群

社区微信群
上一篇介绍了使用jsp完成数据的页面展示 ,但是springboot并不推荐使用jsp,会产生很多问题。官方推荐使用thymeleaf,这里我们将上一篇的jsp页面展示修改为使用thymeleaf,通过对比来熟悉thymeleaf,其实改动的地方并不大。
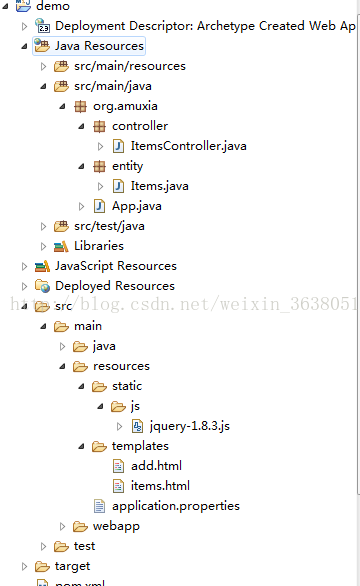
第一篇springboot入门时介绍了项目的大致结构,当时图省事所有的类都放在一个包中,这里略做调整,然后再resource下新建文件夹存放thymeleaf模板,使用springboot生成工程时应该会默认有这几个文件夹,此时项目结构大致如下:
为thymeleaf添加依赖
<dependency>
      	<groupId>org.springframework.boot</groupId>
     	<artifactId>spring-boot-starter-thymeleaf</artifactId>
</dependency>
查询接口(接上一篇,基本没变)
/**
	 * @return
	 * 查询全部信息
	 */
	@RequestMapping("/list")
	public ModelAndView  itemsList() {
		String sql = "select * from items";
		List<Map<String, Object>> list = jdbcTemplate.queryForList(sql);
		ModelAndView mav = new ModelAndView("items");
		mav.addObject("list", list);
		return mav;
	}
对应thymeleaf 模板页面
<!DOCTYPE html>
<html xmlns:th="http://www.thymeleaf.org">
<head>
<meta charset="utf-8" />
<meta name="viewport" content="width=device-width, initial-scale=1.0" />
<title>springboot学习</title>
</head>

<body>
	<div th:each="item : ${list}">
		<h1 th:text="${{item.title}}"></h1>
		<p><a th:text="${{item.name}}"></a></p>
		<p><a th:text="${{item.detail}}"></a></p>
	</div>
</body>
</html>
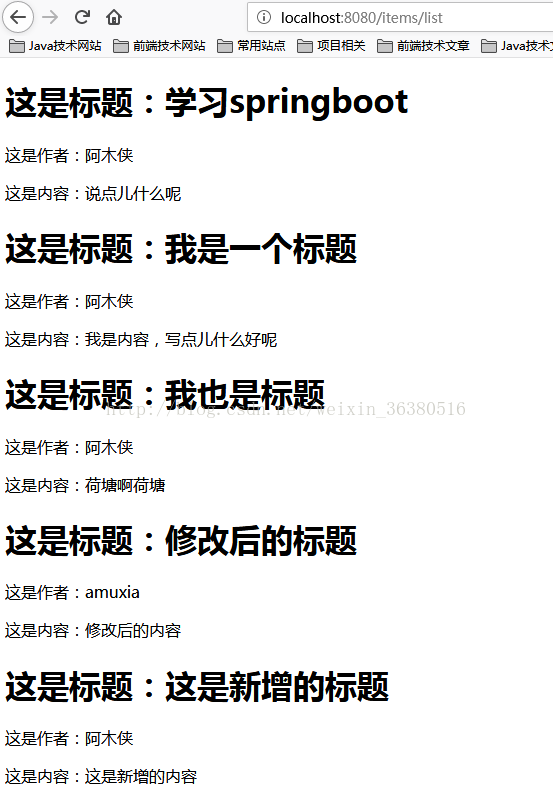
此时我们运行http://localhost:8080/items/list,和jsp输出结果无异
代码很便捷,和上一篇的jsp遍历list数据差别不大,通过对比也能很好的掌握thymeleaf 的用法,这里用 th:each 放入需要遍历的内容,以及定义变量名;在其他标签中用th:text来展示内容,写法也很容易理解。
新增接口
/**
	 * 新增数据
	 * @param items
	 * @return
	 */
	@RequestMapping("/add")
	public @ResponseBody boolean  addItems(Items items) {
		String sql = "insert into items (title,name,detail) value (?,?,?)";
		Object args[] = {items.getTitle(),items.getName(),items.getDetail()};
		int temp = jdbcTemplate.update(sql, args);
		if(temp > 0) {
			return true;
		}
		return false;
	}
对应的thymeleaf 模板页面
<!DOCTYPE html>
<html xmlns:th="http://www.thymeleaf.org">
<head>
<meta charset="utf-8" />
<meta name="viewport" content="width=device-width, initial-scale=1.0" />
<title>springboot学习</title>
<script th:src="@{/js/jquery-1.8.3.js}"></script>
</head>
<body>
	<div>
    	<form name="addItems">
  			<input type="text" name="title" />
  			<input type="text" name="name" />
  			<input type="text" name="detail" />
  			<input type="button" value="提交" οnclick="return add()"/>
  		</form>
    </div>
</body>
<script type="text/javascript">
		function add(){
			var title = addItems.title.value;
			var name = addItems.name.value;
			var detail = addItems.detail.value;
			 $(document).ready(function(){
				$.post("add",
				{"title":title,"name":name,"detail":detail},
				function(data){
	 				if(data == true){
	 					alert("新建成功");
	 				}
	 				if(data == false){
	 					alert("新建失败");
	 				}
	 			});
			});
		}
	</script>
</html>
表单提交方式的写法(更多可以参考:http://itutorial.thymeleaf.org;很全面)
<!DOCTYPE html>
<html xmlns:th="http://www.thymeleaf.org">
    <head>
        <title>Thymeleaf tutorial: exercise 12</title>
        <link rel="stylesheet" href="../../../css/main-static.css" th:href="@{/css/main.css}" />
        <meta charset="utf-8" />
    </head>
    <body>
        <h1>Thymeleaf tutorial - Solution for exercise 12: forms</h1>
        <h2>Customer edition</h2>
        <form action="saveCustomer.html" th:action="@{/exercise12/saveCustomer.html}" th:object="${customer}" method="post">
            <input type="hidden" th:field="*{id}" />

            <label for="firstName">First name:</label>
            <input type="text" th:field="*{firstName}" value="John" />

            <label for="lastName">Last name:</label>
            <input type="text" th:field="*{lastName}" value="Wayne" />

            Genre:
            <div th:each="gender : ${genders}" class="radio">
                <input type="radio" th:value="${gender}" th:field="*{gender}" />
                <label th:for="${#ids.prev('gender')}" th:text="${gender.description}">Male</label>
            </div>
            <div th:remove="all" class="radio">
                <input type="radio" />
                <label>Female</label>
            </div>

            <label for="paymentMethod">Payment method:</label>
            <select th:field="*{paymentMethod}" th:remove="all-but-first">
                <option th:each="paymentMethod : ${paymentMethods}"
                        th:value="${paymentMethod}" th:text="${paymentMethod.description}">Credit card</option>
                <option>Another payment method</option>
                <option>Another payment method</option>
            </select>

            <label for="balance">Balance (dollars):</label>
            <input type="text" th:field="*{balance}" size="10" value="2500" />

            <input type="submit" />
        </form>
    </body>
</html>
这里列举常见用法:
1、在html页面中引入thymeleaf命名空间:<html xmlns:th=http://www.thymeleaf.org></html>,此时在html模板文件中动态的属性使用th:命名空间修饰 ;
2、引用静态资源文件:比如CSS和JS文件,语法格式为“@{}”,比如引用resource/static/js下的jquery文件:<script th:src="@{/js/jquery-1.8.3.js}"></script>;
3、页面显示时将时间的格式化: ${#dates.format(worker.updateTime,'yyyy-MM-dd HH:mm:ss')} 表示将时间格式化为”yyyy-MM-dd HH:mm:ss”;
4、字符串拼接:比如拼接这样一个URL:/items/delete/{itemId} 写法是:th:href="'/items/delete/' + ${items.id }"
5、for循环遍历出数据,以上查询全部中已有例子:<div th:each="item : ${list}"><h1 th:text="${{item.title}}"></h1></div>
如果觉得我的文章对您有用,请随意打赏。你的支持将鼓励我继续创作!