社区微信群开通啦,扫一扫抢先加入社区官方微信群

社区微信群
1. 下载MQTTKIT开源库,编译出你所需要的libMQTTKit.a和头文件
MQTTKIT开源库github下载地址:点这里
下载好MQTTKIT开源库后,编译下(假如你想在模拟器上运行客户端,可以直接编译出一个模拟器版本的libMQTTKit.a和头文件,反之编译出一个手机客户端版本)
编译好的文件截图:
2. MQTT客户端设计(连接服务器,发布话题,订阅话题)
新建一个关于mqtt的xcode工程,然后将上面编译好的libMQTTKit.a和头文件拖到工程中去
然后新建一个类,用做连接测试用,具体代码如下:
(也可以参考这个github大神写的demo:地址)
@implementation LJMQTTViewController
- (void)dealloc
{
// disconnect the MQTT client
[self.client disconnectWithCompletionHandler:^(NSUInteger code) {
// The client is disconnected when this completion handler is called
NSLog(@"MQTT is disconnected");
}];
}
- (void)viewDidLoad
{
[super viewDidLoad];
[self initMqttSerive];
[self createBulletButton];
}
- (void)createBulletButton
{
UIButton *_ljBtn = [[UIButton alloc]init];
[_ljBtn setFrame:CGRectMake((screenFrame.size.width - 150)/2.0, (screenFrame.size.height - 50)/2.0 + 120, 150, 50)];
_ljBtn.backgroundColor = [UIColor grayColor];
[_ljBtn setTitle:@"Bullet test" forState:UIControlStateNormal];
[_ljBtn addTarget:self action:@selector(ljBulletBtnClicked) forControlEvents:UIControlEventTouchUpInside];
[self.view addSubview:_ljBtn];
}
- (void)initMqttSerive
{
// create the MQTT client with an unique identifier
NSString *clientID = [UIDevice currentDevice].identifierForVendor.UUIDString;
self.client = [[MQTTClient alloc] initWithClientId:clientID];
// keep a reference on the switch to avoid having a reference to self in the
// block below (retain/release cycle, blah blah blah)
// UISwitch *subSwitch = self.subscribedSwitch;
// define the handler that will be called when MQTT messages are received by the client
[self.client setMessageHandler:^(MQTTMessage *message) {
// extract the switch status from the message payload
BOOL on = [message.payloadString boolValue];
// the MQTTClientDelegate methods are called from a GCD queue.
// Any update to the UI must be done on the main queue
dispatch_async(dispatch_get_main_queue(), ^{
//[subSwitch setOn:on animated:YES];
});
}];
// connect the MQTT client
[self.client connectToHost:kMQTTServerHost completionHandler:^(MQTTConnectionReturnCode code) {
if (code == ConnectionAccepted) {
// The client is connected when this completion handler is called
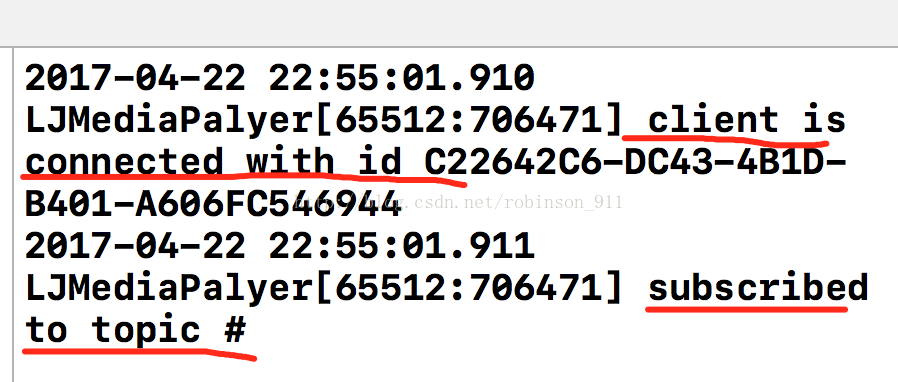
NSLog(@"client is connected with id %@", clientID);
[self subscribeTop:kTopic];
}
}];
//获取话题消息回调
//[self handleMqttMessage];
}
- (void)ljBulletBtnClicked
{
[self publishString:@"test"];
}
#pragma mark -- 订阅话题
- (void)subscribeTop:(NSString*)topicStr
{
// Subscribe to the topic
[self.client subscribe:topicStr withCompletionHandler:^(NSArray *grantedQos) {
// The client is effectively subscribed to the topic when this completion handler is called
NSLog(@"subscribed to topic %@", kTopic);
}];
}
#pragma mark -- 发布
- (void)publishString:(NSString*)payload
{
// use the MQTT client to send a message with the switch status to the topic
[self.client publishString:payload
toTopic:kTopic
withQos:AtMostOnce
retain:YES
completionHandler:nil];
// we passed nil to the completionHandler as we are not interested to know
// when the message was effectively sent
}
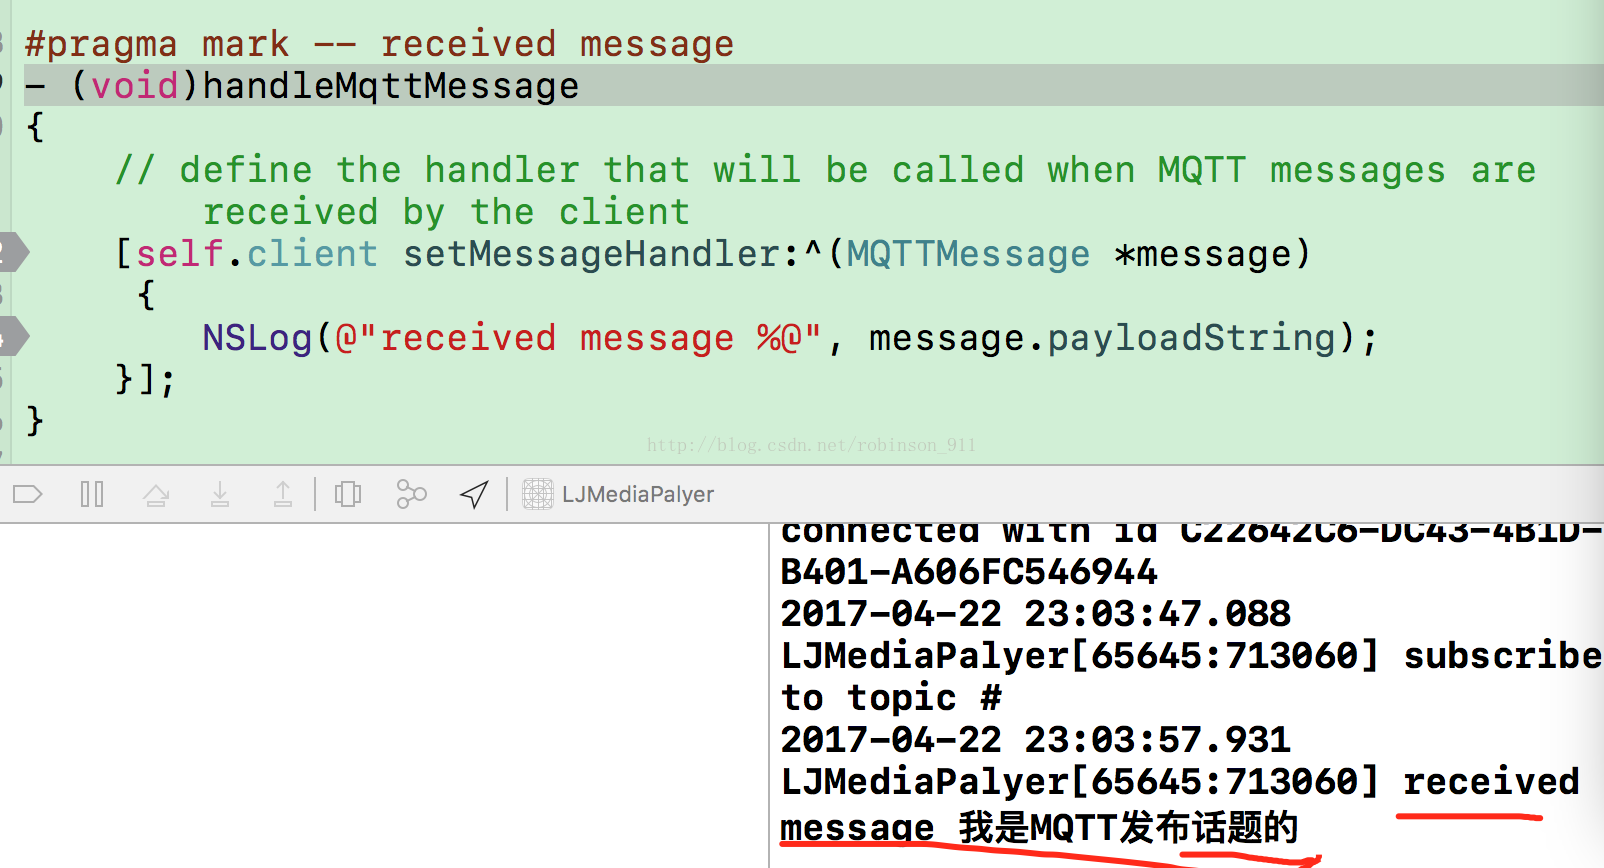
#pragma mark -- received message
- (void)handleMqttMessage
{
// define the handler that will be called when MQTT messages are received by the client
[self.client setMessageHandler:^(MQTTMessage *message)
{
NSLog(@"received message %@", message.payloadString);
}];
}
从上面的log可以看出,当你连接服务器成功后,服务器会给你返回一个唯一的id,当服务端想给你推消息时,可以根据你的这个唯一id来推给你
我此处订阅的话题是“#”,它代表服务器上所有的话题消息,我都可以接收到。
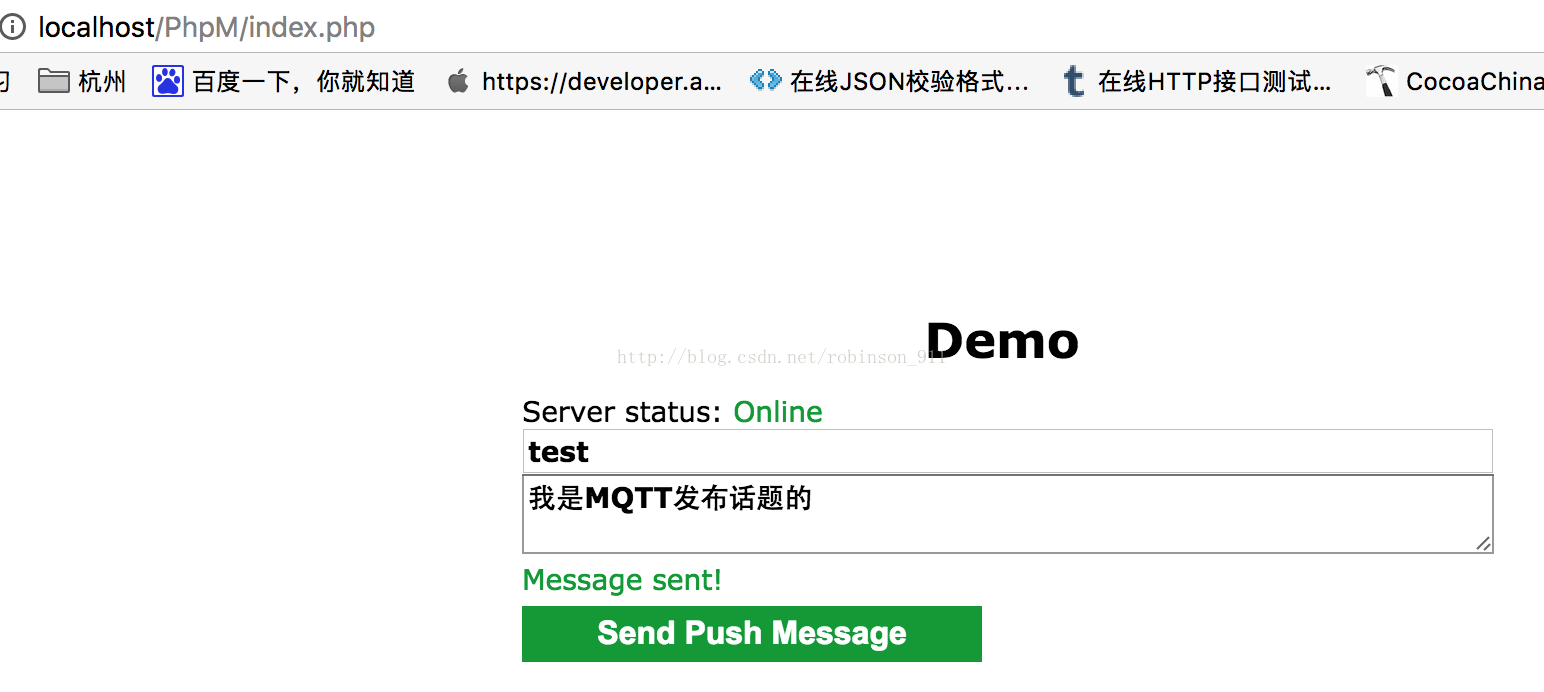
3. 通过PHP网页来向客户端发送一个话题(此处的服务器就是上一篇搭建的mosquitto)
PHP发送消息的截图(http://localhost/PhpM/index.php):
PHP的MQTT环境搭建见我的这篇文章:地址
IOS MQTT客户端接收到的消息截图:
如果觉得我的文章对您有用,请随意打赏。你的支持将鼓励我继续创作!