社区微信群开通啦,扫一扫抢先加入社区官方微信群

社区微信群
gin中间件类似java的拦截器,通过中间件可以在处理具体的route请求时,提前做一些业务。比如用户有效性的校验,特定日志格式的打印,错误日志的打印等等。
gin的中间件大致可以分为两类,全局中间件和路由中间件,下面记录gin的中间件学习过程中的一些问题。
全局中间件作用于所有的路由上,所有的路由请求都需要经过这些全局中间件。gin本身提供了一些基础的中间件:
func BasicAuth(accounts Accounts) HandlerFunc
func BasicAuthForRealm(accounts Accounts, realm string) HandlerFunc
func Bind(val interface{}) HandlerFunc //拦截请求参数并进行绑定
func ErrorLogger() HandlerFunc       //错误日志处理
func ErrorLoggerT(typ ErrorType) HandlerFunc //自定义类型的错误日志处理
func Logger() HandlerFunc //日志记录
func LoggerWithConfig(conf LoggerConfig) HandlerFunc
func LoggerWithFormatter(f LogFormatter) HandlerFunc
func LoggerWithWriter(out io.Writer, notlogged ...string) HandlerFunc
func Recovery() HandlerFunc
func RecoveryWithWriter(out io.Writer) HandlerFunc
func WrapF(f http.HandlerFunc) HandlerFunc //将http.HandlerFunc包装成中间件
func WrapH(h http.Handler) HandlerFunc //将http.Handler包装成中间件
使用router := gin.Default()定义route时,默认带了Logger()和Recovery()。我们可以使用BasicAuth()中间件做一些简单的用户权限的认证,但是当我们使用了自定义的session时,gin自带的中间件已经不能满足需求。这时,可以编写自定义的中间件并且将自定义的中间件加入到全局中间件队列中去。每一个route的请求同样会到自定义的中间件去,实现自定义的认证等。
需要实现一个函数,其返回值是func(*Context),下面是gin源码中HandleFunc的描述。通常的做法是在定义的中间件中用闭包的形式返回业务函数,如2.2所示。
// HandlerFunc defines the handler used by gin middleware as return value.
type HandlerFunc func(*Context)
以下为一个自定义的中间件,获取请求中的sessionid,写入到context中,context.Next()跳到下一个中间件中,下一个中间件会对这个session进行有效性校验(sessionid是否存在,是否过期等)。
//用户身份认证中间件
func Validate() gin.HandlerFunc {
	return func(context *gin.Context) {
		// 参数的或者以及部分业务逻辑
		var sessionid = ""
		cookie, err := context.Request.Cookie(defs.Cookie_key)
		if err == nil && cookie != nil {
			sessionid = cookie.Value
		} else {
			sessionid = session.GenerateSess(login.UserName)
		}
		context.Set("sessionid", sessionid)
		context.Next()
		return
	}
}
路由中间件相对于全局中间件来说作用范围只是针对该路由规则。
下面定义了一个分组路由/user,分组路由下的/login需要验证用户名和密码,这个路由使用的是路由中间件Validate(),通过查库验证用户名和密码。而其余的路由/manager/show和/manager/modify使用了路由中间件handles.Cookie(),这个中间件验证用户在登陆成功后的sessionid的有效性。
// 设置user路由组
	{
		userGroup := router.Group("/user")
		{
			//userGroup.Use(handles.AccessJsMiddleware())
			//显示用户登录主页
			userGroup.GET("/show", handles.ShowUserLogin())
			//用户登录
			userGroup.POST(
				"/login",
				handles.Validate(), //用户密码有效性验证
				handles.HandleUserLogin())
			//用户管理
			userGroup.GET("/manager/show", handles.Cookie(), handles.ShowUserManager())
			userGroup.POST("/manager/modify", handles.Cookie(), handles.HandleUserOperte())
		}
	}
gin提供了两个函数Abort()和Next(),配合着return关键字用来跳转或者终止存在着业务逻辑关系的中间件。
需要注意的是第12行和第18行,Next()函数和Abort()函数。abort()就是终止该中间件的流程,如果不return的话会继续执行后面的逻辑,但不再执行其他的中间件。next()跳过当前的中间件,执行下一个中间件,待下一个中间件执行完后再回到当前next位置,直接后面的逻辑。如果觉得很绕,看2.next和abort示例。
func Cookie() gin.HandlerFunc {
	return func(context *gin.Context) {
		log.Printf("检查cookie的合法性")
		cookie, err := context.Request.Cookie(defs.Cookie_key)
		if err != nil || err == http.ErrNoCookie {
			context.JSON(
				http.StatusUnauthorized,
				gin.H{
					"status":     http.StatusUnauthorized,
					"session_id": "",
				})
			context.Abort()
			return
		} else {
			if session.IsExpried(cookie.Value) {
				log.Printf("请求cookie-name=%v,cookie-value=%v 已经过期", cookie.Name, cookie.Value)
			}
			context.Next()
		}
	}
}
定义一个gin的route对象,并且按照次序在use()函数中增加中间件,注意中间件的顺序。
router := gin.Default()
router.Use(middler1(), middler2(), middler3())
router.GET("/", handleGet())
下面是响应的函数,执行到该函数打印一行日志。
func handleGet() gin.HandlerFunc {
	return func(context *gin.Context) {
		log.Printf("执行get请求")
	}
}
定义了3个自定义的中间件,执行到对应的中间件时会有对应的打印日志。
func middler1() gin.HandlerFunc {
	return func(context *gin.Context) {
		log.Printf("中间件1")
	}
}

func middler2() gin.HandlerFunc {
	return func(context *gin.Context) {
		log.Printf("中间件2")
	}
}

func middler3() gin.HandlerFunc {
	return func(context *gin.Context) {
		log.Printf("中间件3")

	}
}
执行结果: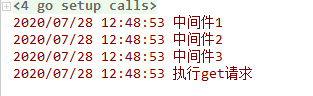
分析:
按照中间件在use()中的定义顺序依次打印了中间件中的日志。
对上面的中间件进行了修改,在m1和m2中增加了next()函数。
func middler1() gin.HandlerFunc {
	return func(context *gin.Context) {
		log.Printf("中间件1")
		context.Next()
		log.Printf("中间件1 执行完成")
	}
}

func middler2() gin.HandlerFunc {
	return func(context *gin.Context) {
		log.Printf("中间件2")
		context.Next()
		log.Printf("中间件2 执行完成")
	}
}

func middler3() gin.HandlerFunc {
	return func(context *gin.Context) {
		log.Printf("中间件3")

	}
}
执行结果: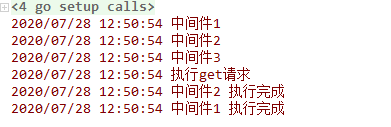
分析:
当执行完m1中的next函数后,next()直接跳过了m1中后续的逻辑进入了m2。执行m2中的第一行打印后,next()函数跳过m2的后续逻辑进入m3,开始执行m3里面的内容。待m3执行完后再次执行了m2中未执行完的逻辑,最后回到m1中执行m1中的逻辑。
func middler1() gin.HandlerFunc {
	return func(context *gin.Context) {
		log.Printf("中间件1")
		context.Next()
		log.Printf("中间件1 执行完成")
	}
}

func middler2() gin.HandlerFunc {
	return func(context *gin.Context) {
		log.Printf("中间件2")
		context.Abort()
		log.Printf("中间件2 执行完成")
	}
}

func middler3() gin.HandlerFunc {
	return func(context *gin.Context) {
		log.Printf("中间件3")

	}
}
执行后打印日志: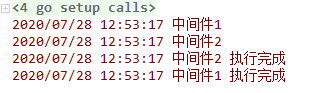
分析:
我们可以看出m1的next后,进入了m2。m2中abort后,执行了m2后续的逻辑,然后并没有进入m3,而是又回到了m1(m1中的next原因)。并且没有打印handleGet中的日志。
// Set is used to store a new key/value pair exclusively for this context.
// It also lazy initializes  c.Keys if it was not used previously.
func (c *Context) Set(key string, value interface{}) {}

// Get returns the value for the given key, ie: (value, true).
// If the value does not exists it returns (nil, false)
func (c *Context) Get(key string) (value interface{}, exists bool) {}

// MustGet returns the value for the given key if it exists, otherwise it panics.
func (c *Context) MustGet(key string) interface{} {}

// GetString returns the value associated with the key as a string.
func (c *Context) GetString(key string) (s string) {}

// GetBool returns the value associated with the key as a boolean.
func (c *Context) GetBool(key string) (b bool) {}

// GetInt returns the value associated with the key as an integer.
func (c *Context) GetInt(key string) (i int) {}

// GetInt64 returns the value associated with the key as an integer.
func (c *Context) GetInt64(key string) (i64 int64) {}

// GetFloat64 returns the value associated with the key as a float64.
func (c *Context) GetFloat64(key string) (f64 float64) {}

// GetTime returns the value associated with the key as time.
func (c *Context) GetTime(key string) (t time.Time) {}

// GetDuration returns the value associated with the key as a duration.
func (c *Context) GetDuration(key string) (d time.Duration) {}

// GetStringSlice returns the value associated with the key as a slice of strings.
func (c *Context) GetStringSlice(key string) (ss []string) {}

// GetStringMap returns the value associated with the key as a map of interfaces.
func (c *Context) GetStringMap(key string) (sm map[string]interface{}) {}

// GetStringMapString returns the value associated with the key as a map of strings.
func (c *Context) GetStringMapString(key string) (sms map[string]string) {}

// GetStringMapStringSlice returns the value associated with the key as a map to a slice of strings.
func (c *Context) GetStringMapStringSlice(key string) (smss map[string][]string) {}
如果觉得我的文章对您有用,请随意打赏。你的支持将鼓励我继续创作!
