社区微信群开通啦,扫一扫抢先加入社区官方微信群

社区微信群
当我们构建go-kit微服务时,会发现不同的微服务之间会有大量的冗余代码,Endpoint和Transport以及其他组件代码基本一致,书写这部分代码会浪费大量的时间,并且容易出现问题。当然,我们可以提取共用部分减少代码的冗余,但并不是一件容易的事情,十分考验我们的代码能力。那么,有没有一个工具可以快速帮助我们生成这些共用代码从而使我们集中精力关注业务逻辑呢?
GoKit-CLI就是解决这个问题的,下面来介绍一下这个工具应该如何使用。
和其他go语言包一样,我们需要使用go get命令来安装:
$ go get github.com/kujtimiihoxha/kit
安装成功后,会在$GOPATH/bin文件夹下生成kit.exe,如果没有将$GOPATH/bin加入到环境变量,请及时加入。
以user服务为例:此服务用于操作用户相关信息。
$ kit new service user
# 或者可以使用简写别名:kit n s user
此时,我们可以在项目文件夹下看到生成的目录:
user/
|---pkg/
|------service/
|----------service.go
service.go
package service

// UserService describes the service.
type UserService interface {
	// Add your methods here
	// e.x: Foo(ctx context.Context,s string)(rs string, err error)
}
由上述注释可以看出我们需要在UserService接口中定义我们的业务逻辑函数。
model
在定义业务逻辑之前我们需要定义好数据类型以供我们在业务逻辑函数中使用,此文件我们可以放在项目根路径(与user同级)下,以供后续创建的其他微服务使用:
// model.go
package model

type User struct {
	Id                  string  `json:"id"`
	SId                 string  `json:"sId" xorm:"sId"`
	Name                string  `json:"name"`
	Introduction        string  `json:"introduction"`
	Balance             float64 `json:"balance"`
	Icon                string  `json:"icon"`
	Phone               string  `json:"phone"`
	Email               string  `json:"email"`
	// ......其他属性
}
定义service
现在我们可以定义service.go文件中的函数,定义函数名称尽可能语义化,如果可以的话尽量符合REST风格:
package service

import (
	"context"
	"github.com/money-hub/MoneyDodo.service/model"
)

// UserService describes the service.
type UserService interface {
	GetSpec(ctx context.Context, id string) (status bool, errinfo string, data *model.User)
	GetAll(ctx context.Context, page, offset, limit int, orderby string) (status bool, errinfo string, data []model.User)
	GetUDF(ctx context.Context, name string, page, offset, limit int, orderby string) (status bool, errinfo string, data []model.User)
	Post(ctx context.Context, user model.User) (status bool, errinfo string, data *model.User)
	Put(ctx context.Context, id string, user model.User) (status bool, errinfo string, data *model.User)
	Delete(ctx context.Context, id string) (status bool, errinfo string, data *model.User)
}
生成服务
$ kit g s todo -w --gorilla
-w 生成一些默认的服务中间件--gorilla使用gorilla/mux来替换默认的http handler
成功运行命令之后,目录结构如下:
user/
|---cmd/
|------service/
|----------server.go          Wire the service.
|----------server_gen.go      Also wire the service.
|------main.go                Runs the service
|---pkg/
|------endpoints/
|----------endpoint.go        The endpoint logic.
|----------endpoint_gen.go    This will wire the endpoints.
|----------middleware.go      Endpoint middleware
|------http/
|----------handler.go         Transport logic encode/decode data.
|----------handler_gen.go     This will wire the transport.
|------service/
|----------middleware.go      The service middleware.
|----------service.go         Business logic.
此时,我们就可以通过go run user/cmd/main.go来运行我们的服务,但是并不能提供任何操作。
完整的业务逻辑必定离不开数据库(mongodb、mysql、sqlite等)的支持,我以mysql数据库为例来进行说明。同样,此文件我们可以放在项目根路径(与user同级)下,以供后续创建的其他微服务使用:
db.go
package db

import (
	"io/ioutil"
	"log"

	_ "github.com/go-sql-driver/mysql"
	"github.com/go-xorm/xorm"
	yaml "gopkg.in/yaml.v2"
)

type config struct {
	Host     string `yaml:"host"`
	Port     string `yaml:"port"`
	Username string `yaml:"username"`
	Password string `yaml:"password"`
	Schema   string `yaml:"schema"`
}

type DBService struct {
	conf   config
	engine *xorm.Engine
}

func checkErr(err error) {
	if err != nil {
		log.Println(err)
	}
}

func (dbsvc *DBService) Bind(dbconf string) error {
	confFile, err := ioutil.ReadFile(dbconf)
	checkErr(err)

	// fmt.Println(string(confFile))
	err = yaml.Unmarshal(confFile, &dbsvc.conf)
	checkErr(err)
	dataSourceName := dbsvc.conf.Username + ":" + dbsvc.conf.Password + "@tcp(" + dbsvc.conf.Host + ":" + dbsvc.conf.Port + ")/" + dbsvc.conf.Schema + "?charset=utf8"
	// fmt.Println(dataSourceName)
	dbsvc.engine, err = xorm.NewEngine("mysql", dataSourceName)
	checkErr(err)
	return err
}

func (dbsvc *DBService) Engine() *xorm.Engine {
	return dbsvc.engine
}
微服务通过调用dbsvc.Bind()来绑定到数据库,之后便可以通过dbsvc.Engine()进行数据库操作。数据库操作我使用xorm,如果对xorm不了解,可以参考官方文档:http://www.xorm.io/docs/
service.go
修改basicUserService结构体以及NewBasicUserService函数:
type basicUserService struct {
	*db.DBService
}
// ......
// NewBasicUserService returns a naive, stateless implementation of UserService.
func NewBasicUserService() UserService {
	basicUserSvc := &basicUserService{
		&db.DBService{},
	}
	err := basicUserSvc.Bind("conf/conf.moneydodo.yml")
	if err != nil {
		log.Printf("The UserService failed to bind with mysql")
	}
	return basicUserSvc
}
其中,basicUserSvc.Bind(“conf/conf.moneydodo.yml”)中参数为项目根目录下的conf文件夹下的配置文件,自行编写即可,格式如下:
# 服务器地址,mysql端口,用户名,密码,以及数据库名称
host: 127.0.0.1
port: 3306
username: XXXX
password: XXXX
schema: XXXX
至此,我们的工作重心终于集中到了业务逻辑。
以GetSpec方法(根据用户id获取用户信息)为例:
func (b *basicUserService) GetSpec(ctx context.Context, id string) (status bool, errinfo string, data *model.User) {
	data = &model.User{
		Id: id,
	}
	status, err := b.Engine().Get(data)
	if status == false {
		data = nil
	}
	if err != nil {
		errinfo = err.Error()
	}
	return
}
当我们书写完业务逻辑之后,我们便需要修改user/http/handler.go
decode
以GetSpec服务为例,我们要从url中解析到userId,然后传递给业务逻辑函数:
// decodeGetSpecRequest is a transport/http.DecodeRequestFunc that decodes a
// JSON-encoded request from the HTTP request body.
func decodeGetSpecRequest(_ context.Context, r *http1.Request) (interface{}, error) {
	vars := mux.Vars(r)
	id, ok := vars["userId"]
	if !ok {
		return nil, errors.New("not a valid ID")
	}
	req := endpoint.GetSpecRequest{
		Id: id,
	}
	return req, nil
}
encode
此函数无需修改
// encodeGetSpecResponse is a transport/http.EncodeResponseFunc that encodes
// the response as JSON to the response writer
func encodeGetSpecResponse(ctx context.Context, w http1.ResponseWriter, response interface{}) (err error) {
	w.Header().Set("Content-Type", "application/json; charset=utf-8")
	err = json.NewEncoder(w).Encode(response)
	return
}
makeGetSpecHandler
在此函数中,我们需要注册路由,主要修改的是Methods、Path、handlers.AllowedMethods三个函数的参数:
// makeGetSpecHandler creates the handler logic
func makeGetSpecHandler(m *mux.Router, endpoints endpoint.Endpoints, options []http.ServerOption) {
	m.Methods("GET").Path("/api/users/{userId:[0-9]+}").Handler(
		handlers.CORS(
			handlers.AllowedMethods([]string{"GET"}),
			handlers.AllowedOrigins([]string{"*"}),
		)(http.NewServer(endpoints.GetSpecEndpoint, decodeGetSpecRequest, encodeGetSpecResponse, options...)),
	)
}
至此,我们的user微服务基本实现,此时可以启动我们的服务:go run user/cmd/main.go。注意我们需要提前打开mysql,并创建相关的数据库和表。启动服务时,我们发现该服务启动了两个端口:
ts=2019-5-12T14:40:39.5168185Z caller=service.go:80 tracer=none
ts=2019-5-12T14:40:39.5204223Z caller=service.go:137 transport=debug/HTTP addr=:8080
ts=2019-5-12T14:40:39.5204223Z caller=service.go:102 transport=HTTP addr=:8081
其中,http协议端口为8081,我们的http请求使用此端口即可。
Post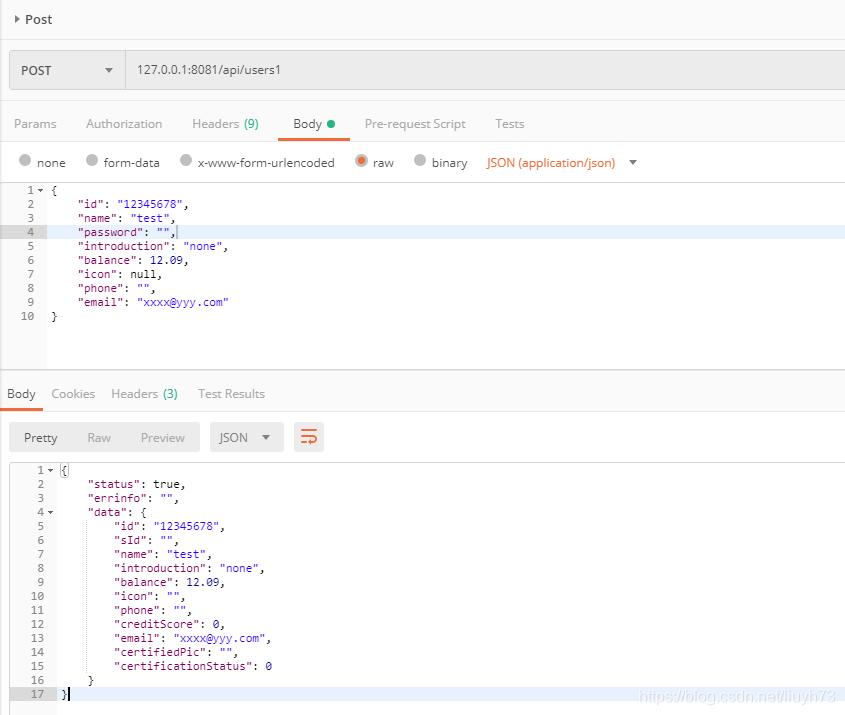
Get
查看数据库:
下面介绍一下8080端口:
打开浏览器输入:127.0.0.1:8080/metrics,我们即可看到: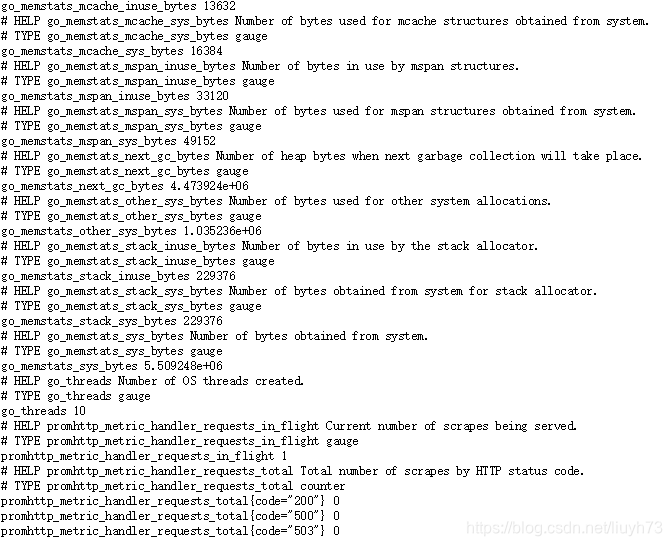
此服务其实就是go-kit组件中的metrics服务,实现了跟踪计数、延迟、健康状况和其他的周期性的或针对每个请求信息的仪表盘化。
kit g s xxxx -w --gorilla生成好服务之后发现自己定义的service.go内interface中函数(endpoint)参数书写有问题应该怎么办?pkg/service/service.go、pkg/service/middleware.go、pkg/http/handler.go、pkg/endpoint/endpoint.go等文件中与此函数相关的部分函数的参数,如果不确定需要修改哪些函数,我们可以尝试启动服务,报错位置便是我们需要修改的地方。kit g s xxx -w --gorilla生成服务。cmd/service/service.go文件中定义了服务端口号:var debugAddr = fs.String("debug.addr", ":8080", "Debug and metrics listen address")
var httpAddr = fs.String("http-addr", ":8081", "HTTP listen address")
var grpcAddr = fs.String("grpc-addr", ":8082", "gRPC listen address")
var thriftAddr = fs.String("thrift-addr", ":8083", "Thrift listen address")
var thriftProtocol = fs.String("thrift-protocol", "binary", "binary, compact, json, simplejson")
var thriftBuffer = fs.Int("thrift-buffer", 0, "0 for unbuffered")
var thriftFramed = fs.Bool("thrift-framed", false, "true to enable framing")
var zipkinURL = fs.String("zipkin-url", "", "Enable Zipkin tracing via a collector URL e.g. http://localhost:9411/api/v1/spans")
var lightstepToken = fs.String("lightstep-token", "", "Enable LightStep tracing via a LightStep access token")
var appdashAddr = fs.String("appdash-addr", "", "Enable Appdash tracing via an Appdash server host:port")
我们可以根据需要开启、关闭或者修改端口号。
如果觉得我的文章对您有用,请随意打赏。你的支持将鼓励我继续创作!
