社区微信群开通啦,扫一扫抢先加入社区官方微信群

社区微信群
Go语言已经为开发者内置配套了很多性能调优监控的好工具和方法,这大大提升了我们profile分析的效率。此外本文还将重点介绍和推荐uber开源的go-torch,其生成的火焰图更方便更直观的帮我们进行性能调优。我也是在实际一次的性能调优中,接触到go-torch,非常棒。
Go强大之处是它已经在语言层面集成了profile采样工具,并且允许我们在程序的运行时使用它们,使用Go的profiler我们能获取以下的样本信息:
基准测试文件:例如使用命令go test . -bench . -cpuprofile prof.cpu生成采样文件后,再通过命令 go tool pprof [binary] prof.cpu 来进行分析。
import _ net/http/pprof:如果我们的应用是一个web服务,我们可以在http服务启动的代码文件(eg: main.go)添加 import _ net/http/pprof,这样我们的服务 便能自动开启profile功能,有助于我们直接分析采样结果。
通过在代码里面调用runtime.StartCPUProfile或者runtime.WriteHeapProfile等内置方法,即可方便的进行数据采样。
更多Golang Profiling的使用,推荐https://blog.golang.org/profiling-go-programs。
go tool pprof的参数很多,不做详细介绍,自己help看看。在这里,我主要用到的命令为: go tool pprof --seconds 25 http://localhost:9090/debug/pprof/profile
命令中,设置了25s的采样时间,当25s采样结束后,就生成了我们想要的profile文件,然后在pprof交互命令行中输入web,从浏览器中打开,就能看到对应的整个调用链的性能树形图。
root@garnett:~/# go tool pprof -h
usage: pprof [options] [binary] <profile source> ...
Output format (only set one):
  -callgrind        Outputs a graph in callgrind format
  -disasm=p         Output annotated assembly for functions matching regexp or address
  -dot              Outputs a graph in DOT format
  -eog              Visualize graph through eog
  -evince           Visualize graph through evince
  -gif              Outputs a graph image in GIF format
  -gv               Visualize graph through gv
  -list=p           Output annotated source for functions matching regexp
  -pdf              Outputs a graph in PDF format
  -peek=p           Output callers/callees of functions matching regexp
  -png              Outputs a graph image in PNG format
  -proto            Outputs the profile in compressed protobuf format
  -ps               Outputs a graph in PS format
  -raw              Outputs a text representation of the raw profile
  -svg              Outputs a graph in SVG format
  -tags             Outputs all tags in the profile
  -text             Outputs top entries in text form
  -top              Outputs top entries in text form
  -tree             Outputs a text rendering of call graph
  -web              Visualize graph through web browser
  -weblist=p        Output annotated source in HTML for functions matching regexp or address
Output file parameters (for file-based output formats):
  -output=f         Generate output on file f (stdout by default)
Output granularity (only set one):
  -functions        Report at function level [default]
  -files            Report at source file level
  -lines            Report at source line level
  -addresses        Report at address level
Comparison options:
  -base <profile>   Show delta from this profile
  -drop_negative    Ignore negative differences
Sorting options:
  -cum              Sort by cumulative data

Dynamic profile options:
  -seconds=N        Length of time for dynamic profiles
Profile trimming options:
  -nodecount=N      Max number of nodes to show
  -nodefraction=f   Hide nodes below <f>*total
  -edgefraction=f   Hide edges below <f>*total
Sample value selection option (by index):
  -sample_index      Index of sample value to display
  -mean              Average sample value over first value
Sample value selection option (for heap profiles):
  -inuse_space      Display in-use memory size
  -inuse_objects    Display in-use object counts
  -alloc_space      Display allocated memory size
  -alloc_objects    Display allocated object counts
Sample value selection option (for contention profiles):
  -total_delay      Display total delay at each region
  -contentions      Display number of delays at each region
  -mean_delay       Display mean delay at each region
Filtering options:
  -runtime          Show runtime call frames in memory profiles
  -focus=r          Restricts to paths going through a node matching regexp
  -ignore=r         Skips paths going through any nodes matching regexp
  -tagfocus=r       Restrict to samples tagged with key:value matching regexp
                    Restrict to samples with numeric tags in range (eg "32kb:1mb")
  -tagignore=r      Discard samples tagged with key:value matching regexp
                    Avoid samples with numeric tags in range (eg "1mb:")
Miscellaneous:
  -call_tree        Generate a context-sensitive call tree
  -unit=u           Convert all samples to unit u for display
  -divide_by=f      Scale all samples by dividing them by f
  -buildid=id       Override build id for main binary in profile
  -tools=path       Search path for object-level tools
  -help             This message
Environment Variables:
   PPROF_TMPDIR       Location for saved profiles (default $HOME/pprof)
   PPROF_TOOLS        Search path for object-level tools
   PPROF_BINARY_PATH  Search path for local binary files
                      default: $HOME/pprof/binaries
finds binaries by $name and $buildid/$namego-torch是Uber公司开源的一款针对Golang程序的火焰图生成工具,能收集 stack traces,并把它们整理成火焰图,直观地程序给开发人员。go-torch是基于使用BrendanGregg创建的火焰图工具生成直观的图像,很方便地分析Go的各个方法所占用的CPU的时间。
go-torch的具体使用参加如下help信息,在这里,我们主要使用到-u和-t参数: go-torch -u http://localhost:9090 -t 30
root@garnett:~/# go-torch -h
Usage:
  go-torch [options] [binary] <profile source>

pprof Options:
  -u, --url=         Base URL of your Go program (default: http://localhost:8080)
  -s, --suffix=      URL path of pprof profile (default: /debug/pprof/profile)
  -b, --binaryinput= File path of previously saved binary profile. (binary profile is anything accepted by https://golang.org/cmd/pprof)
      --binaryname=  File path of the binary that the binaryinput is for, used for pprof inputs
  -t, --seconds=     Number of seconds to profile for (default: 30)
      --pprofArgs=   Extra arguments for pprof

Output Options:
  -f, --file=        Output file name (must be .svg) (default: torch.svg)
  -p, --print        Print the generated svg to stdout instead of writing to file
  -r, --raw          Print the raw call graph output to stdout instead of creating a flame graph; use with Brendan Gregg's flame graph perl script (see
                     https://github.com/brendangregg/FlameGraph)
      --title=       Graph title to display in the output file (default: Flame Graph)
      --width=       Generated graph width (default: 1200)
      --hash         Colors are keyed by function name hash
      --colors=      set color palette. choices are: hot (default), mem, io, wakeup, chain, java, js, perl, red, green, blue, aqua, yellow, purple, orange
      --cp           Use consistent palette (palette.map)
      --reverse      Generate stack-reversed flame graph
      --inverted     icicle graph

Help Options:
-h, --help Show this help messagegit clone https://github.com/brendangregg/FlameGraph.git
cp flamegraph.pl /usr/local/bin在终端输入 flamegraph.pl -h 是否安装FlameGraph成功:
$ flamegraph.pl -h
Option h is ambiguous (hash, height, help)
USAGE: /usr/local/bin/flamegraph.pl [options] infile > outfile.svg

    --title       # change title text
    --width       # width of image (default 1200)
    --height      # height of each frame (default 16)
    --minwidth    # omit smaller functions (default 0.1 pixels)
    --fonttype    # font type (default "Verdana")
    --fontsize    # font size (default 12)
    --countname   # count type label (default "samples")
    --nametype    # name type label (default "Function:")
    --colors      # set color palette. choices are: hot (default), mem, io,
                  # wakeup, chain, java, js, perl, red, green, blue, aqua,
                  # yellow, purple, orange
    --hash        # colors are keyed by function name hash
    --cp          # use consistent palette (palette.map)
    --reverse     # generate stack-reversed flame graph
    --inverted    # icicle graph
    --negate      # switch differential hues (blue<->red)
    --help        # this message

    eg,
/usr/local/bin/flamegraph.pl --title="Flame Graph: malloc()" trace.txt > graph.svg有了flamegraph的支持,我们接下来要使用go-torch展示profile的输出:
go get -v github.com/uber/go-torch在我的实例中,是一个简单的web Demo,go run main.go -printStats启动之后,浏览器能正常访问待调优的接口: http://localhost:9090/demo。每次该接口的访问,都会打印访问信息,如下所示:
root@garnett:/# go run main.go -printStats
Starting Server on :9090
IncCounter: handler.received.garnett.advance.no-os.no-browser = 1
IncCounter: handler.received.garnett.advance.no-os.no-browser = 1
RecordTimer: handler.latency.garnett.advance.no-os.no-browser = 67.984µs
IncCounter: handler.received.garnett.advance.no-os.no-browser = 1
RecordTimer: handler.latency.garnett.advance.no-os.no-browser = 339.656µs
IncCounter: handler.received.garnett.advance.no-os.no-browser = 1
RecordTimer: handler.latency.garnett.advance.no-os.no-browser = 55.749µs
IncCounter: handler.received.garnett.advance.no-os.no-browser = 1
RecordTimer: handler.latency.garnett.advance.no-os.no-browser = 89.34µs
IncCounter: handler.received.garnett.advance.no-os.no-browser = 1
RecordTimer: handler.latency.garnett.advance.no-os.no-browser = 59.606µs
IncCounter: handler.received.garnett.advance.no-os.no-browser = 1
RecordTimer: handler.latency.garnett.advance.no-os.no-browser = 47.917µs
IncCounter: handler.received.garnett.advance.no-os.no-browser = 1
RecordTimer: handler.latency.garnett.advance.no-os.no-browser = 42.768µs
IncCounter: handler.received.garnett.advance.no-os.no-browser = 1
RecordTimer: handler.latency.garnett.advance.no-os.no-browser = 1.270416ms
IncCounter: handler.received.garnett.advance.no-os.no-browser = 1
RecordTimer: handler.latency.garnett.advance.no-os.no-browser = 34.518µs
IncCounter: handler.received.garnett.advance.no-os.no-browser = 1
RecordTimer: handler.latency.garnett.advance.no-os.no-browser = 281.014µs接下来,我们对该接口进行压力测试,看看它在大并发情况下的性能表现。
我们使用go-wrk工具进行试压,go-wrk的安装请前往github官网https://github.com/adjust/go-wrk,只要把代码clone下来go build一下即可。
执行如下命令,进行35s 1W次高并发场景模拟:
go-wrk -d 35 -n 10000 http://localhost:9090/demo
在上面的压测过程中,我们再新建一个终端窗口输入以下命令,生成我们的profile文件:
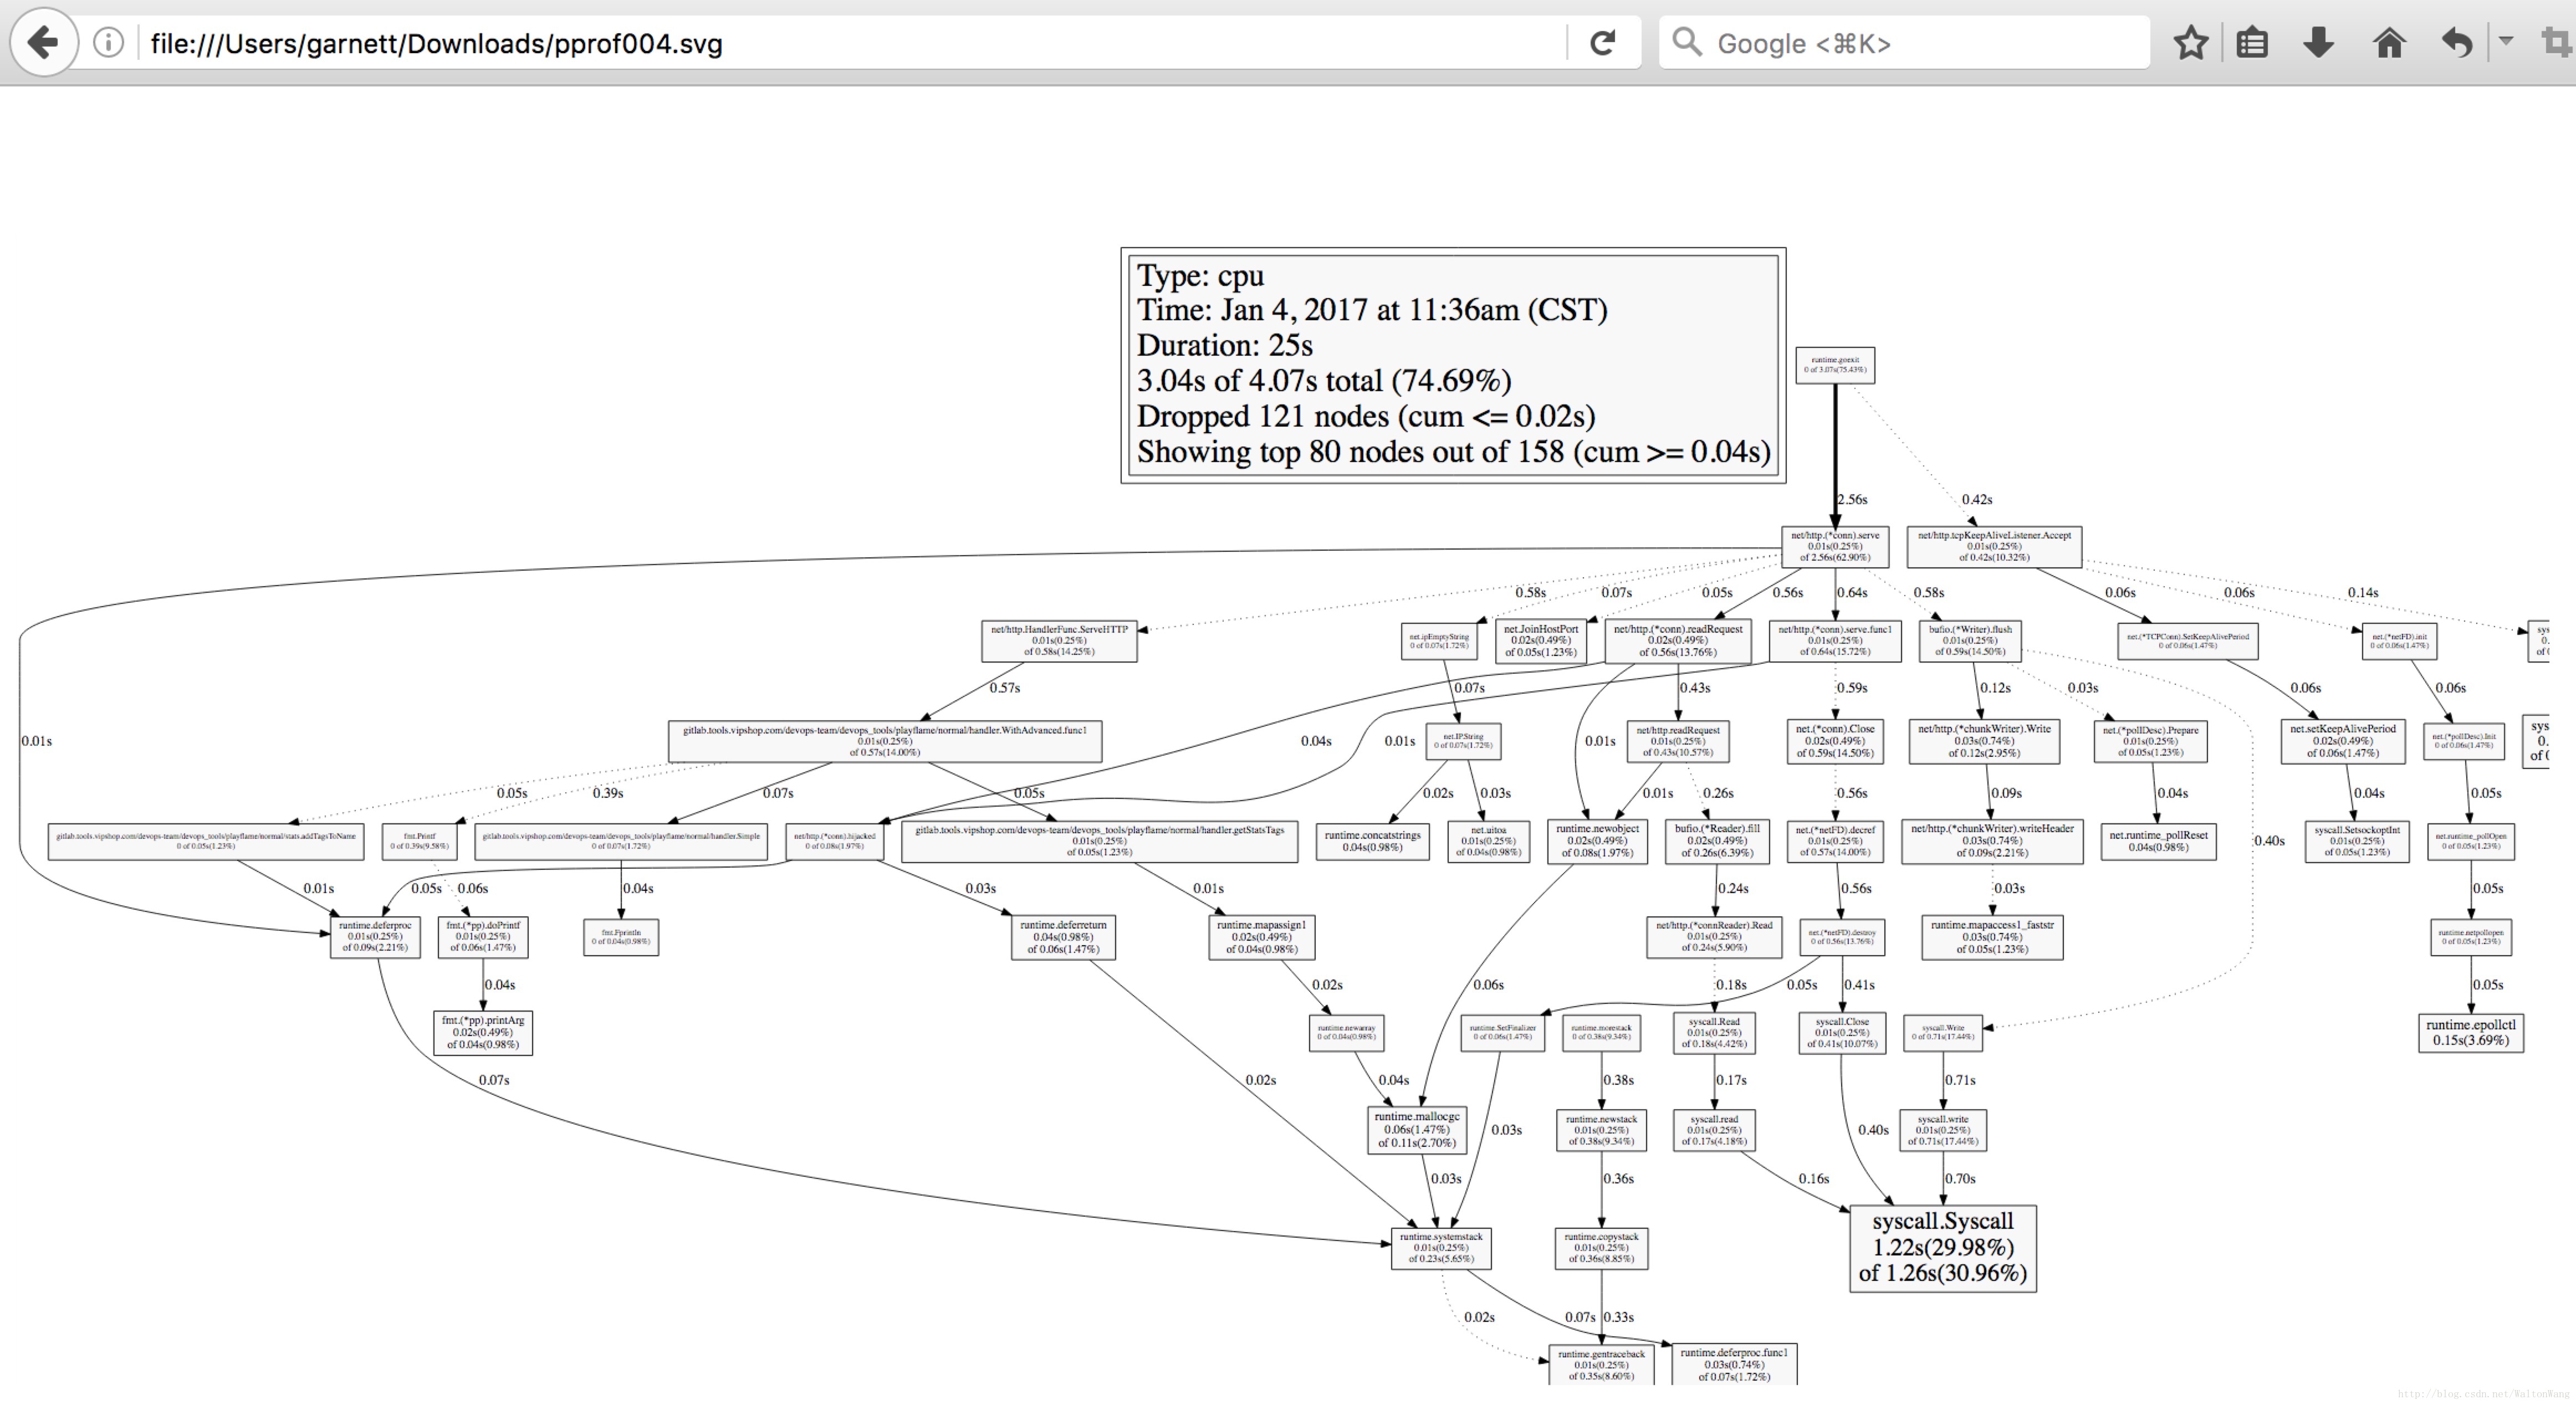
go tool pprof --seconds 25 http://localhost:9090/debug/pprof/profile命令中,我们设置了25秒的采样时间,当看到(pprof)的时候,我们输入 web, 表示从浏览器打开,可见下图:
看到这个图,你可能已经懵逼了。在我这个简单的Demo中,已经这么难看了,更何况在实际的性能调优中呢!
在上面的压测过程中,这次我们使用go-torch来生成采样报告:
go-torch -u http://localhost:9090 -t 3030s后,go-torch完成采样,输出以下信息:
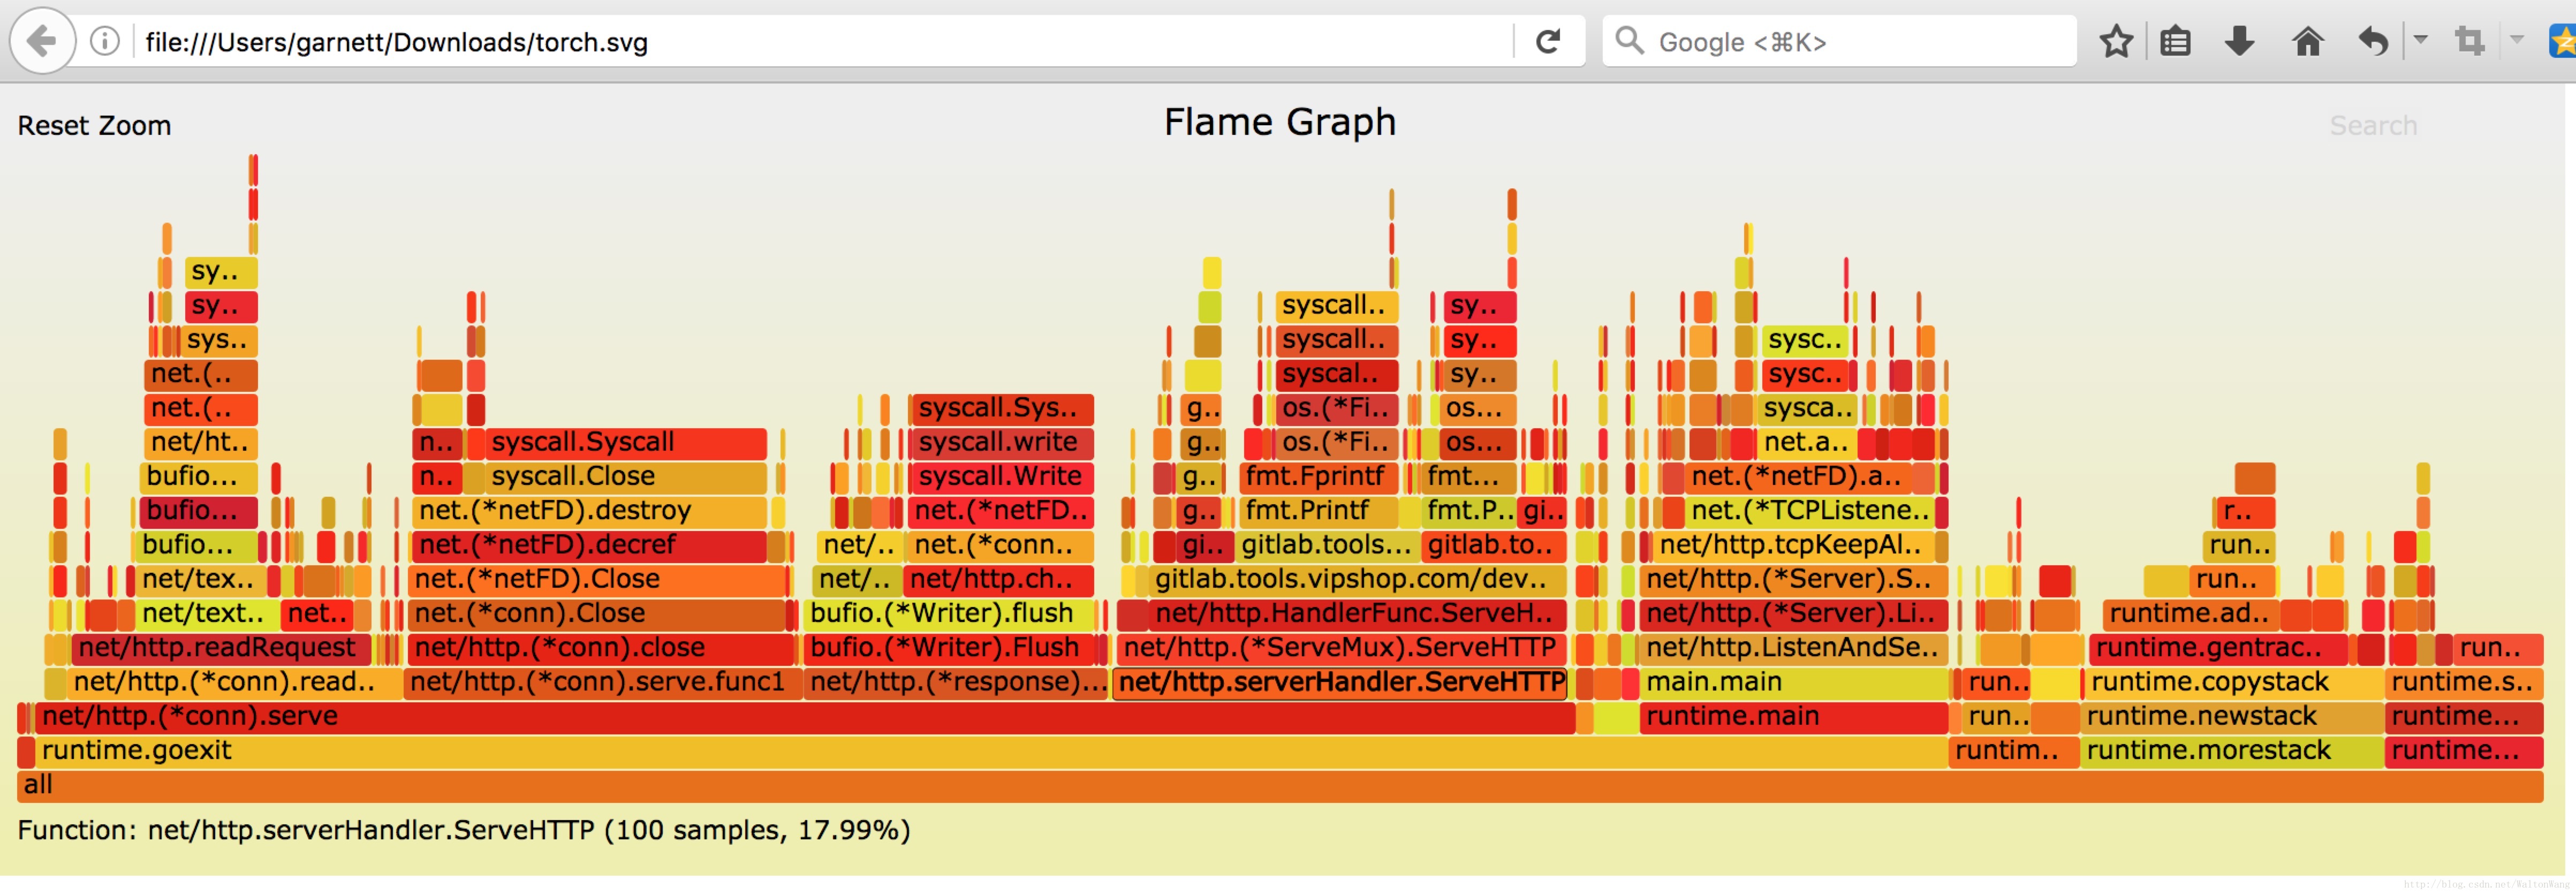
Writing svg to torch.svgtorch.svg是go-torch采样结束后自动生成的profile文件,我们也用浏览器打开,可见下图:
这就是go-torch生成的火焰图,看起来是不是舒服多了。
火焰图的y轴表示cpu调用方法的先后,x轴表示在每个采样调用时间内,方法所占的时间百分比,越宽代表占据cpu时间越多
有了火焰图,我们就可以更清楚的看到哪个方法调用耗时长了,然后不断的修正代码,重新采样,不断优化。
好了,本文只有一个目的,就是希望让你对golang程序的性能调优更有兴趣。接下来,你可以在自己的golang项目中对那些耗时太长的接口进行调优了。
如果觉得我的文章对您有用,请随意打赏。你的支持将鼓励我继续创作!