社区微信群开通啦,扫一扫抢先加入社区官方微信群

社区微信群
首先,在使用mysql的时候,我们新建一个数据库,并且在数据库新建一个表格后,一般我们会新建一个用户,然后使用该用户对该数据库进行管理,这时候我们必须对于该用户赋予操作该数据库的相关权限,具体有以下几种权限以及对应操作。没有赋予权限时候,golang对于数据库的操作都会报Access Denied的错误。关于mysql的安装以及配置可以借鉴以下博客:http://www.cnblogs.com/sshoub/p/4321640.html
关于新建数据库用户以及赋予用户权限的相关操作如下:
grant 普通数据用户,查询、插入、更新、删除 数据库中所有表数据的权利。
grant select on testdb.* to common_user@’%’
grant insert on testdb.* to common_user@’%’
grant update on testdb.* to common_user@’%’
grant delete on testdb.* to common_user@’%’
或者,用一条 MySQL 命令来替代:
grant select, insert, update, delete on testdb.* to common_user@’%’
9>.grant 数据库开发人员,创建表、索引、视图、存储过程、函数。。。等权限。
grant 创建、修改、删除 MySQL 数据表结构权限。
grant create on testdb.* to developer@’192.168.0.%’;
grant alter on testdb.* to developer@’192.168.0.%’;
grant drop on testdb.* to developer@’192.168.0.%’;
grant 操作 MySQL 外键权限。
grant references on testdb.* to developer@’192.168.0.%’;
grant 操作 MySQL 临时表权限。
grant create temporary tables on testdb.* to developer@’192.168.0.%’;
grant 操作 MySQL 索引权限。
grant index on testdb.* to developer@’192.168.0.%’;
grant 操作 MySQL 视图、查看视图源代码 权限。
grant create view on testdb.* to developer@’192.168.0.%’;
grant show view on testdb.* to developer@’192.168.0.%’;
grant 操作 MySQL 存储过程、函数 权限。
grant create routine on testdb.* to developer@’192.168.0.%’; -- now, can show procedure status
grant alter routine on testdb.* to developer@’192.168.0.%’; -- now, you can drop a procedure
grant execute on testdb.* to developer@’192.168.0.%’;
10>.grant 普通 DBA 管理某个 MySQL 数据库的权限。
grant all privileges on testdb to dba@’localhost’
其中,关键字 “privileges” 可以省略。
11>.grant 高级 DBA 管理 MySQL 中所有数据库的权限。
grant all on *.* to dba@’localhost’
12>.MySQL grant 权限,分别可以作用在多个层次上。
1. grant 作用在整个 MySQL 服务器上:
grant select on *.* to dba@localhost; -- dba 可以查询 MySQL 中所有数据库中的表。
grant all on *.* to dba@localhost; -- dba 可以管理 MySQL 中的所有数据库
2. grant 作用在单个数据库上:
grant select on testdb.* to dba@localhost; -- dba 可以查询 testdb 中的表。
3. grant 作用在单个数据表上:
grant select, insert, update, delete on testdb.orders to dba@localhost;
4. grant 作用在表中的列上:
grant select(id, se, rank) on testdb.apache_log to dba@localhost;
5. grant 作用在存储过程、函数上:
grant execute on procedure testdb.pr_add to ’dba’@’localhost’
grant execute on function testdb.fn_add to ’dba’@’localhost’
注意:修改完权限以后 一定要刷新服务,或者重启服务,刷新服务用:FLUSH PRIVILEGES。
1.前言
Docker最近推出了可以运行在Win10和Mac上的稳定版本,让我们赶紧来体验一下。
2.安装准备
需要的条件为: 64bit Windows 10,开启Hyper-V
2.1 下载Docker for Windows
从官网的下面地址可以下载
https://download.docker.com/win/stable/InstallDocker.msi
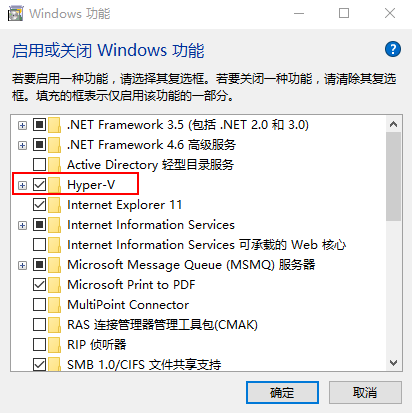
2.2 开启win10的Hyper-V
控制面板 -> 程序 -> 启用或关闭Windows功能 -> 选中Hyper-V
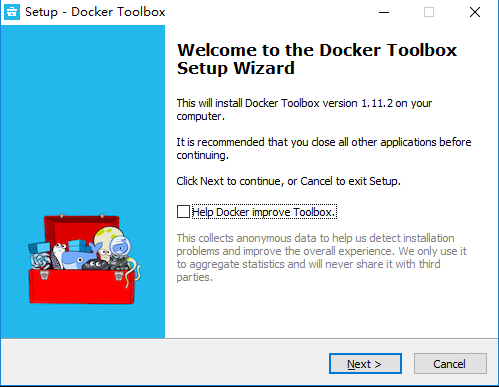
3.安装Docker Toolbox
在这一步,你将安装Docker Toolbox。安装后你的系统将会安装以下几个软件:
如果你的电脑已经安装了Virtualbox,那么不需要再重新安装Oracle VM Virtualbox,在安装的时候取消勾选就可以了
Ps:如果你的Virtual box正在运行,那么要先关闭掉它然后再重新运行安装
1. 打开Docker Toolbox页面
2. 点击installer链接进行下载
3. 双击安装包进行安装Docker Toolbox
4. 点击下一步,进行安装就可以了
安装完成
第三步. 确认是否安装成功
1. 安装完成后,你会在你的电脑桌面上看到新增了三个图标
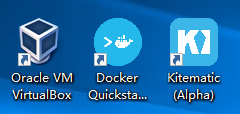
2. 双击Docker Quickstart Terminal图标,启动一个终端
第一次启动的话你会看到命令行会输出一些东西,等待一下,它会配置Docker Toolbox,之后,当它完成后,你会看到启动成功的画面
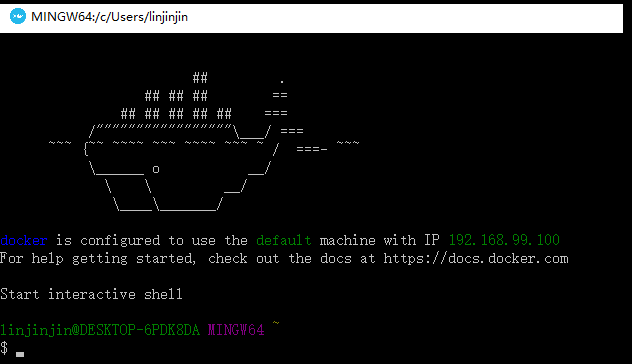
这个终端是运行在bash环境下的,而不是标准的windows命令行,因为Docker需要运行在bash环境下,否则一些命令无法运行
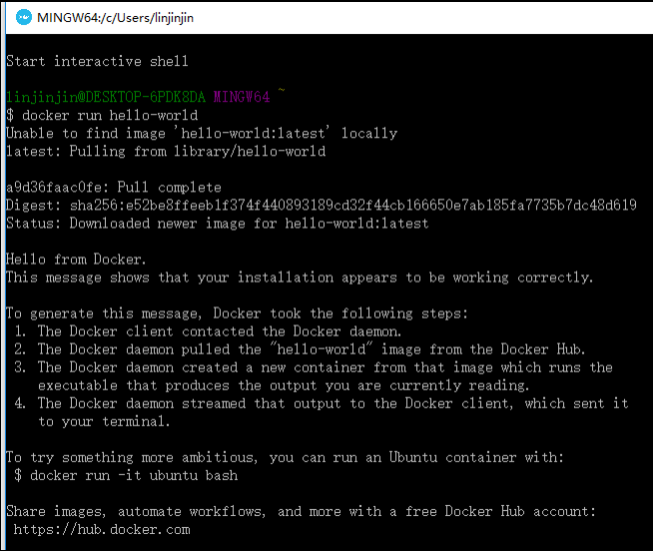
3. 在命令行中输入docker run hello-world并按回车键,如果docker配置成功的话,你会看到命令行中有如下输出:
然后这里必须这一这个地址,之后你将通过192.168.99.100:端口访问docker里面的某个进程
如果觉得我的文章对您有用,请随意打赏。你的支持将鼓励我继续创作!