社区微信群开通啦,扫一扫抢先加入社区官方微信群

社区微信群
springcloud教程:http://blog.csdn.net/forezp/article/details/70148833
一路按教程做下来,碰到以下的问题:
1.在feign中使用熔断器hystrix,但是一直不起作用。因为在D版本的Spring Cloud中,它没有默认打开。
解决:在yml文件中加入
feign:
  hystrix:
enabled: true做完以上工作,重启服务即可。
2.feign hystrix dashboard 断路器 仪表盘无法打开
解决:a.pom添加一下依赖
	<!-- 断路器 hystrix -->
        <dependency>
		<groupId>org.springframework.cloud</groupId>
		<artifactId>spring-cloud-starter-hystrix</artifactId>
	</dependency>
<!-- hystrix dashboard 断路器 仪表盘 -->
<dependency>
<groupId>org.springframework.cloud</groupId>
<artifactId>spring-cloud-starter-hystrix-dashboard</artifactId>
</dependency>
<dependency>
<groupId>org.springframework.boot</groupId>
<artifactId>spring-boot-starter-actuator</artifactId>
</dependency>@EnableHystrix@EnableHystrixDashboard
3.zuul
maven中直接添加zuul依赖无法成功,需要手动添加到maven库。
<!-- https://mvnrepository.com/artifact/org.springframework.cloud/spring-cloud-starter-zuul -->
<dependency>
	<groupId>org.springframework.cloud</groupId>
	<artifactId>spring-cloud-starter-zuul</artifactId>
	<version>1.4.3.RELEASE</version>
</dependency>

<!-- https://mvnrepository.com/artifact/com.netflix.zuul/zuul-core -->
<dependency>
	<groupId>com.netflix.zuul</groupId>
	<artifactId>zuul-core</artifactId>
	<version>1.3.0</version>
</dependency>4.分布式配置中心(Spring Cloud Config)
1) server:
关于server部分,主要注意一下,uri和对应的git中的命名规则组合。
如SpringcloudConfig/respo/config-client-dev.properties
想取到config-client-dev.properties,则uri对应的为:http://localhost:8888/config-client/dev
http请求地址和资源文件映射如下:

/{application}/{profile}[/{label}]
/{application}-{profile}.yml
/{label}/{application}-{profile}.yml
/{application}-{profile}.properties
/{label}/{application}-{profile}.properties
server:
port: 8888
spring:
application:
name: config-server
cloud:
config:
server:
git:
uri: https://github.com/forezp/SpringcloudConfig/
searchPaths: respo
#uri: https://github.com/eddie-code/SpringCloudDemo
#searchPaths: config-repo
label: master
eureka:
client:
serviceUrl:
defaultZone: http://localhost:8761/eureka/2)client
关于client,主要注意bootstrap.yml的优先级高于application.yml,所以关于外部配置写在bootstrap.yml中。
server:
  port: 8881
eureka:
  client:
    serviceUrl:
      defaultZone: http://localhost:8761/eureka/
spring:
  application:
    name: config-client
  cloud:
    config:
      label: master
      profile: dev
      discovery:
        serviceId: config-server
enabled: trueconfig-client-dev.properties@Value("${foo}")
private String foo;
@Value("${democonfigclient.message}")
private String message;
@GetMapping("/configs")
public String configs() {
return "This is " + foo + " ; Message: " + message;
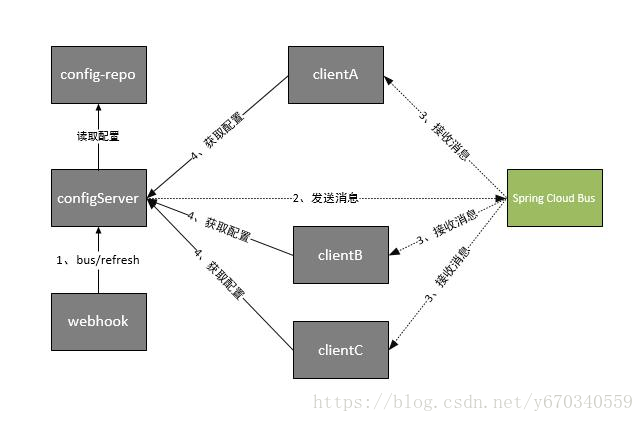
}此处整合rabbitMq。RabbitMQ系列(一):Windows下RabbitMQ安装及入门
安装完毕,此处直接使用下图架构:
一)、springcloud_EurekaConfigServer:
1)、pom.xml
添加spring-cloud-starter-bus-amqp依赖
<?xml version="1.0" encoding="UTF-8"?>
<project xmlns="http://maven.apache.org/POM/4.0.0" xmlns:xsi="http://www.w3.org/2001/XMLSchema-instance"
    xsi:schemaLocation="http://maven.apache.org/POM/4.0.0 http://maven.apache.org/xsd/maven-4.0.0.xsd">
    <modelVersion>4.0.0</modelVersion>


    <groupId>com.forezp</groupId>
    <artifactId>service-ConfigServer</artifactId>
    <version>0.0.1-SNAPSHOT</version>
    <packaging>jar</packaging>


    <name>service-ConfigServer</name>
    <description>Demo project for Spring Boot</description>


    <parent>
        <groupId>org.springframework.boot</groupId>
        <artifactId>spring-boot-starter-parent</artifactId>
        <version>1.5.2.RELEASE</version>
        <relativePath/> <!-- lookup parent from repository -->
    </parent>


    <properties>
        <project.build.sourceEncoding>UTF-8</project.build.sourceEncoding>
        <project.reporting.outputEncoding>UTF-8</project.reporting.outputEncoding>
        <java.version>1.8</java.version>
    </properties>


    <dependencies>
		<!--eureka client -->
        <dependency>
            <groupId>org.springframework.cloud</groupId>
            <artifactId>spring-cloud-starter-eureka</artifactId>
        </dependency>

    	<!-- config-server -->
    	<dependency>
            <groupId>org.springframework.cloud</groupId>
            <artifactId>spring-cloud-config-server</artifactId>
        </dependency>

        <dependency>
            <groupId>org.springframework.boot</groupId>
            <artifactId>spring-boot-starter-web</artifactId>
        </dependency>


        <!-- Spring Cloud Bus 将分布式的节点用轻量的消息代理连接起来 -->
		<!-- Rabbitmq模块 -->
		<dependency>
            <groupId>org.springframework.cloud</groupId>
            <artifactId>spring-cloud-starter-bus-amqp</artifactId>
        </dependency>
		<dependency>
            <groupId>org.springframework.retry</groupId>
            <artifactId>spring-retry</artifactId>
        </dependency>

        <!--monnitor就是在server 端设置一个监听,来接收我们发送的post信息,告诉它我们更新了配置,你可以开始刷新已经注入的值了。-->
        <dependency>
            <groupId>org.springframework.cloud</groupId>
            <artifactId>spring-cloud-config-monitor</artifactId>
        </dependency>

		<dependency>
			<groupId>org.springframework.boot</groupId>
			<artifactId>spring-boot-starter-web</artifactId>
		</dependency>

		<dependency>
            <groupId>org.springframework.boot</groupId>
            <artifactId>spring-boot-starter-aop</artifactId>
        </dependency>


		<dependency>
			<groupId>org.springframework.boot</groupId>
			<artifactId>spring-boot-starter-test</artifactId>
			<scope>test</scope>
		</dependency>

		<dependency>
            <groupId>org.springframework.boot</groupId>
            <artifactId>spring-boot-starter-actuator</artifactId>
        </dependency>

        <!-- 修改代码后自动生效,Reload Java classes without restarting the container -->
        <dependency>
            <groupId>org.springframework</groupId>
            <artifactId>springloaded</artifactId>
        </dependency>
        <dependency>
		    <groupId>org.springframework.boot</groupId>
		    <artifactId>spring-boot-devtools</artifactId>
		    <optional>true</optional>
		    <scope>true</scope>
		</dependency>
    </dependencies>


	<dependencyManagement>
        <dependencies>
            <dependency>
                <groupId>org.springframework.cloud</groupId>
                <artifactId>spring-cloud-dependencies</artifactId>
                <version>Camden.SR1</version>
                <type>pom</type>
                <scope>import</scope>
            </dependency>
        </dependencies>
    </dependencyManagement>

    <build>
        <plugins>
            <plugin>
                <groupId>org.springframework.boot</groupId>
                <artifactId>spring-boot-maven-plugin</artifactId>
            </plugin>
        </plugins>
    </build>
    <repositories>
        <repository>
            <id>spring-milestones</id>
            <name>Spring Milestones</name>
            <url>https://repo.spring.io/milestone</url>
            <snapshots>
                <enabled>false</enabled>
            </snapshots>
        </repository>
    </repositories>
</project>
2)、eurekaConfingServerApplication:
package com.imm;
import org.springframework.boot.SpringApplication;
import org.springframework.boot.autoconfigure.SpringBootApplication;
import org.springframework.cloud.config.server.EnableConfigServer;
import org.springframework.cloud.netflix.eureka.EnableEurekaClient;

@SpringBootApplication
@EnableEurekaClient
@EnableConfigServer
public class eurekaConfingServerApplication {
    public static void main(String[] args) {
        SpringApplication.run(eurekaConfingServerApplication.class, args);
    }
}
3)、application-dev.yml
此处配置rabbitmq对应的配置参数,和
management: #关闭安全验证
  security:
     enabled: false
server:
port: 8910
spring:
application:
name: eureka-config-server
cloud:
config:
server:
git:
uri: https://github.com/nihaomashaonian/cloud-demo
searchPaths: TIMMY
#uri: https://github.com/forezp/SpringcloudConfig/
#searchPaths: respo
label: master
rabbitmq:
host: localhost
port: 5672
username: guest
password: guest
eureka:
client:
serviceUrl:
defaultZone: http://localhost:8900/eureka/
management: #关闭安全验证
security:
enabled: false
二)、springcloud_EurekaConfigClient:
1)、pom.xml
<?xml version="1.0" encoding="UTF-8"?>
<project xmlns="http://maven.apache.org/POM/4.0.0" xmlns:xsi="http://www.w3.org/2001/XMLSchema-instance"
	xsi:schemaLocation="http://maven.apache.org/POM/4.0.0 http://maven.apache.org/xsd/maven-4.0.0.xsd">
	<modelVersion>4.0.0</modelVersion>

	<groupId>com.forezp</groupId>
	<artifactId>config-client</artifactId>
	<version>0.0.1-SNAPSHOT</version>
	<packaging>jar</packaging>

	<name>config-client</name>
	<description>Demo project for Spring Boot</description>

	<parent>
		<groupId>org.springframework.boot</groupId>
		<artifactId>spring-boot-starter-parent</artifactId>
		<version>1.5.2.RELEASE</version>
		<relativePath/> <!-- lookup parent from repository -->
	</parent>

	<properties>
		<project.build.sourceEncoding>UTF-8</project.build.sourceEncoding>
		<project.reporting.outputEncoding>UTF-8</project.reporting.outputEncoding>
		<java.version>1.8</java.version>
	</properties>

	<dependencies>
		<!--eureka client -->
        <dependency>
            <groupId>org.springframework.cloud</groupId>
            <artifactId>spring-cloud-starter-eureka</artifactId>
        </dependency>

        <!--config client -->
		<dependency>
			<groupId>org.springframework.cloud</groupId>
			<artifactId>spring-cloud-starter-config</artifactId>
		</dependency>

		<!-- Spring Cloud Bus 将分布式的节点用轻量的消息代理连接起来 -->
		<dependency>
            <groupId>org.springframework.cloud</groupId>
            <artifactId>spring-cloud-starter-bus-amqp</artifactId>
        </dependency>

		<dependency>
            <groupId>org.springframework.retry</groupId>
            <artifactId>spring-retry</artifactId>
        </dependency>


		<dependency>
			<groupId>org.springframework.boot</groupId>
			<artifactId>spring-boot-starter-web</artifactId>
		</dependency>

		<dependency>
            <groupId>org.springframework.boot</groupId>
            <artifactId>spring-boot-starter-aop</artifactId>
        </dependency>

		<dependency>
			<groupId>org.springframework.boot</groupId>
			<artifactId>spring-boot-starter-test</artifactId>
			<scope>test</scope>
		</dependency>

		<dependency>
            <groupId>org.springframework.boot</groupId>
            <artifactId>spring-boot-starter-actuator</artifactId>
        </dependency>


		<!-- 修改代码后自动生效,Reload Java classes without restarting the container -->
        <dependency>
            <groupId>org.springframework</groupId>
            <artifactId>springloaded</artifactId>
        </dependency>
        <dependency>
		    <groupId>org.springframework.boot</groupId>
		    <artifactId>spring-boot-devtools</artifactId>
		    <optional>true</optional>
		    <scope>true</scope>
		</dependency>
	</dependencies>

	<dependencyManagement>
		<dependencies>
			<dependency>
				<groupId>org.springframework.cloud</groupId>
				<artifactId>spring-cloud-dependencies</artifactId>
				<version>Dalston.SR1</version>
				<type>pom</type>
				<scope>import</scope>
			</dependency>
		</dependencies>
	</dependencyManagement>

	<build>
		<plugins>
			<plugin>
				<groupId>org.springframework.boot</groupId>
				<artifactId>spring-boot-maven-plugin</artifactId>
			</plugin>
		</plugins>
	</build>

	<!-- 上面版本可能依赖一些snapshots版本,添加spring的资源 -->
	<repositories>
		<repository>
			<id>spring-milestones</id>
			<name>Spring Milestones</name>
			<url>https://repo.spring.io/milestone</url>
			<snapshots>
				<enabled>false</enabled>
			</snapshots>
		</repository>
	</repositories>
</project>
2)、eurekaConfingClientApplication
package com.imm;
import org.springframework.boot.SpringApplication;
import org.springframework.boot.autoconfigure.SpringBootApplication;
import org.springframework.cloud.netflix.eureka.EnableEurekaClient;

@SpringBootApplication
@EnableEurekaClient
public class eurekaConfingClientApplication {
	public static void main(String[] args) {
		SpringApplication.run(eurekaConfingClientApplication.class, args);
	}
}
3)、HelloControler
这里@RefreshScope是重点,即代码中需要动态刷新配置,在需要的类上加上该注解就行,
开始尝试很多次,始终接收不到参数
Received remote refresh request. Keys refreshed []
在对应的类中加入@RefreshScope 即可。
正确的客户端打印出的log应为:Received remote refresh request. Keys refreshed [foo]
package com.imm.amo.controller;

import org.springframework.beans.factory.annotation.Value;
import org.springframework.cloud.context.config.annotation.RefreshScope;
import org.springframework.web.bind.annotation.GetMapping;
import org.springframework.web.bind.annotation.RestController;

@RestController
@RefreshScope
public class HelloControler {

	@Value("${foo}")
    private String foo;

    @Value("${timmy.message}")
    private String message;

    @Value("${server.port}")
    String port;

    @GetMapping("/configs")
    public String configs() {
        return "This is " + foo + " ;port: "+port+"; Message: " + message;
    }
}
4)、bootstrap-local.yml
server:
  port: 8911
eureka:
  client:
    serviceUrl:
      defaultZone: http://localhost:8900/eureka/
spring:
  application:
    name: timmy-client
  cloud:
    config:
      label: master
      profile: dev
      #uri: http://localhost:8910/
      discovery:
        serviceId: eureka-config-server   #服务名,这时如果配置服务部署多份,通过负载均衡,从而高可用。
enabled: true参考:https://www.cnblogs.com/ityouknow/p/6931958.html 关于最后Eureka会重启的BUG
如果觉得我的文章对您有用,请随意打赏。你的支持将鼓励我继续创作!