社区微信群开通啦,扫一扫抢先加入社区官方微信群

社区微信群
本节主要内容:
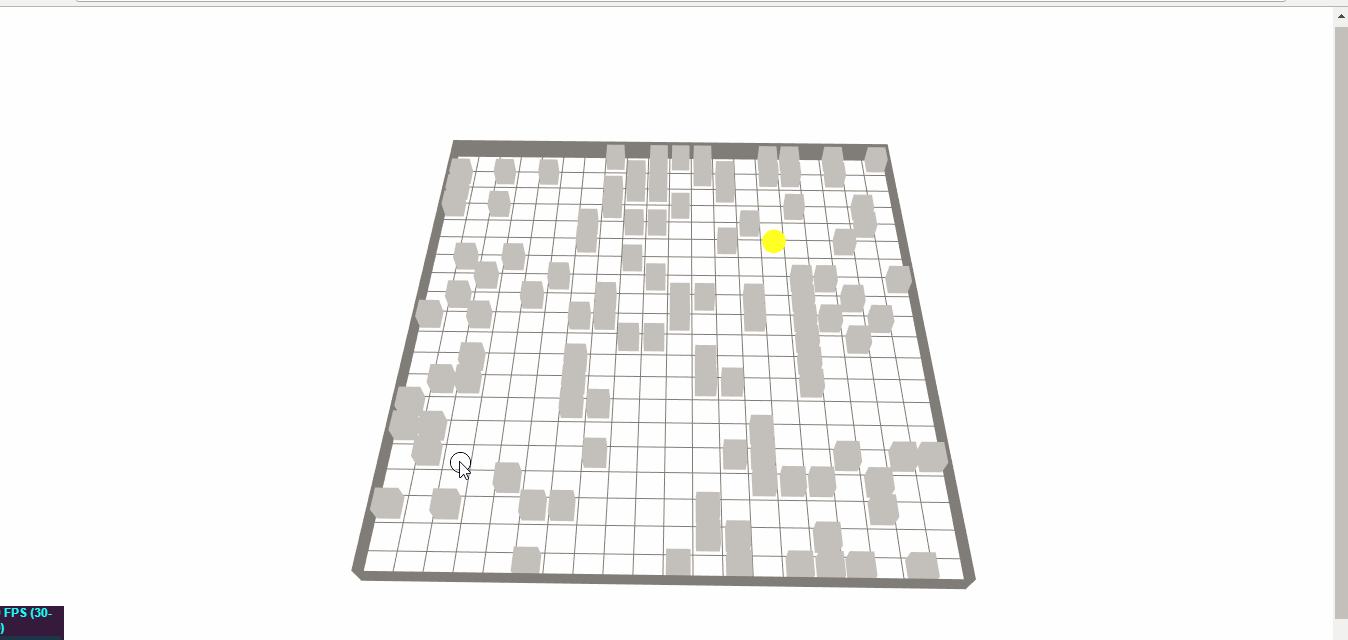
本节最终效果图如下:
该项目Github地址为: http://github.com/bgrins/javascript-astar
实现寻路的案例代码为:
If you want just the A* search code (not the demo visualization), use code like this http://gist.github.com/581352

<script type='text/javascript' src='astar.js'></script>
<script type='text/javascript'>
	var graph = new Graph([
		[1,1,1,1],
		[0,1,1,0],
		[0,0,1,1]
	]);
	var start = graph.grid[0][0];
	var end = graph.grid[1][2];
	var result = astar.search(graph, start, end);
	// result is an array containing the shortest path
	var graphDiagonal = new Graph([
		[1,1,1,1],
		[0,1,1,0],
		[0,0,1,1]
	], { diagonal: true });

	var start = graphDiagonal.grid[0][0];
	var end = graphDiagonal.grid[1][2];
	var resultWithDiagonals = astar.search(graphDiagonal, start, end, { heuristic: astar.heuristics.diagonal });
	// Weight can easily be added by increasing the values within the graph, and where 0 is infinite (a wall)
	var graphWithWeight = new Graph([
		[1,1,2,30],
		[0,4,1.3,0],
		[0,0,5,1]
	]);
	var startWithWeight = graphWithWeight.grid[0][0];
	var endWithWeight = graphWithWeight.grid[1][2];
	var resultWithWeight = astar.search(graphWithWeight, startWithWeight, endWithWeight);
	// resultWithWeight is an array containing the shortest path taking into account the weight of a node
</script>
案例代码介绍了该库的三种使用方法:
使用该库时,先初始化一个Graph对象,该对象可由一个数组进行初始化,然后,确定起止点在数组中的位置,调用astar.search函数,即可获得路径数组。路径数组的组成如下:
(26) [GridNode, GridNode, GridNode, GridNode, GridNode, GridNode, GridNode, GridNode, GridNode, GridNode, GridNode, GridNode, GridNode, GridNode, GridNode, GridNode, GridNode, GridNode, GridNode, GridNode, GridNode, GridNode, GridNode, GridNode, GridNode, GridNode]
0:
GridNode {x: 3, y: 15, weight: 1, f: 26, g: 1, …}
1:
GridNode {x: 4, y: 15, weight: 1, f: 26, g: 2, …}
2:
GridNode {x: 4, y: 14, weight: 1, f: 26, g: 3, …}
3:
GridNode {x: 5, y: 14, weight: 1, f: 26, g: 4, …}
4:
GridNode {x: 6, y: 14, weight: 1, f: 26, g: 5, …}
5:
GridNode {x: 7, y: 14, weight: 1, f: 26, g: 6, …}
6:
GridNode {x: 7, y: 13, weight: 1, f: 26, g: 7, …}
7:
GridNode {x: 7, y: 12, weight: 1, f: 26, g: 8, …}
8:
GridNode {x: 8, y: 12, weight: 1, f: 26, g: 9, …}
9:
GridNode {x: 8, y: 11, weight: 1, f: 26, g: 10, …}
10:
GridNode {x: 9, y: 11, weight: 1, f: 26, g: 11, …}
11:
GridNode {x: 10, y: 11, weight: 1, f: 26, g: 12, …}
12:
GridNode {x: 10, y: 10, weight: 1, f: 26, g: 13, …}
13:
GridNode {x: 10, y: 9, weight: 1, f: 26, g: 14, …}
14:
GridNode {x: 10, y: 8, weight: 1, f: 26, g: 15, …}
15:
GridNode {x: 10, y: 7, weight: 1, f: 26, g: 16, …}
16:
GridNode {x: 11, y: 7, weight: 1, f: 26, g: 17, …}
17:
GridNode {x: 12, y: 7, weight: 1, f: 26, g: 18, …}
18:
GridNode {x: 13, y: 7, weight: 1, f: 26, g: 19, …}
19:
GridNode {x: 14, y: 7, weight: 1, f: 26, g: 20, …}
20:
GridNode {x: 15, y: 7, weight: 1, f: 26, g: 21, …}
21:
GridNode {x: 16, y: 7, weight: 1, f: 26, g: 22, …}
22:
GridNode {x: 16, y: 6, weight: 1, f: 26, g: 23, …}
23:
GridNode {x: 16, y: 5, weight: 1, f: 26, g: 24, …}
24:
GridNode {x: 16, y: 4, weight: 1, f: 26, g: 25, …}
25:
GridNode {x: 16, y: 3, weight: 1, f: 26, g: 26, …}
length:
26
__proto__
:
Array(0)
可见路径数组为一个GridNode对象,他的x,y属性为此步的位置,g属性为执行的次序。
首先,我们需要初始化一个数组用于存放地图信息:
var graph = [];
第二步,更改地图生成函数initGrid(),每次生成方块时,将当前位置设置为0(0表示墙,1表示路):
function initGrid() {
	var geometry = new THREE.CubeGeometry( 8,8,8);
		var material = new THREE.MeshBasicMaterial( {color: 0xC0C0C0} );
		for(var i=0;i<length/10;i++){
			 var nodeRow = [];
             graph.push(nodeRow);
			for(var j=0;j<length/10;j++){
				var salt=randomNum(1,7);
				if(salt>flex){
					nodeRow.push(1);
				}else{
					nodeRow.push(0);
				}
				if(salt<=flex){
					var cube = new THREE.Mesh( geometry, material );
					cube.position.set(10*j-length/2+5,5,10*i-length/2+5);
					scene.add(cube);
				}
			}
		}
}
第三步,在屏幕上确定起止点坐标后,调用astar.search函数,生成路径数组
var result;
function caculatePath(resultArray){
        var maps = new Graph(graph);
	var startX=(resultArray[0].position.z-5+length/2)/10;
	var startY=(resultArray[0].position.x-5+length/2)/10;
	var endX=(resultArray[1].position.z-5+length/2)/10;
	var endY=(resultArray[1].position.x-5+length/2)/10;
	var start = maps.grid[startX][startY];
	var end = maps.grid[endX][endY];
	result = astar.search(maps, start, end);
	    if(result.length==0){
	    	alert("无可到达路径");
	    	cleanSphere();
	    	return;
	    }
	}
window.requestAnimationFrame()方法告诉浏览器您希望执行动画并请求浏览器在下一次重绘之前调用指定的函数来更新动画。该方法使用一个回调函数作为参数,这个回调函数会在浏览器重绘之前调用。
语法
window.requestAnimationFrame(callback);参数
callback一个指定函数的参数,该函数在下次重新绘制动画时调用。这个回调函数只有一个传参,
DOMHighResTimeStamp,指示requestAnimationFrame()开始触发回调函数的当前时间(performance.now()返回的时间)。返回值
一个
long整数,请求 ID ,是回调列表中唯一的标识。是个非零值,没别的意义。你可以传这个值给window.cancelAnimationFrame()以取消回调函数。
var timesRun = 0;
var tempSphere;
var isAdded=false;
function pathAnimate(){
	if(!isAdded){
		scene.add(tempSphere);
		isAdded=true;
	}
	if(timesRun==result.length){
		return;
	}
	var next={
	    x:result[timesRun].y*10-length/2+5,
	    z:result[timesRun].x*10-length/2+5
	}
	if(tempSphere.position.x==next.x&&tempSphere.position.z==next.z){
	    timesRun++;
	    requestAnimationFrame(pathAnimate);
	    return;
	}
	if(tempSphere.position.x>next.x)tempSphere.position.x-=1;
	if(tempSphere.position.x<next.x)tempSphere.position.x+=1;
	if(tempSphere.position.z>next.z)tempSphere.position.z-=1;
	if(tempSphere.position.z<next.z)tempSphere.position.z+=1;
	requestAnimationFrame(pathAnimate);

}
通过对requestAnimationFrame函数的循环调用,实现60FPS动画。
本节完整代码:https://github.com/BluFis/Threejs-Demo1
下节内容:使用Three.JS以及A*寻路算法制作自动寻路场景(五)使用多view绘图实现小地图功能
如果觉得我的文章对您有用,请随意打赏。你的支持将鼓励我继续创作!