社区微信群开通啦,扫一扫抢先加入社区官方微信群

社区微信群
环境:树莓派系统,互联网,电脑
sudo apt-get install vimsudo apt-get install python-dev
sudo apt-get install python-pip
sudo apt-get install libpcre3 libpcre3-dev
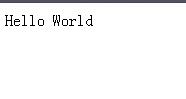
sudo pip install --upgrade pipsudo pip install django uwsgi -timeout 6000sudo apt-get install nginx sudo apt-get install php5-fpm php5-sqlitevim test.py# test.py
def application(env, start_response):
start_response('200 OK', [('Content-Type','text/html')])
return [b"Hello World"]uwsgi --http :8000 --wsgi-file test.py在树莓派浏览器输入
http://127.0.0.1:8000/
或者在电脑浏览器输入 http://raspberrypi:8000
测试完成
django-admin.py startproject helloworldcd helloworldpython manage.py runserver 0.0.0.0:8000在树莓派浏览器输入
http://127.0.0.1:8000/
或者在电脑浏览器输入 http://raspberrypi:8000
测试完成
uwsgi --http :8000 --module helloworld.wsgi在树莓派浏览器输入
http://127.0.0.1:8000/
或者在电脑浏览器输入 http://raspberrypi:8000
测试完成
可见两次测试结果相同
sudo cat /etc/nginx/uwsgi_paramsuwsgi_params
uwsgi_param  QUERY_STRING       $query_string;
uwsgi_param  REQUEST_METHOD     $request_method;
uwsgi_param  CONTENT_TYPE       $content_type;
uwsgi_param  CONTENT_LENGTH     $content_length;

uwsgi_param  REQUEST_URI        $request_uri;
uwsgi_param  PATH_INFO          $document_uri;
uwsgi_param  DOCUMENT_ROOT      $document_root;
uwsgi_param  SERVER_PROTOCOL    $server_protocol;
uwsgi_param  HTTPS              $https if_not_empty;

uwsgi_param  REMOTE_ADDR        $remote_addr;
uwsgi_param  REMOTE_PORT        $remote_port;
uwsgi_param  SERVER_PORT        $server_port;
uwsgi_param SERVER_NAME $server_name;vim nginx.confnginx.conf
# django组件连接
upstream django{
  server unix:///tmp/uwsgi_1.sock; # sock,名字随意,后边要保持一致
}
server {
    # 监视的网站端口
    listen    80;
    #UTF-8编码
    charset    utf-8;
    # 最大上传大小128M,可自由定义
    client_max_body_size 128M;
    # 媒体文件
    location /media  {
        alias /home/pi/helloworld/media;
    }
    # 静态文件
    location /static {
        alias /home/pi/helloworld/static; # 静态网页存放,位置可自定义,地址写详细
    }

    # 其他交由django处理
    location / {
        uwsgi_pass  django;
        include    uwsgi_params; # uwsgi
    }
}sudo rm /etc/nginx/sites-enabled/default
sudo ln -s -f /home/pi/helloworld/nginx.conf /etc/nginx/sites-enabled/sudo nginx -t结果
没有错误
如果发现有错,按照错误提示去更改
sudo /etc/init.d/nginx reload加载成功
uwsgi --socket /tmp/uwsgi_1.sock --wsgi-file /home/pi/test.py在树莓派浏览器输入
http://127.0.0.1
或者在电脑浏览器输入 http://raspberrypi
测试完成
uwsgi --socket /tmp/uwsgi_1.sock --wsgi-file /home/pi/test.py --chmod-socket=666uwsgi --socket /tmp/uwsgi_1.sock --module helloworld.wsgi --chmod-socket=666在树莓派浏览器输入
http://127.0.0.1
或者在电脑浏览器输入 http://raspberrypi/
测试完成
vim uwsgi_1.iniuwsgi_1.ini
[uwsgi]
chdir = /home/pi/helloworld
socket = /tmp/uwsgi_1.sock
module = helloworld.wsgi
chmod-socket = 666
processes = 4
master = true
vacuum = true
uid = pi
gid = piuwsgi --ini uwsgi_1.ini在树莓派浏览器输入
http://127.0.0.1
或者在电脑浏览器输入 http://raspberrypi/
测试完成
sudo mkdir /etc/uwsgi
sudo mkdir /etc/uwsgi/vassals
sudo ln -s /home/pi/helloworld/uwsgi_1.ini /etc/uwsgi/vassals/uwsgi --emperor /etc/uwsgi/vassals在树莓派浏览器输入
http://127.0.0.1
或者在电脑浏览器输入 http://raspberrypi/
测试成功
vim emperor.uwsgi.serviceemperor.uwsgi.service
[Unit]
Description=uWSGI Emperor
After=syslog.target
[Service]
ExecStart=/usr/local/bin/uwsgi --emperor /etc/uwsgi/vassals/ --daemonize /var/log/uwsgi_emperor.log
RuntimeDirectory=uwsgi
KillSignal=SIGQUIT
Restart=on-failure
Type=forking
[Install]
WantedBy=multi-user.targetsudo cp emperor.uwsgi.service /etc/systemd/system/ls /etc/systemd/system/sudo systemctl start emperor.uwsgi.servicesudo systemctl | grep uwsgi
sudo systemctl | grep nginx加载成功
在树莓派浏览器输入
http://127.0.0.1
或者在电脑浏览器输入 http://raspberrypi/
测试成功
sudo systemctl enable emperor.uwsgi.service自启动加入成功
vim nginx.confnginx.conf
#django组件
upstream django{
  server unix:///tmp/uwsgi_1.sock;
}
server {
    # 监视的网站端口
    listen    80;
    # UTF-8编码
    charset    utf-8;
    # 最大上传大小128M,可自由定义
    client_max_body_size 128M;

    #以下为更改内容
    ###################################
    #nginx默认寻找路径
    root /home/pi/helloworld;
    #默认首页页类型
    index index.html index.htm index.php;
    # 默认首页路径
    location =/ {
        root /home/pi/helloworld;
    }
    #php文件
    location ~.php$ {
       include snippets/fastcgi-php.conf;
       fastcgi_pass unix:/var/run/php5-fpm.sock;
    }
    ###################################
    #以上为更改内容

    # 媒体文件
    location /media  {
        alias /home/pi/helloworld/media;
    }
    # 静态文件
    location /static {
        alias /home/pi/helloworld/static; # 静态网页存放,位置可自定义,地址写详细
    }
    # 其他交由django处理
    location / {
        uwsgi_pass  django;
        include    /home/pi/helloworld/uwsgi_params; # uwsgi
    }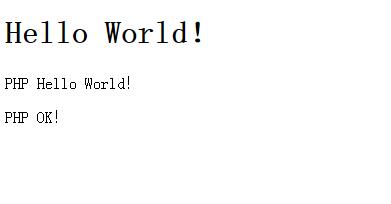
}sudo /etc/init.d/nginx reloadvim index.phpindex.php
<?php
  print <<< EOT
<!doctype html>
<html lang="en">
<head>
<meta charset="UTF-8">
<title>Hello World!</title>
</head>
<body>
<h1>Hello World!</h1>
<p>PHP Hello World!</p>
<p>PHP OK!</p>
</body>
</html>
EOT;
?>
在树莓派浏览器输入
http://127.0.0.1
或者在电脑浏览器输入 http://raspberrypi/
测试成功
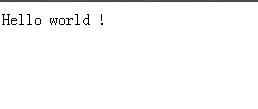
   cd /home/pi/helloworld/helloworld
   vim view.py
view.py
from django.http import HttpResponse

def hello(request):
return HttpResponse("Hello world ! ")"""helloworld
"""
from django.conf.urls import url
from helloworld.view import hello
urlpatterns = [
url(r'^hello/$', hello),
]在树莓派浏览器输入
http://127.0.0.1/hello
或者在电脑浏览器输入 http://raspberrypi/hello
测试成功
简单配置就这些了,可以很愉快的编写python和PHP了☺
官方配置说明
http://uwsgi-docs.readthedocs.io/en/latest/tutorials/Django_and_nginx.html
如果觉得我的文章对您有用,请随意打赏。你的支持将鼓励我继续创作!