社区微信群开通啦,扫一扫抢先加入社区官方微信群

社区微信群
本文主要介绍如何把个人编写的 Python 应用打包并上传到官方仓库 PyPI,使得可以直接通过 pip 进行安装使用,并在 PyPI 上进行维护。
曾经 Python 的分发工具是 distutils,但它无法定义包之间的依赖关系。setuptools 则是它的增强版,能帮助我们更好的创建和分发 Python 包,尤其是具有复杂依赖关系的包。其通过添加一个基本的依赖系统以及许多相关功能,弥补了该缺陷。他还提供了自动包查询程序,用来自动获取包之间的依赖关系,并完成这些包的安装,大大降低了安装各种包的难度,使之更加方便。
一般 Python 安装会自带 setuptools,如果没有可以使用 pip 安装:
$ pip install setuptools
setuptools 简单易用,只需写一个简短的 setup.py 安装文件,就可以将你的 Python 应用打包。
在目录 learn_setup 下新建安装文件 setup.py,然后创建包 myapp 模拟要打包源码包:
.
├── myapp
│ └── __init__.py
└── setup.py
一个最简单的 setup.py 文件内容如下:
from setuptools import setup

setup(
    name='firstApp', # 应用名
    version='0.0.1', # 版本号
    packages=['myapp'], # 包括在安装包内的 Python 包
)有了上面的 setup.py 文件,我们就可以打出各种安装包,主要分为两类:sdist 和 bdist。
使用 sdist 可以打包成 source distribution,支持的压缩格式有:
| Format | Description | Notes |
|---|---|---|
| zip | zip file (.zip) | Windows 默认 |
| gztar | gzip’ed tar file (.tar.gz) | Unix 默认 |
| bztar | bzip2’ed tar file (.tar.bz2) | |
| xztar | xz’ed tar file (.tar.xz) | |
| ztar | compressed tar file (.tar.Z) | |
| tar | tar file (.tar) |
使用方式为:
$ python setup.py sdist --formats=gztar,zip
现在目录下多出 dist 和 *.egg-info 目录,dist 内保存了我们打好的包,上面命令使用 --formats 指定了打出 .tar.gz 和 .zip 包,如果不指定则如上表根据具体平台默认格式打包。
包的名称为 setup.py 中定义的 name, version以及指定的包格式,格式如:firstApp-0.0.1.tar.gz。
使用 bdist 可以打出 built distribution,和源码包相比,由于预先构建好,所以安装更快:
| Format | Description | Notes |
|---|---|---|
| gztar | gzipped tar file (.tar.gz) | Unix 默认 |
| bztar | bzipped tar file (.tar.bz2) | |
| xztar | xzipped tar file (.tar.xz) | |
| ztar | compressed tar file (.tar.Z) | |
| tar | tar file (.tar) | |
| zip | zip file (.zip) | Windows 默认 |
| rpm | RPM | |
| pkgtool | Solaris pkgtool | |
| sdux | HP-UX swinstall | |
| wininst | self-extracting ZIP file for Windows | |
| msi | Microsoft Installer. |
使用上,和 sdist 一样,可以使用 --formats 指定包格式。如:
$ python setup.py bdist --formats=rpm
同时为了简化操作,setuptools 提供了如下命令:
| Command | Formats | Notes |
|---|---|---|
| bdist_dumb | tar, gztar, bztar, xztar, ztar, zip | Windows 默认 zip, Unix 默认 gztar |
| bdist_rpm | rpm, srpm | |
| bdist_wininst | wininst | |
| bdist_msi | msi |
所以上面打 rpm 包可以使用:
$ python setup.py bdist_rpm
如果使用 bdist_wininst,打出来的是 exe 安装文件,可以点击安装。
Wheel 也是一种 built 包,而且是官方推荐的打包方式。也许你曾经遇见或使用过 egg 包,但现在 wheel 是官方推荐的打包方式(https://wheel.readthedocs.io/en/stable/)。
wheel 包的优点:
使用 wheel 打包,首先要安装 wheel:
$ pip install wheel
然后使用 bdist_wheel 打包:
$ python setup.py bdist_wheel
执行成功后,目录下除了 dist 和 *.egg-info 目录外,还有一个 build 目录用于存储打包中间数据。
wheel 包的名称如 firstApp-0.0.1-py3-none-any.whl,其中 py3 指明只支持 Python3。
可以使用参数 --universal,包名如 mfirstApp-0.0.1-py2.py3-none-any.whl,表明 wheel 包同时支持 Python2 和 Python3
使用 universal 也成为通用 wheel 包,反之称为纯 wheel 包。
上一节的示例应用没有任何内容。下面添加模块 greet 并重新打包。
# greet.py

def hello():
    print('Hello, welcome to setuptools!')
使用 bdist_wheel 再次打包后,我们可以使用 pip 安装到本地 Python 的 site-packages 目录。
$ pip install dist/fisrtApp-0.0.1-py3-none-any.whl
现在和其他使用 pip 安装的三方库一样使用:
from myapp.greet import hello

hello()
应用开发过程中会频繁变更,每次安装都需要先卸载旧版本很麻烦。使用 develop 开发模式安装的话,实际代码不会拷贝到 site-packages 下,而是除一个指向当前应用的链接(*.egg-link)。这样当前位置的源码改动就会马上反映到 site-packages。使用如下:
$ pip install -e . # 或者 python setup.py develop
如需卸载,使用 pip uninstall。
Wheel 包可以自己使用和传输给其他人使用,但是维护更新不方便,而 PyPI 作为 Python 的 软件仓库,让所有人可以方便的上传和下载,以及管理三方库。
登录 https://pypi.python.org/pypi,进入 Register 注册账号。
虽然 setuptools 支持使用 setup.py upload 上传包文件到 PyPI,但只支持 HTTP 而被新的 twine 取代。
同样的,需要先安装 twine:
$ pip install twine
使用 upload:
$ twine upload dist/*
输入 username 和 password 即上传至 PyPI。如果不想每次输入账号密码,可以在家目录下创建 .pypirc 文件,内容如下:
[distutils]
index-servers =
    pypi
    pypitest

[pypi]
username:
password:

[pypitest]
repository: https://test.pypi.org/legacy/
username:
password:
填上自己的账号密码即可,这里配置了官方的 pypi 和 pypitest,若要配置其他仓库,按格式添加。
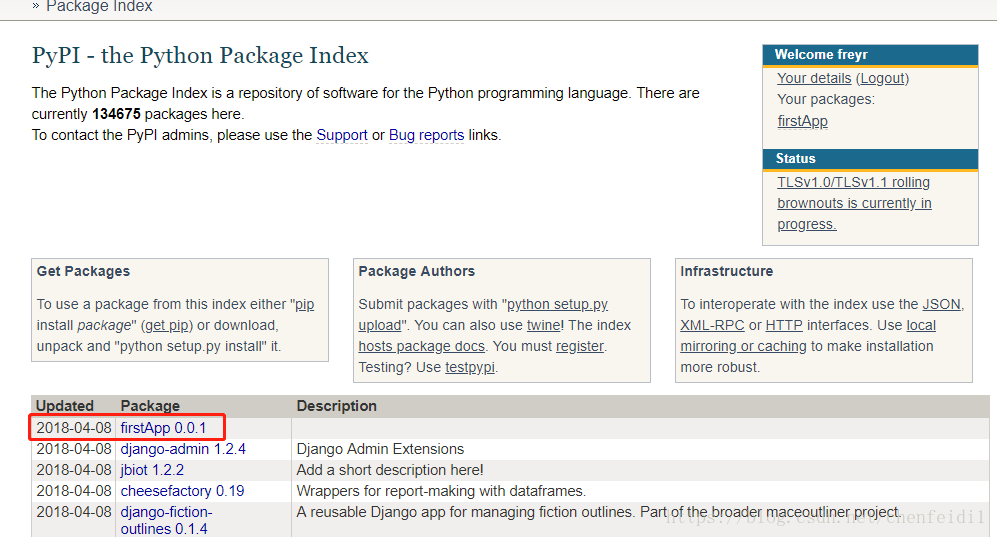
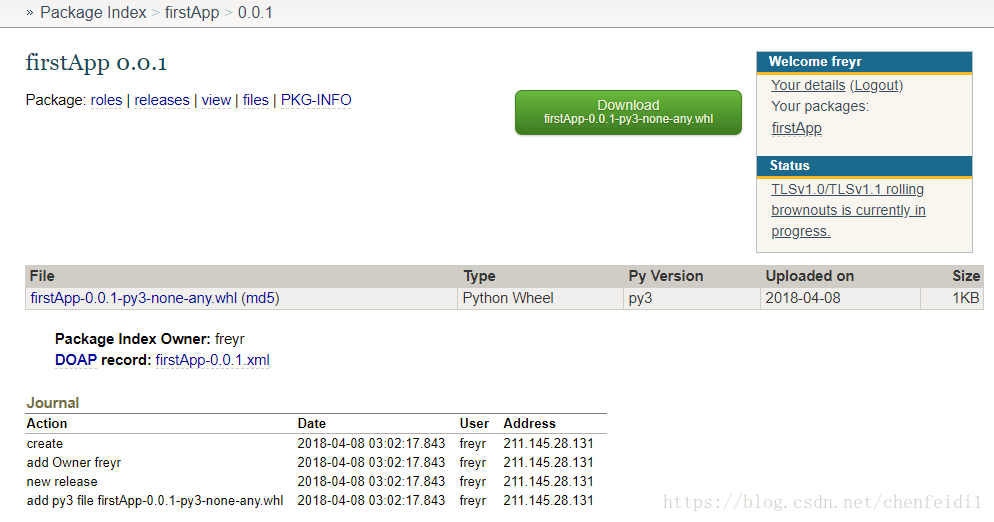
回到 PyPI 主页即可看到上传的 firstApp。
PyPI 主页显示会有延迟,所以不能马上搜索到结果,pip search 也可能搜索不到,但已经可以使用 pip 安装。
以上就是 Python 打包和分发的全部内容,当然是最简单的功能。更复杂的打包,比如模块过滤,非 py 文件打包,作者信息等常见的需求,都被实现在 setup() 内。所以接下来详细介绍 setup()。
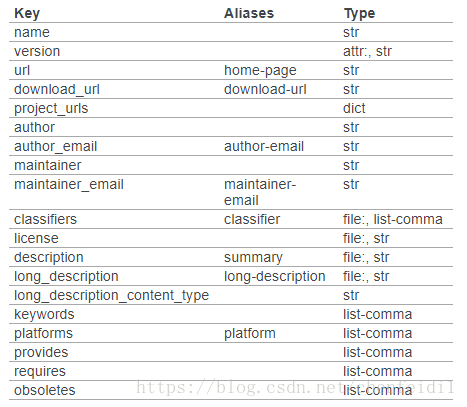
上面的 setup.py 安装文件内,我们已经使用了 setup() 一些参数:name, version, packages。
项目名,也是最终在 PyPI 上搜索的名称。
name = 'firstApp'
项目版本号,一般由三部分组成:MAJOR, MINOR, MAINTENANCE。
- MAJOR version when they make incompatible API changes,
- MINOR version when they add functionality in a backwards-compatible manner, and
- MAINTENANCE version when they make backwards-compatible bug fixes.
版本号的选择参见:https://packaging.python.org/tutorials/distributing-packages/#choosing-a-versioning-scheme
version='0.0.1'
列出项目内需要被打包的所有 package。一般使用 setuptools.find_packages() 自动发现。
packages=find_packages(exclude=['contrib', 'docs', 'tests*'])
exclude 用于排除不打包的 package。
项目的简短描述,一般一句话就好,会显示在 PyPI 上名字下端。
description='My first Python project'
对项目的完整描述,使用 long_description。如果此字符串是 rst 格式的,PyPI 会自动渲染成 HTML 显示。也可指定使用 markdown。
long_description=long_description,
long_description_content_type='text/x-rst'
通常为 GitHub上 的链接或者 readthedocs 的链接。。
url='https://github.com/pypa/sampleproject'
作者信息。
author='example',
author_email='example@example.com'
项目许可证。
license='MIT'
关于各种许可证的介绍和选择,参考:https://choosealicense.com/。
项目分类,完整可选项参考:https://pypi.python.org/pypi?%3Aaction=list_classifiers。
classifiers=[
    # How mature is this project? Common values are
    # 3 - Alpha
    # 4 - Beta
    # 5 - Production/Stable
    'Development Status :: 3 - Alpha',

    # Indicate who your project is intended for
    'Intended Audience :: Developers',
    'Topic :: Software Development :: Build Tools',

    # Pick your license as you wish (should match "license" above)
     'License :: OSI Approved :: MIT License',

    # Specify the Python versions you support here. In particular, ensure
    # that you indicate whether you support Python 2, Python 3 or both.
    'Programming Language :: Python :: 2',
    'Programming Language :: Python :: 2.6',
    'Programming Language :: Python :: 2.7',
    'Programming Language :: Python :: 3',
    'Programming Language :: Python :: 3.2',
    'Programming Language :: Python :: 3.3',
    'Programming Language :: Python :: 3.4',
],
项目关键词列表。
keywords='sample setuptools development'
项目相关额外连接,如代码仓库,文档地址等。
project_urls={
    'Documentation': 'https://packaging.python.org/tutorials/distributing-packages/',
    'Funding': 'https://donate.pypi.org',
    'Say Thanks!': 'http://saythanks.io/to/example',
    'Source': 'https://github.com/pypa/sampleproject/',
    'Tracker': 'https://github.com/pypa/sampleproject/issues',
}
项目依赖的 Python 库,使用 pip 安装本项目时会自动检查和安装依赖。
install_requires=['pyyaml']
指定项目依赖的 Python 版本。
python_requires='>=3'
项目依赖数据文件,数据文件必须放在项目目录内且使用相对路径。
package_data={
    'myapp': ['data/*.yml'],
}
如果不指定作为目录的键为空串,则代表对所有模块操作(下例中将包含所有包内 data 目录下的 yaml 文件):
package_data={
    '': ['data/*.yml'],
}
如果数据文件存在于项目外,则可以使用 data_files 参数或者 MANIFEST.in 文件进行管理。
如果用于 wheel,则使用 data_files。
data_files=[(‘mydata’, [‘data/conf.yml’])]
上述设置将在打包 wheel 时,将 data/conf.yml 文件添加至 mydata 目录。
data_files 不能使用路径通配符。
此外,scripts, py_modeles, entry_points, console_scripts 等参数参考:https://packaging.python.org/tutorials/distributing-packages/#setup-args。
在阅读 Github 上的 Python 库时,除了最基本核心的 setup.py 文件和主程序之外,还会看到其他一些文件。本节将介绍它们的作用和使用方法。
包含了构建时候的一些默认参数,如:
[bdist_wheel]

universal=1
用于在使用 bdist_wheel 的时候的默认设置 --universal 参数 。
项目说明文档,使用 reStrutruedText 可以在 PyPI 上很好的渲染,但 Markdown 则支持不够好。
此文件在打源码包的时候告诉 setuptools 还需要额外打包哪些文件。
# Include the README
include *.md

# Include the license file
include LICENSE.txt

# Include the data files
recursive-include data *
不同于 data_files,MANIFEST.in 支持路径通配符。
项目许可说明文件。
所以其他的文件,如 LICENSE.txt,在源码包时需要手动在 MANIFEST.in 里添加 include,在 wheel 包时需要在 setup.cfg 添加:
[metadata]
license_file = LICENSE.txt
from setuptools import setup, find_packages

with open('README.rst', 'r', encoding='utf-8') as rd:
    long_description = rd.read()

setup(
    name="HelloWorld",
    version="0.1",
    packages=find_packages(),
    scripts=['say_hello.py'],

    # Project uses reStructuredText, so ensure that the docutils get
    # installed or upgraded on the target machine
    install_requires=['docutils>=0.3'],

    package_data={
        # If any package contains *.txt or *.rst files, include them:
        '': ['*.txt', '*.rst'],
        # And include any *.msg files found in the 'hello' package, too:
        'hello': ['*.msg'],
    },

    # metadata for upload to PyPI
    author="Me",
    author_email="me@example.com",
    description="This is an Example Package",
    long_description = long_description,
    license="PSF",
    keywords="hello world example examples",
    url="http://example.com/HelloWorld/", # project home page, if any
    project_urls={
        "Bug Tracker": "https://bugs.example.com/HelloWorld/",
        "Documentation": "https://docs.example.com/HelloWorld/",
        "Source Code": "https://code.example.com/HelloWorld/",
    }

    # could also include long_description, download_url, classifiers, etc.
)如果觉得我的文章对您有用,请随意打赏。你的支持将鼓励我继续创作!